

For years, I salted my steak right before it hit the pan — exactly when I started cooking, just like every recipe I ever read told me to. And for years, my steak came out fine, but never quite restaurant-good. A little tough at the edges. Never that deep, dark crust I kept seeing in photos.
The fix turned out to be the opposite of what felt intuitive: salt the steak way earlier than you’d think — sometimes a full hour before cooking, sometimes the night before. I assumed early salting would dry the meat out. It does the exact opposite. The salt pulls moisture to the surface, then that moisture dissolves the salt and gets reabsorbed back into the meat — carrying seasoning deep into the steak and leaving a drier surface behind. A drier surface is exactly what produces a better crust.
That single change — plus understanding that the steak keeps cooking even after it leaves the pan — is the difference between a good homemade steak and one that genuinely rivals what you’d pay $40 for at a steakhouse.
This Pan-Seared Steak Recipe walks through both the technique and the why behind every step. Let’s cook one properly.
Why This Is the Best Pan-Seared Steak Recipe
The dry brine timing is explained clearly — not just “salt it early.” Most recipes give you one number and move on. This guide explains exactly what happens at 40 minutes, 1 hour, and 24 hours, so you can choose based on how much time you actually have.
Carryover cooking is given exact numbers, not vague advice. “Pull it early” means nothing without knowing how early. This recipe gives you a specific temperature chart based on steak thickness, so you stop guessing and start hitting medium-rare consistently.
Both major methods are covered — pan sear and reverse sear. Most sites commit to one technique. This guide explains both and tells you exactly which situation calls for which method.
The “release test” replaces the urge to keep checking. No more lifting the steak every 30 seconds to see if it’s browning. One simple physical test tells you exactly when it’s ready to flip.
No grill required — ever. Just a heavy pan, a thermometer, and butter. Steakhouse results from a stovetop.
A Quick History — Why We Sear Steak At All
The technique of searing meat over high heat predates written history — early humans cooking meat over open flame discovered that intense heat created a flavor and texture unattainable through any other method. The specific chemistry behind that flavor — what we now call the Maillard reaction — was not formally identified until 1912, when French chemist Louis Camille Maillard documented the reaction between amino acids and sugars that occurs at high temperatures, producing the hundreds of complex flavor compounds responsible for that distinctive browned, savory crust.
Steakhouses built entire reputations around mastering this reaction — extremely high heat, dry surfaces, minimal interference — to produce the signature crusted exterior that has defined American steak culture since the early 20th century. Everything in this recipe is built around recreating that exact chemistry in a home kitchen.
The Science: Why Some Steaks Turn Out Tough, Dry, or Pale — and How to Fix Every Cause
This section explains exactly what is happening to the meat at every stage — understanding it means you can fix any problem before it happens.
Why salting early makes steak juicier, not drier — the osmosis reversal.
When salt first contacts the surface of a steak, it draws moisture out through osmosis — pulling liquid from inside the meat to the surface. This is the stage that makes people nervous; it looks like the salt is drying the meat out. But that surface moisture dissolves the salt into a concentrated brine, and over the next 40 minutes to several hours, that brine gets reabsorbed back into the meat through the same osmotic process, now running in reverse. Salting the steak in advance gives the salt and juices time to be reabsorbed, seasoning the steak more deeply and aiding in moisture retention. The meat ends up better seasoned throughout — not just on the surface — and structurally better at holding onto its juices during cooking.
Why salt actually tenderizes the meat at a molecular level.
Salt works to denature proteins — meat proteins are essentially strings that are bundled together, and salt has the effect of loosening these strings slightly from each other, creating a more tender bite. This denaturing process — called myosin solubilization — physically changes the protein structure so the meat is more tender and better able to retain moisture when heat hits it later. This is the same protein class that gets tight and squeezes water to the edges during cooking, which is why we rest steak afterward — to allow the proteins to relax and let the moisture redistribute evenly for a juicier result.
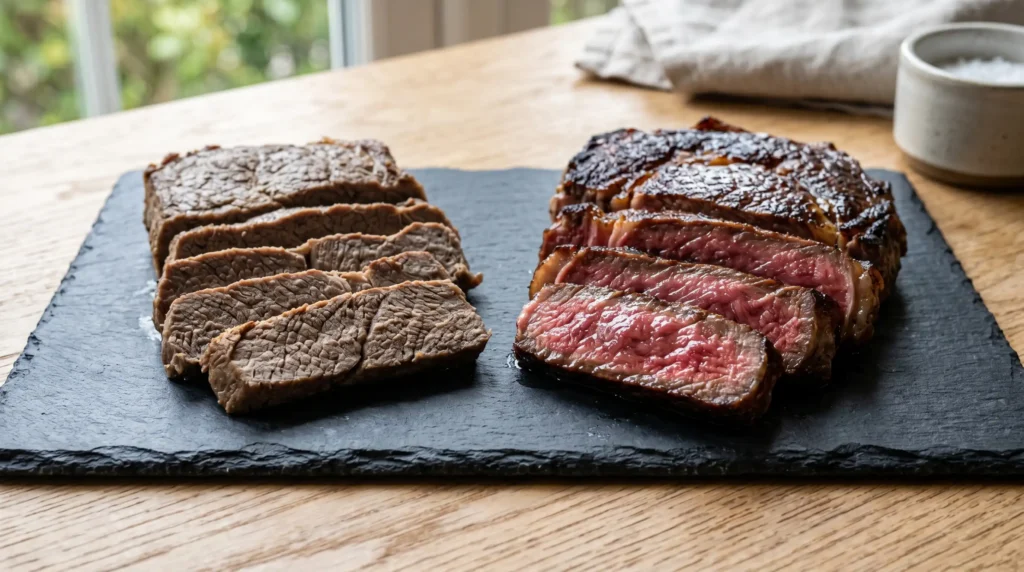
Why a dry surface produces a better crust — the Maillard requirement.
The Maillard reaction requires a relatively dry surface to occur efficiently — excess surface moisture has to evaporate before the proteins and sugars can begin reacting and browning. Patting meat down with a paper towel before cooking removes moisture and allows the Maillard reaction to occur even faster — refrigerating the meat uncovered works the same way, but even better, producing a drier surface that forms an exterior crust faster. This is exactly why dry brining produces a noticeably superior crust compared to salting immediately before cooking — the extended time allows the surface to dry out completely.
Why carryover cooking matters more than people realize.
Once you remove a steak from heat, the outer layers — which are hotter than the center — continue transferring their heat inward. This means the internal temperature continues rising for several minutes after the steak leaves the pan. The thicker the steak, the more pronounced this effect. A 1-inch steak might rise 3–5°F after removal. A 2-inch steak can rise 10–15°F. Pulling your steak at your target temperature means it will overshoot that target by the time you cut into it. The fix: pull the steak 5–10°F below your desired final temperature, accounting for thickness.
Why oil smoke point actually matters for flavor — not just safety.
Every cooking oil has a smoke point — the temperature at which it begins to break down chemically and burn, releasing bitter, acrid compounds into whatever you’re cooking. Searing steak requires very high heat — well above the smoke point of oils like extra virgin olive oil or butter alone. Using a high smoke point oil like avocado oil, refined canola oil, or grapeseed oil means the oil stays chemically stable at searing temperatures, contributing clean flavor instead of burnt bitterness. This is why every serious steak recipe specifies a high-heat oil — it is not a minor detail.
Why you should cut against the grain — the muscle fiber science.
Meat is composed of long muscle fiber bundles running in a single direction — visible as the “grain” when you look closely at a steak. Cutting parallel to those fibers (with the grain) leaves long, intact fiber strands in every bite — which your teeth have to work through entirely, producing a chewy texture regardless of how well the steak was cooked. Cutting perpendicular to those fibers (against the grain) shortens every strand to a fraction of its length — making each bite dramatically easier to chew, even on tougher cuts. This single technique can make more difference to perceived tenderness than the cooking method itself.
For full USDA guidance on safe internal cooking temperatures for beef, see the official USDA safe temperature chart. For the complete chemistry behind dry brining, Crowd Cow’s science explainer covers the Maillard reaction and protein structure in detail.
Choose Your Method — Traditional Sear vs Reverse Sear
| Method | Best For | Time | Result |
|---|---|---|---|
| Traditional Pan Sear | Steaks under 1.5 inches thick, weeknight dinners | 20–30 minutes | Fast, classic crust, slightly more gradient from edge to center |
| Reverse Sear | Steaks 1.5–2+ inches thick, special occasions | 45–60 minutes | Edge-to-edge even pink color, maximum crust, more control |
My recommendation: Traditional sear for everyday steaks under 1.5 inches. Reverse sear for thick-cut steaks (ribeye, porterhouse, thick filet) when you want that steakhouse edge-to-edge doneness with zero guesswork.
What You Need
For the Steak
- 2 steaks, 1–1.5 inches thick (ribeye, New York strip, or top sirloin recommended)
- 1–1.5 tsp coarse kosher salt per steak (use less if using fine table salt)
- ½ tsp freshly ground black pepper per steak
- 1–2 tbsp high smoke point oil (avocado, refined canola, or grapeseed)
For the Butter Baste (Optional but Highly Recommended)
- 2 tbsp unsalted butter
- 2 garlic cloves, lightly crushed (skin left on, just smashed with a knife)
- 2–3 sprigs fresh thyme or rosemary
Equipment: Cast iron or heavy stainless steel skillet, instant-read meat thermometer, tongs, wire rack and baking sheet (for dry brining and reverse sear method) Serves: 2
How to Make the Perfect Pan-Seared Steak Recipe — Step by Step

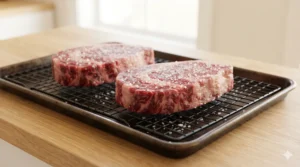
Dry Brine the Steak — Start Early
Salt and Refrigerate: Pat the steaks completely dry with paper towels. Season generously with coarse kosher salt on all sides — more than feels comfortable. Place on a wire rack set over a baking sheet so air can circulate on all sides. Refrigerate uncovered for at least 40 minutes — 1 to 4 hours is ideal, and overnight (up to 24 hours) gives the deepest seasoning and the driest, crust-ready surface. Do not rinse the salt off before cooking.
The wire rack matters here — placing the steak directly on a plate traps moisture underneath and defeats the purpose of dry brining. Air needs to reach every surface.
Bring to Room Temperature
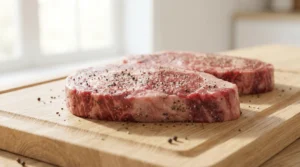
Rest Before Cooking: Remove the steak from the refrigerator 30 to 45 minutes before you plan to cook. A cold steak straight from the fridge cooks unevenly — the outside can overcook before the center catches up. Pat the surface dry one more time with a paper towel right before cooking, even though it should already be quite dry from the dry brine.
Season and Prepare
Add Pepper Last: Season both sides with freshly ground black pepper right before cooking — pepper can scorch and turn bitter if it sits too long before high heat. The salt should already be doing its work from the dry brine.
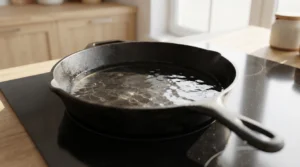
Heat the Pan
Get It Properly Hot: Place a cast iron or heavy stainless steel skillet over high heat. Let it preheat for a full 3 to 4 minutes — this is longer than feels necessary, but a properly preheated pan is the single biggest factor in getting a good crust. Add the high smoke point oil and let it heat until it shimmers and moves like water across the pan — about 30 seconds.
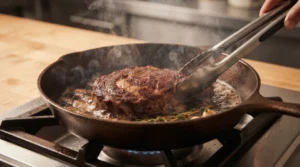
Sear the Steak
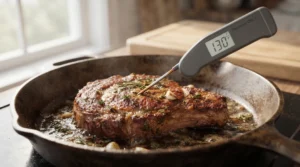
Place and Do Not Touch: Carefully place the steak in the pan away from you to avoid oil splatter. Do not move it, shake the pan, or peek underneath. Let it sear undisturbed for 3 to 4 minutes depending on thickness.
Use the Release Test: Instead of lifting the steak to check progress, try to slide it very slightly with your tongs. If it moves freely and easily across the pan, the crust has fully formed and it is ready to flip. If it resists or sticks, it needs more time. This test prevents you from tearing the crust by checking too early.
Flip and Baste
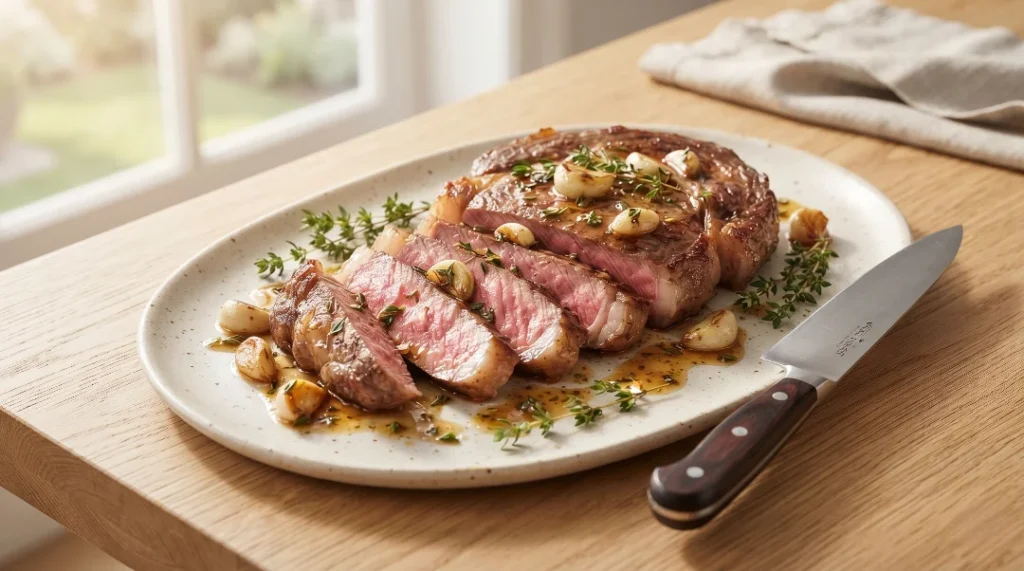
Flip Once: Flip the steak using tongs — just once. Reduce heat to medium. Add the butter, crushed garlic, and herb sprigs to the pan. As the butter melts and foams, tilt the pan slightly and use a large spoon to continuously baste the top of the steak with the melted butter, garlic, and herb mixture for 1 to 2 minutes.
This is also when the fond — the browned bits left in the pan from searing — gets released into the butter, concentrating all that flavor and basting it directly back onto the steak. This is why the butter goes in at the END, not the beginning — adding it at the start would burn it before the steak even develops a crust.
Check Temperature and Pull Early
Use Your Thermometer — Pull Below Target: Insert an instant-read thermometer into the thickest part of the steak, avoiding any bone or large fat pockets. Pull the steak from the heat 5 to 10°F below your final target temperature — the steak will continue cooking from carryover heat for several minutes after removal. See the carryover guide below for exact numbers based on thickness.
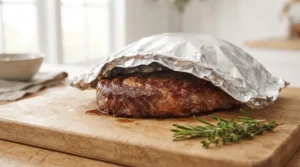
Rest the Steak
Let It Sit — Do Not Skip This: Transfer the steak to a cutting board or clean plate. Loosely tent with foil. Let it rest for 5 to 10 minutes depending on size — this allows the proteins that tightened during cooking to relax and the juices that moved to the center to redistribute evenly throughout the meat. Cutting too soon means those juices end up on your cutting board instead of in your mouth.
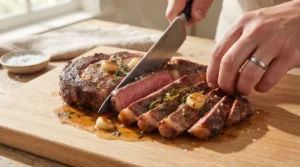
Slice and Serve
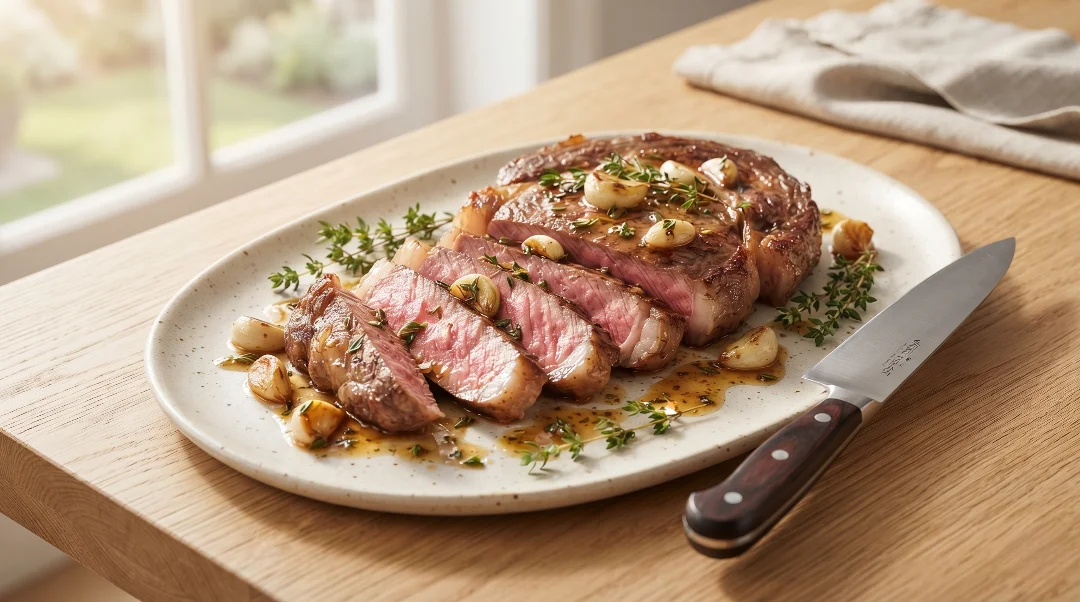
Cut Against the Grain: Identify the direction the muscle fibers run — look closely at the surface for parallel lines. Slice perpendicular to those lines, not parallel to them. This single step makes a dramatic difference in tenderness regardless of cooking method. Spoon any remaining garlic herb butter from the pan over the sliced steak before serving.
Carryover Cooking Guide — Pull Temperature by Thickness
| Steak Thickness | Carryover Rise | Pull at This Temp for Medium-Rare (130°F final) |
|---|---|---|
| ¾ inch | 2–3°F | 127–128°F |
| 1 inch | 3–5°F | 125–127°F |
| 1.5 inches | 5–8°F | 122–125°F |
| 2+ inches | 8–15°F | 115–122°F |
Doneness reference temperatures (final, after resting):
- Rare: 120–125°F
- Medium-Rare: 130–135°F
- Medium: 140–145°F
- Medium-Well: 150–155°F
- Well Done: 160°F+
Always verify your final numbers against current USDA safe minimum temperature guidance for whole-cut beef steaks.
J.ZaiB’s Expert Touch
Choose your cut based on what you actually want. Ribeye has the most marbling and the richest flavor — forgiving for beginners because the fat keeps it juicy even with slight overcooking. New York strip has a firmer bite with great flavor and less fat. Top sirloin is leaner and more budget-friendly, excellent if you nail the timing precisely. There is no universally “best” cut — only the best cut for your specific preference and skill level.
The 24-hour dry brine is worth planning for. If you know you’re cooking steak tomorrow night, salt it tonight. The difference between a 40-minute brine and a 24-hour brine is real — deeper seasoning throughout the meat and a noticeably better, drier crust. The trade-off is minimal: a slightly more pronounced grey band just under the surface, which most people do not notice or mind.
Smash the garlic, don’t mince it, for butter basting. Whole cloves smashed with the flat side of a knife release their flavor slowly into the butter without burning — minced garlic burns almost immediately in a hot pan and turns bitter. Smashed cloves with the skin still on can simply be removed before serving.
A cast iron pan needs more preheat time than you think. Stainless steel heats up faster but cast iron retains heat more evenly once it gets there — worth the extra 1–2 minutes of patience. If your steak isn’t sizzling immediately and aggressively when it hits the pan, the pan was not hot enough.
Save the pan — don’t wash it immediately. That fond left in the pan after cooking is concentrated flavor. Use a splash of wine, stock, or even water to deglaze it into a quick pan sauce while the steak rests — five extra minutes for a sauce that tastes like it came from a real kitchen, not a quick dinner.
Serving Ideas
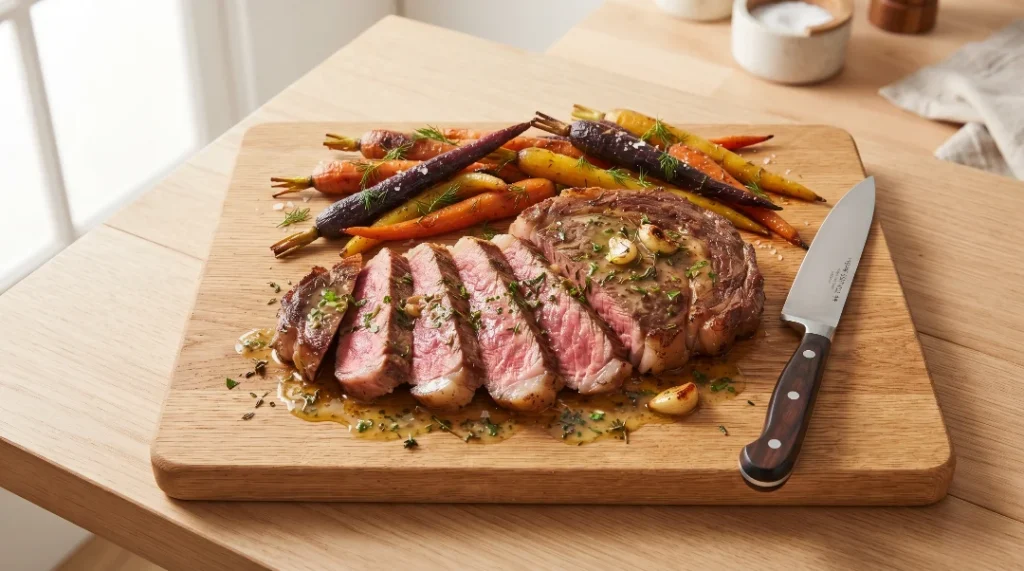
Classic steakhouse dinner: Sliced steak fanned on a plate, spooned with the garlic herb butter from the pan, alongside our Honey Glazed Carrots and a simple green salad. Restaurant quality without the markup.
Steak and pasta night: Slice thinly against the grain and serve over our Italian Meatballs marinara as an upgraded protein option for guests who want something heartier than meatballs alone.
Leftover steak reinvented: Slice cold leftover steak thinly against the grain and use it in our Steak Rice Bowl the next day — the dry brine seasoning means leftover steak tastes just as good cold, sliced over rice with a quick sauce.
Date night at home: Two perfectly seared steaks, a bottle of red wine, and minimal sides — let the steak be the entire event. Sometimes the best dinner is also the simplest one.
Storage Guide
Refrigerator: Cooked steak keeps in an airtight container up to 3 days. Slice cold leftovers against the grain for sandwiches or rice bowls — reheating whole steak tends to overcook it past its original doneness.
Reheating: For best results, reheat gently in a low oven (250°F) until just warmed through, about 10 minutes — this preserves the interior doneness far better than a microwave, which tends to overcook the edges before the center warms.
Freezing: Raw, dry-brined steak can be frozen for up to 3 months. Cooked steak does not freeze particularly well — the texture changes noticeably upon thawing. If you must freeze cooked steak, slice it thin first for easier reheating and repurposing into other dishes.
Make-ahead: Dry brine the night before for the best results — this is genuinely the only “make-ahead” component, and it actively improves the final result rather than just saving time.
Perfect Pan-Seared Steak Recipe
Ingredients
Equipment
Method
- Salt and Refrigerate Uncovered: Pat the steaks completely dry with paper towels. Season generously with coarse kosher salt on all sides. Place on a wire rack over a baking sheet so air circulates freely on every surface. Refrigerate uncovered for at least 40 minutes — 1 to 4 hours is ideal, and up to 24 hours gives the deepest flavor and driest, crust-ready surface. Do not rinse the salt off before cooking.

- Rest Before Cooking: Remove the steak from the fridge 30 to 45 minutes before you plan to cook. Pat the surface dry one more time with a paper towel. Season both sides with freshly ground black pepper right before cooking — pepper can scorch and turn bitter if it sits too long before high heat.
- Preheat Thoroughly: Place a cast iron or heavy stainless steel skillet over high heat and let it preheat for a full 3 to 4 minutes — longer than feels necessary, but essential for a proper crust. Add the high smoke point oil and let it heat until it shimmers and moves like water across the pan, about 30 seconds.
- Place and Do Not Touch: Carefully place the steak in the pan away from you to avoid splatter. Do not move it, shake the pan, or peek underneath. Let it sear undisturbed for 3 to 4 minutes. Use the release test instead of lifting to check — gently try to slide the steak with your tongs. If it moves freely, the crust has formed and it is ready to flip. If it resists, give it more time.
- Flip Once, Add Butter: Flip the steak with tongs — just once. Reduce heat to medium. Add the butter, smashed garlic, and herb sprigs to the pan. As the butter melts and foams, tilt the pan slightly and spoon the melted butter mixture continuously over the steak for 1 to 2 minutes. This also releases the flavorful browned fond from the pan into the butter, which bastes right back onto the steak.

- Use a Thermometer — Pull Below Target: Insert an instant-read thermometer into the thickest part of the steak, avoiding bone or large fat pockets. Pull the steak from heat 5 to 10°F below your final target temperature — it will continue cooking from carryover heat for several minutes after removal. Thicker steaks need a bigger buffer; see the carryover guide above for exact numbers.
- Let It Sit: Transfer the steak to a cutting board. Tent loosely with foil. Rest for 5 to 10 minutes depending on thickness — this lets the tightened proteins relax and the juices redistribute evenly through the meat instead of spilling out the moment you cut in.
- Slice Against the Grain: Identify the direction the muscle fibers run on the surface of the steak and slice perpendicular to those lines — never parallel. This single step makes a dramatic difference in tenderness. Spoon any remaining garlic herb butter from the pan over the sliced steak and serve immediately while hot.
Notes
- Dry brine timing: 40 minutes minimum for noticeable improvement. 1 to 4 hours is the sweet spot for most home cooks. Up to 24 hours gives maximum seasoning depth and the best possible crust — plan ahead the night before for special occasions.
- Never rinse off dry brine salt. The salt has already done its work of seasoning and tenderizing — rinsing removes flavor for no benefit.
- Carryover cooking guide: ¾ inch steak rises 2–3°F after removal. 1 inch rises 3–5°F. 1.5 inches rises 5–8°F. 2+ inches can rise 8–15°F. Always pull below your target accordingly.
- Doneness reference (final temp after resting): Rare 120–125°F. Medium-rare 130–135°F. Medium 140–145°F. Medium-well 150–155°F. Well done 160°F+.
- High smoke point oil only. Avocado oil, refined canola, or grapeseed oil. Extra virgin olive oil and plain butter burn at searing temperatures and add bitter flavor.
- Smash garlic, don’t mince it for basting — minced garlic burns almost instantly in hot butter. Smashed whole cloves release flavor slowly without burning.
- Cutting against the grain matters more than people think — identify the direction of the muscle fibers and always slice perpendicular to them for maximum tenderness.
- Reverse sear alternative for thick cuts (1.5+ inches): Bake at 275°F on a wire rack until 30–40°F below target temperature, then sear in a very hot pan for 1–2 minutes per side to finish. Best for porterhouse, thick ribeye, or any cut over 1.5 inches.
- Storage: Refrigerate cooked steak up to 3 days. Reheat gently in a 250°F oven, not the microwave, to avoid overcooking the edges. Raw dry-brined steak can be frozen up to 3 months.
- UK/Australia notes: “Kosher salt” = coarse cooking salt. “Cast iron skillet” = cast iron frying pan. “Instant-read thermometer” = digital probe thermometer.
- Nutrition values are estimates and vary significantly based on the specific cut and trim of steak used.
NUTRITION
(Per 1 steak — based on 8oz ribeye with butter baste)
| Nutrient | Amount |
|---|---|
| Calories | ~520 kcal |
| Total Fat | 38g |
| Saturated Fat | 16g |
| Cholesterol | 135mg |
| Sodium | 680mg |
| Total Carbs | 1g |
| Sugars | 0g |
| Fiber | 0g |
| Protein | 42g |
Note: Values are estimates and vary significantly based on the cut of steak used, exact size, and amount of butter baste consumed.
Frequently Asked Questions
When should I salt my steak before cooking?
Earlier than feels natural — at minimum 40 minutes before cooking, ideally 1 to 4 hours, and up to 24 hours for maximum flavor penetration and the driest, crust-ready surface. Salting immediately before cooking is actually the worst timing — there is no time for the salt to dissolve, reabsorb, and season the meat throughout. Never rinse dry-brined salt off before cooking.
Why is my steak tough even though I cooked it to the right temperature?
Two likely causes: you cut with the grain instead of against it (leaving long muscle fibers intact in every bite), or you skipped resting the steak after cooking (causing the juices to spill out onto the cutting board instead of redistributing through the meat). Both fixes are free and take seconds — identify the grain direction before slicing, and always rest for at least 5 minutes.
What is carryover cooking and why does it matter?
After you remove a steak from heat, the hotter outer layers continue transferring heat inward, causing the internal temperature to keep rising for several minutes. A 1-inch steak might rise 3–5°F after removal; a 2-inch steak can rise up to 15°F. If you pull the steak exactly at your target temperature, it will overshoot by the time you cut into it. Always pull 5–10°F below your final target, adjusting more for thicker cuts.
Should I use the reverse sear or traditional pan sear method?
For steaks under 1.5 inches thick, traditional pan searing is faster and produces excellent results with less equipment. For thicker cuts (1.5 to 2+ inches), reverse sear — slow oven cooking followed by a quick hot sear — gives more even, edge-to-edge doneness and removes most of the guesswork around overcooking.
What oil should I use for searing steak?
Use a high smoke point oil — avocado oil, refined (not extra virgin) canola oil, grapeseed oil, or refined vegetable oil all work well. These oils remain chemically stable at the very high temperatures required for searing. Extra virgin olive oil and butter alone have lower smoke points and will burn, contributing bitter, acrid flavors to the crust.
How long should I rest steak after cooking?
As a general guide: 5 minutes for thinner steaks (under 1 inch), 8–10 minutes for steaks 1 to 1.5 inches thick, and up to 10–12 minutes for very thick cuts (2+ inches). Tent loosely with foil during resting — wrapping tightly traps steam and can soften the crust you just worked to develop.
Why does my steak stick to the pan?
Usually one of two reasons: the pan was not hot enough before the steak went in, or there wasn’t enough oil. Preheat the pan for a full 3–4 minutes on high heat before adding oil, and make sure the oil is shimmering before adding the steak. A properly seared steak releases naturally from the pan on its own — use the release test (a gentle slide with tongs) rather than forcing it with a spatula.
What is the best cut of steak for pan searing?
Ribeye, New York strip, top sirloin, and filet mignon all work excellently for pan searing. Ribeye has the most marbling and is the most forgiving for beginners. New York strip offers a great balance of flavor and tenderness. Filet mignon is the most tender but leanest, so it benefits significantly from the butter basting step. Choose based on your budget and flavor preference — all four respond beautifully to this technique.
The Steak That Makes Takeout Feel Unnecessary
A great Pan-Seared Steak Recipe does not require a grill, a culinary degree, or a steakhouse reservation. It requires understanding three things: salt early, watch your temperature with carryover in mind, and always rest before cutting.
Everything else — the cast iron pan, the butter baste, the smashed garlic and herbs — turns a good steak into a genuinely memorable one. But those three fundamentals are what separate a tough, unevenly cooked disappointment from a steak with a perfect crust and a juicy, evenly pink center that tastes like it came from somewhere that charges $40 a plate.
Salt it tonight if you’re cooking it tomorrow. Trust the thermometer over your instincts. Rest it longer than feels necessary. And when you make that first slice against the grain and see that even, rosy center all the way through — you will understand exactly why every serious home cook eventually stops ordering steak out.
Tag us on Instagram @viralfoodhacks706 when your steak comes off the pan — I especially love seeing that sliced cross-section! Save this to Pinterest for the next date night, celebration, or Tuesday that deserves something better than delivery.