

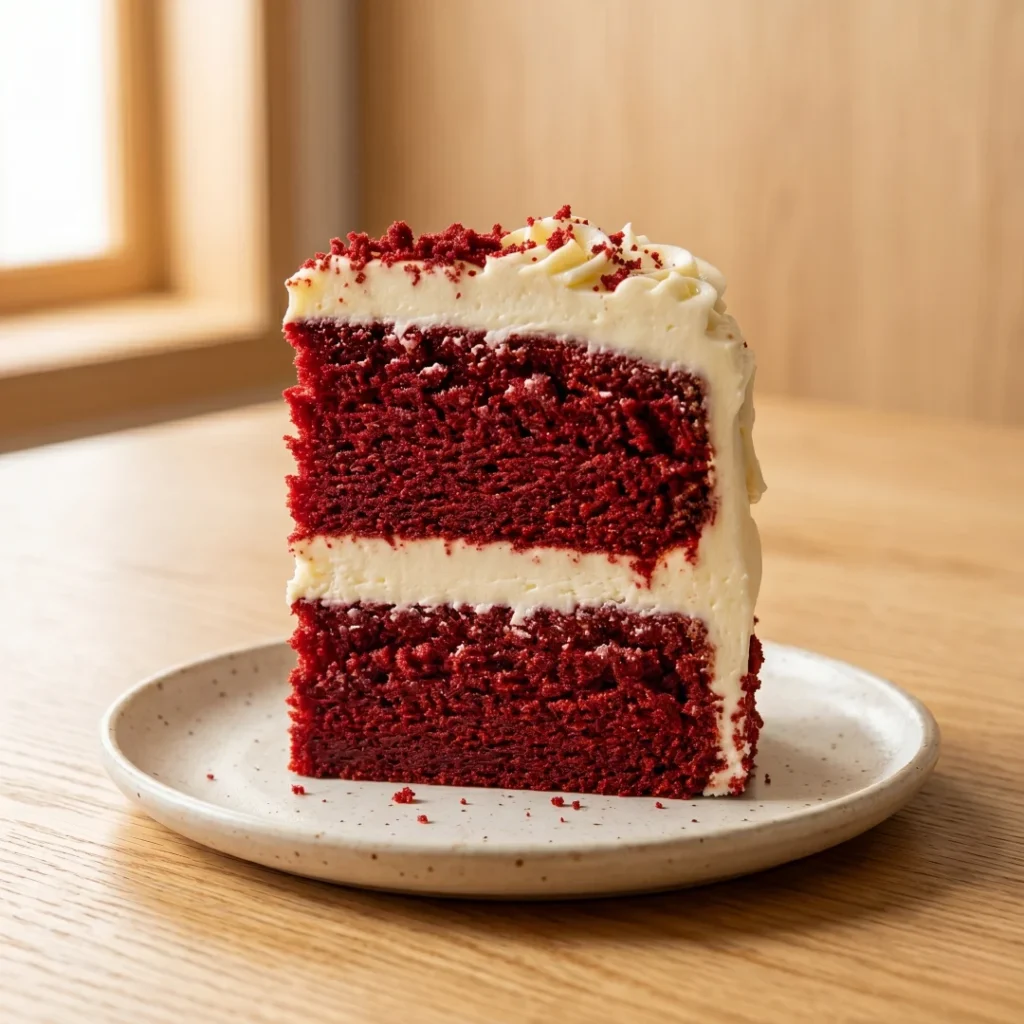
There is something about a Red Velvet Cake that makes people stop mid-conversation. That bold, vivid crimson color. The stark white cream cheese frosting. The way it looks impossibly elegant on a cake stand before you have even tasted a single bite.
Most people assume it must be complicated. They see it at bakeries with those perfect swirled layers and that frosting that holds its shape like a professional did it, and they immediately think — not for me, too advanced, too risky.
But here is what no one tells you: Red Velvet Cake is actually one of the most forgiving cakes you will ever bake. The batter comes together in minutes. The technique is simpler than chocolate cake. And with a few key secrets — the right cocoa, the right food coloring, and a frosting trick that keeps it stable for days — you will produce a cake that looks and tastes like it came from a boutique bakery.
Valentine’s Day, birthday, anniversary, or a random Tuesday that needs to feel special — this is the cake. Let’s make it.
Why You’ll Love This Red Velvet Cake Recipe
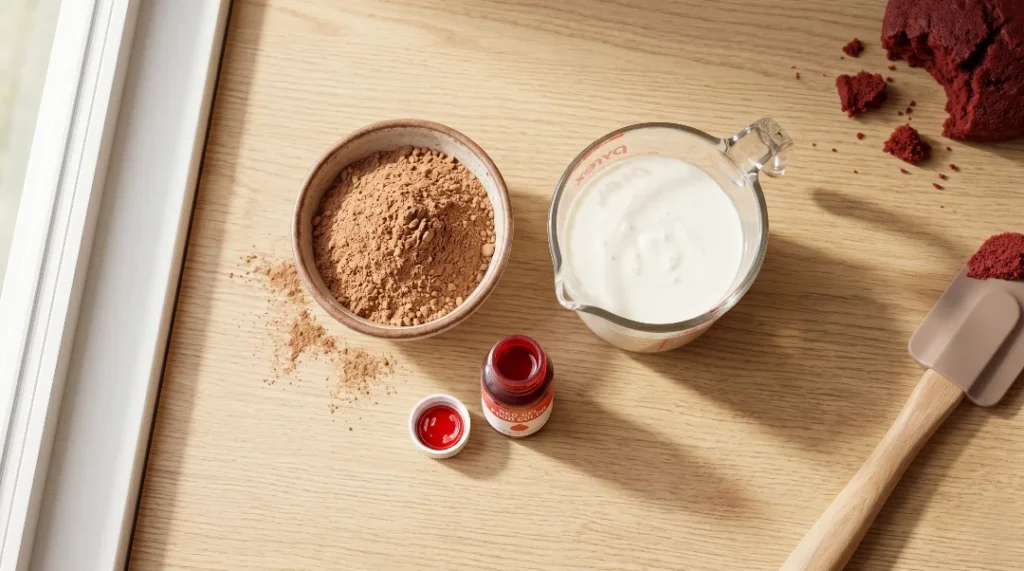
That color is real — and we’re going to get it right. Most home bakers end up with a brownish-red cake because they used liquid food coloring instead of gel. Gel food coloring is ten times more concentrated — you use a fraction of the amount and get a dramatically more vivid crimson color that holds through baking. This recipe uses gel. Your cake will be the exact shade you see in bakery windows.
Butter AND oil — the best of both worlds. Most recipes choose one or the other. Butter gives flavor but makes cakes firm when cold. Oil keeps cakes moist at room temperature. This recipe uses both — rich buttery flavor from creamed butter, and that stay-soft-for-days moisture from oil. No other combination produces the same result.
Cream cheese frosting that never melts. The number one fear with Red Velvet Cake frosting is that it slides off, droops, or turns into a puddle by the time you serve it. One technique change completely solves this — and it is in the frosting instructions below.
No food dye? No problem. If you prefer to skip artificial coloring entirely, this recipe includes a beet powder hack that gives you a stunning natural red color without any chemical aftertaste.
Visually the most Pinterest-worthy cake on the internet. That crimson and white contrast photographs beautifully. One good photo of this cake on Pinterest can drive traffic for years.
The History of Red Velvet Cake (It’s More Interesting Than You Think)
Before we get to the recipe, here is a story that most Red Velvet Cake guides skip entirely — and it makes the cake taste even better when you know it.
The “velvet” in Red Velvet has nothing to do with the color. Velvet cakes date back to the Victorian era, when “velvet” described a cake with an unusually fine, soft crumb — softer than pound cake or sponge cake. Bakers discovered that cocoa powder, when combined with acidic ingredients like buttermilk and vinegar, broke down the proteins in flour and created an extraordinarily tender, smooth crumb. That texture was the original selling point. The color came later.
The red color started as a natural chemical reaction. Natural (non-Dutch process) cocoa powder contains anthocyanins — pigments that turn slightly reddish when they react with the acid in buttermilk and vinegar. Early red velvet cakes had a subtle reddish-brown tint from this reaction alone, with no added coloring whatsoever.
Then came the 1940s. The Waldorf Astoria hotel in New York City served red velvet cake in the 1930s, and John A. Adams of the Texas-based Adams Extract Company tasted the cake at the hotel. In 1940, the company released a recipe using the company’s red food coloring, which helped spread the cake across the South. Southern bakers adopted it enthusiastically, adding buttermilk to give it that signature tangy flavor — and the modern red velvet cake was born.
During World War II, with sugar rationing in effect, bakers used boiled beet juice to add both color and sweetness to the cake — which is why beet-based red velvet recipes still exist today and work beautifully. For the complete history of food coloring in American baking, Britannica has a fascinating overview.
The Science: Why Red Velvet Cake Is Its Own Category
Here is the most important thing to understand about Red Velvet Cake — and the thing that explains why most home recipes fail.
Red Velvet Cake is NOT chocolate cake with food coloring. It is a completely different chemical system.
Chocolate cake uses Dutch process cocoa — alkaline, dark, intensely flavored. Red velvet cake MUST use natural cocoa — acidic, lighter in color, with a mild chocolate note. Why? Because the acid in natural cocoa is what triggers the leavening reaction with baking soda. Dutch process cocoa has been neutralized — it will not react with your baking soda the same way, your cake will not rise properly, and you will lose that signature velvety crumb.
This is the exact opposite of what we do in our Chocolate Fudge Cake — which specifically requires Dutch process cocoa. Same ingredient, opposite rules. Understanding why is what makes you a better baker.
The buttermilk-vinegar-baking soda triangle is what creates the velvet. Here is what is actually happening:
Buttermilk contains lactic acid. Vinegar adds more acidity. When these acids hit the baking soda, they produce carbon dioxide bubbles that lighten the batter. Simultaneously, those same acids are breaking down the long strands of gluten in the flour — shortening them, making the crumb softer and finer. The result is that signature melt-in-your-mouth texture that no other type of cake produces. This is why you cannot skip either the buttermilk or the vinegar — they are doing structural work, not just flavoring.
Gel food coloring vs liquid — this is not optional. Liquid food coloring is mostly water. In a batter that depends on a precise acid-base balance, adding extra liquid disrupts the chemistry. You would need several tablespoons of liquid coloring to get a vivid red — and by that point you have added enough water to affect the batter’s texture. Gel food coloring is concentrated pigment with almost no liquid — half a teaspoon gives you a dramatically more vivid red than two tablespoons of liquid ever could. King Arthur Baking has a great guide on making natural food coloring alternatives — perfect if you want to skip artificial dyes entirely.
What You Need
For the Red Velvet Cake Layers
- 2½ cups (315g) all-purpose flour (or 2½ cups cake flour for an even softer crumb)
- 2 tbsp natural unsweetened cocoa powder (NOT Dutch process — see science section)
- 1 tsp baking soda
- 1 tsp baking powder
- 1 tsp salt
- ½ cup (115g) unsalted butter, softened to room temperature
- ½ cup (120ml) vegetable oil (butter for flavor + oil for moisture = perfect combo)
- 1¾ cups (350g) granulated sugar
- 2 large eggs, room temperature
- 2 tsp pure vanilla extract
- 1 cup (240ml) buttermilk, room temperature (or 1 cup milk + 1 tbsp white vinegar, wait 5 min)
- 1 tsp white vinegar
- 1–2 tsp red gel food coloring (NOT liquid — gel gives vivid color without affecting texture)
- Natural alternative: 2 tbsp beet powder + reduce cocoa to 1 tbsp (no artificial coloring)
For the Cream Cheese Frosting (Never-Melt Version)
- 16 oz (450g) full-fat block cream cheese, cold from the fridge (NOT tub — see notes)
- 1 cup (225g) unsalted butter, softened to room temperature
- 4 cups (480g) powdered sugar, sifted
- 2 tsp pure vanilla extract
- Pinch of salt
- 2 tbsp heavy cream (only if frosting needs thinning)
Serves: 12–16 slices Pan: Two 9-inch round cake pans (or three 8-inch for three thin layers)
How to Make Red Velvet Cake (Step-by-Step)
Step 1 — Prep Everything
Preheat oven to 350°F (175°C). Grease two 9-inch cake pans, line bottoms with parchment paper, and grease the parchment. Set aside. Take butter, eggs, and buttermilk out of the fridge — they must be at room temperature before you start.
J.ZaiB micro-tip: Cold butter will not cream properly with sugar, and cold eggs can cause the batter to curdle. Room temperature ingredients are non-negotiable here — set a 45-minute timer when you pull them from the fridge.
Step 2 — Whisk the Dry Ingredients
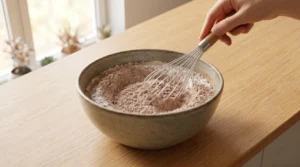
In a medium bowl, whisk together the flour, natural cocoa powder, baking soda, baking powder, and salt until fully combined. Set aside.
J.ZaiB micro-tip: Sift the cocoa powder directly into the bowl if it has any clumps. Cocoa lumps do not break down in batter and you will taste them in the finished cake.
Step 3 — Cream Butter, Oil, and Sugar
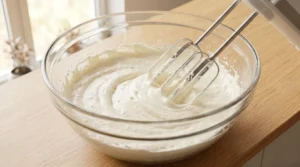
In a large bowl, beat the softened butter on medium-high speed for 2 minutes until pale and creamy. Add the oil and sugar and beat for another 3 minutes until the mixture is very light, fluffy, and almost white in color. This step is building the structure of your cake — do not rush it.
J.ZaiB micro-tip: Adding oil to the creamed butter is the secret weapon. Butter gives you flavor and structure from creaming. Oil gives you staying-moist power. Together they produce a cake that is richer and more tender than either ingredient alone.
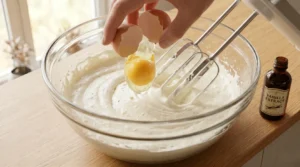
Step 4 — Add Eggs and Vanilla
Add eggs one at a time, beating well after each addition until fully combined. Add vanilla extract and mix. Scrape down the bowl between additions.
J.ZaiB micro-tip: Adding eggs one at a time prevents the batter from curdling. If you add them all at once and the batter looks broken or lumpy, it will recover once you add the dry ingredients — but adding them one at a time prevents the problem entirely.
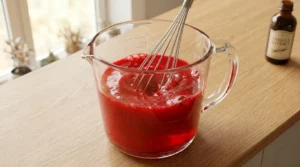
Step 5 — Add Buttermilk, Vinegar, and Food Coloring
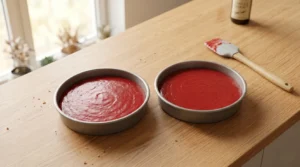
In a small bowl or measuring cup, combine the buttermilk, white vinegar, and red gel food coloring. Stir until the color is evenly distributed — it should be a vivid red liquid.
J.ZaiB micro-tip: Mix the color into the buttermilk BEFORE adding to the batter. This ensures even color distribution throughout the entire cake. Dropping gel coloring directly into the batter risks uneven red streaks.
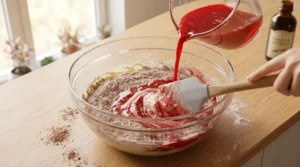
Step 6 — Combine Everything
With the mixer on low speed, alternate adding the dry ingredients and the buttermilk mixture to the butter mixture — beginning and ending with the dry ingredients. Add dry in three additions and buttermilk in two. Mix just until each addition is incorporated. Do not overmix.
J.ZaiB micro-tip: Overmixing develops gluten and turns your velvety crumb into a tough, rubbery one. Stop mixing the moment you no longer see dry flour streaks. A few small lumps are completely fine.

Step 7 — Bake
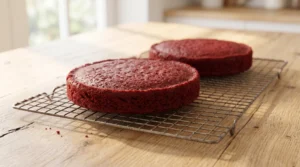
Divide batter evenly between the two prepared pans. Smooth the tops with a spatula. Bake for 28–33 minutes until a toothpick inserted in the center comes out with just a few moist crumbs — not wet batter. Start checking at 26 minutes. Do not overbake.
Let cakes cool in pans for 10 minutes, then turn out onto a wire rack. Cool completely before frosting — at least 1 hour, or 2 hours for best results.
J.ZaiB micro-tip: A warm cake will melt your cream cheese frosting on contact. Do not rush this step. If you are making ahead, wrap the cooled layers tightly in plastic wrap — they will stay moist and peel perfectly when you are ready to frost.
Step 8 — Make the Never-Melt Cream Cheese Frosting
This is where most Red Velvet Cake recipes go wrong. The secret to frosting that holds its shape for hours is using COLD block cream cheese with SOFT butter — and beating them separately before combining.
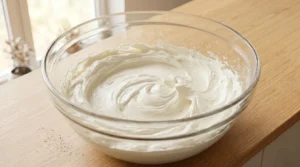
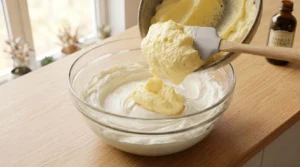
Beat the cold block cream cheese alone for 2 minutes until completely smooth. In a separate bowl, beat the softened butter for 3 minutes until very pale and fluffy. Now add the beaten butter to the cream cheese and beat together for 1 minute. Add sifted powdered sugar one cup at a time on low speed. Add vanilla and salt. Beat on medium-high for 2 minutes until the frosting is thick, glossy, and holds stiff peaks. If too thick, add heavy cream 1 teaspoon at a time.
J.ZaiB micro-tip: The never-melt secret is cold cream cheese + soft butter, beaten separately first. Cold cream cheese keeps the frosting structured. If both ingredients are at room temperature, the frosting becomes too soft and slides off. This one change produces a frosting that holds its shape for hours at room temperature.

Step 9 — Level the Cake Layers
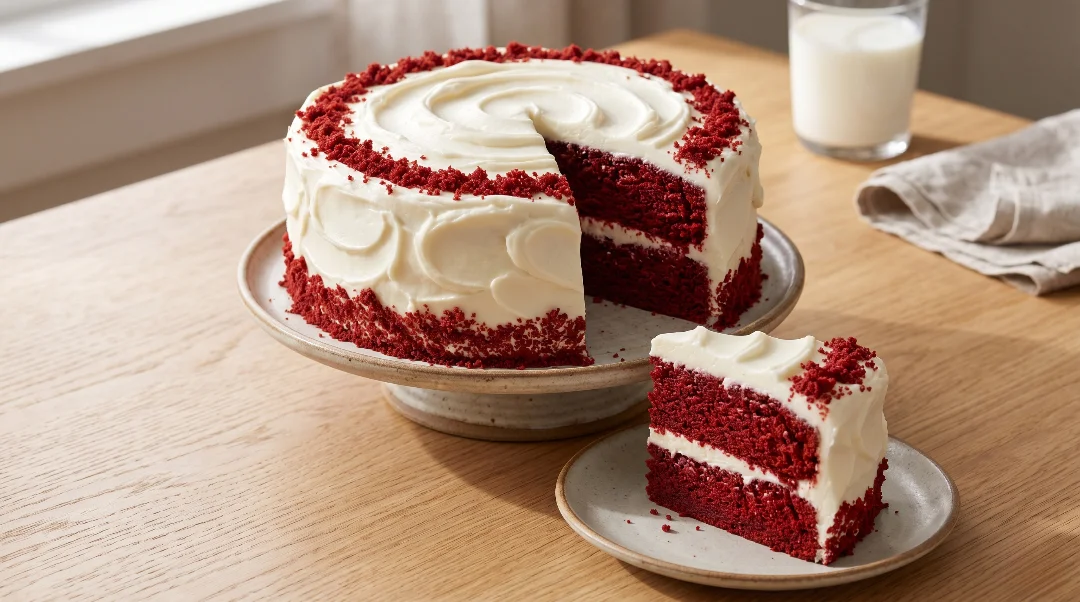
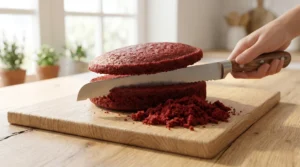
Once cooled, use a serrated knife to level the tops of each cake layer if they have domed. Save the trimmed crumbs — do not throw them away. Crumbled red velvet cake crumbs are the classic decoration for the outside of a red velvet cake, and they look absolutely stunning.
J.ZaiB micro-tip: Freeze the leveled cake layers for 20 minutes before frosting. A lightly frozen cake is much easier to frost — it does not move, crumbs stay put, and the frosting glides on smoothly.
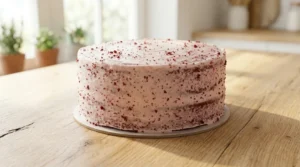
Step 10 — Frost, Decorate, and Serve
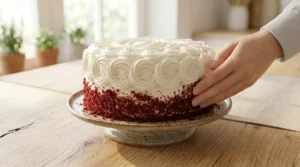
Place one cake layer on a plate or cake board. Spread about 1 cup of frosting evenly on top. Place the second layer on top and apply a thin crumb coat all over — refrigerate for 15 minutes. Apply the final generous layer of frosting. For the classic red velvet finish, press the reserved red cake crumbs gently onto the sides and top of the frosted cake. Slice with a hot damp knife for clean cuts.
J.ZaiB micro-tip: Press crumbs onto the sides immediately after the final frosting layer while it is still slightly tacky. Once the frosting sets, crumbs will not adhere properly. Work quickly and press gently.

J.ZaiB’s Expert Touch
After making this Red Velvet Cake for birthdays, Valentine’s Days, and more random Tuesdays than I can count, here are the tips that genuinely changed my results:
Gel food coloring — half a teaspoon is all you need. Most recipes call for 1–2 tablespoons of liquid food coloring. With gel, start with half a teaspoon, mix into your buttermilk, and see the color. It should look almost shockingly bright — that is correct, because the color will deepen slightly during baking. If you want deeper color, add a few drops more.
The beet powder hack actually works beautifully. If you want to avoid artificial coloring entirely, replace the gel food coloring with 2 tablespoons of beet powder. Beet powder gives a more burgundy-red than crimson, but the color is absolutely stunning and completely natural. Add it with the dry ingredients. The flavor is completely undetectable in the finished cake — you taste vanilla, cocoa, and that buttermilk tang. Nothing else.
Cake flour makes a genuinely different cake. If you can find cake flour, use it. Cake flour has a lower protein content than all-purpose flour, which means less gluten development and an even softer, finer crumb. The difference in texture is noticeable — especially in that signature velvety mouthfeel that gives the cake its name. No cake flour? Mix 2 cups all-purpose flour with ¼ cup cornstarch for a reasonable substitute.
The red crumb decoration is the signature. Trim your leveled cake tops, crumble them finely, and press onto the finished frosted cake. This is the classic look of a Southern red velvet cake — that vivid red crumb coat against stark white frosting. It looks difficult. It takes about 90 seconds.
Coffee instead of hot water for the cocoa bloom. Just as we do in the Chocolate Fudge Cake, dissolving the cocoa powder in a tablespoon of hot strong coffee before adding it to the batter deepens the chocolate note significantly without making the cake taste like coffee. Try it once and you will not go back.
Variations to Try
Red Velvet Cupcakes: Fill lined muffin tins ⅔ full and bake at 350°F for 18–22 minutes. Makes about 24 cupcakes. Pipe frosting generously — a big swirl of white cream cheese frosting on vivid red cupcakes is one of the most beautiful things in baking.
Red Velvet Sheet Cake: Pour all batter into a greased 9×13-inch pan and bake 35–40 minutes. Frost directly in the pan. Perfect for potlucks, office parties, and any time you want maximum impact with zero assembly stress.
Natural Red Velvet (No Food Dye): Replace gel food coloring with 2 tablespoons of beet powder added to the dry ingredients. The color will be a deep burgundy-red — stunning, dramatic, and completely artificial-color-free. This is also the historically authentic version.
Red Velvet with Ermine Frosting: Ermine frosting (also called cooked flour frosting) is the original traditional frosting for red velvet cake — lighter, less sweet, and more stable than cream cheese frosting. If you find cream cheese frosting too rich, ermine frosting is the authentic alternative and it is extraordinary.
Cream Cheese Swirl Variation: Add 4 oz softened cream cheese, 1 egg, and 2 tbsp sugar mixed together — dollop over the batter in the pan and swirl with a knife before baking. The swirled cream cheese bakes into the cake itself for pockets of tangy richness throughout. Incredible.
Red Velvet Cheesecake Layer: Bake one layer of red velvet cake and top with a no-bake or baked cheesecake layer. Refrigerate overnight. The combination of red velvet and cheesecake in one slice is the most dramatic dessert you can serve at a dinner party. For our coconut-flavored take on a moist layer cake, check out the Moist Coconut Cake — the same butter and oil combination technique applies there too.
Serving Ideas
A Red Velvet Cake is already a statement — but here is how to take it further for every occasion.
Valentine’s Day: Serve with a scoop of vanilla bean ice cream and fresh raspberries on the plate. The red and white cake, white ice cream, and deep red raspberries together look like they were styled by a professional food photographer.
Birthday presentation: Skip traditional birthday cake candles and do individual taper candles around the base of the cake stand. The vivid red cake with white frosting looks stunning with candlelight — and gets photographed at every birthday party.
Dinner party serving: Slice thin, lay each piece flat on a plate, and add a small quenelle of whipped cream and a dusting of cocoa powder. Restaurant presentation, zero extra effort.
Complementary flavors: This cake pairs beautifully with cold brew coffee, champagne, or a raspberry coulis drizzled around the plate. The tang of the cream cheese frosting works particularly well alongside anything acidic.
If you loved this Red Velvet Cake, our Chocolate Fudge Cake is the natural next bake — same layer cake format, completely different flavor profile, and another recipe that is far easier than it looks.
Storage & Make-Ahead Guide
Room temperature: Frosted Red Velvet Cake keeps at room temperature under a cake dome or in an airtight container for up to 2 days. The cream cheese frosting is stable at room temperature for this window — the cold cream cheese technique ensures it holds.
Refrigerator: Up to 5 days refrigerated, tightly covered. Always serve at room temperature — remove from fridge 45–60 minutes before serving. Cold cake has a denser, less velvety texture. Room temperature is when it tastes like it was meant to.
Freezer — unfrosted layers: Wrap cooled and leveled layers individually in two layers of plastic wrap and one layer of foil. Freeze up to 3 months. Thaw overnight at room temperature still wrapped, then frost.
Freezer — frosted whole cake: Freeze uncovered for 1 hour until frosting is firm, then wrap tightly in plastic wrap and foil. Freeze up to 2 months. Thaw overnight in the refrigerator, then bring to room temperature 1 hour before serving.
Make-ahead party timeline — the stress-free way:
- 3 days before: Bake and level layers, wrap warm, freeze
- 1 day before: Thaw layers at room temperature, make frosting, frost and assemble, refrigerate overnight
- Day of: Remove from fridge 1 hour before serving, press on red crumb decoration, garnish
Unfrosted layers keep for 2 days wrapped at room temperature — perfect if you want to bake ahead but frost the day of the party for maximum freshness.
Best Red Velvet Cake
Ingredients
Equipment
Method
- Preheat oven to 350°F (175°C). Grease two 9-inch round cake pans, line the bottoms with parchment paper circles, then grease the parchment. Set aside. Take butter, eggs, and buttermilk out of the fridge at least 45 minutes before starting — room temperature ingredients are essential.


- In a medium bowl, whisk together the flour, natural cocoa powder, baking soda, baking powder, and salt until fully combined. Sift the cocoa if it has any clumps. Set aside.
- In a large bowl, beat the softened butter on medium-high speed for 2 minutes until pale and creamy. Add the vegetable oil and granulated sugar. Beat for 3 full minutes until the mixture is very light, fluffy, and almost white in color. Do not rush this step — it builds the structure of your cake.
- Add the eggs one at a time, beating well after each addition until fully combined. Add vanilla extract and mix. Scrape down the sides of the bowl between additions.
- In a small bowl or measuring cup, combine the buttermilk, white vinegar, and red gel food coloring. Stir until the color is evenly distributed — it should be a vivid red liquid.
- With the mixer on low speed, alternate adding the dry ingredients and the buttermilk mixture — beginning and ending with the dry ingredients (dry in 3 additions, buttermilk in 2). Mix just until each addition is incorporated. Stop mixing the moment you no longer see dry flour streaks. Do not overmix.
- Divide the batter evenly between the two prepared cake pans. Smooth the tops with a spatula. Bake for 28–33 minutes until a toothpick inserted in the center comes out with just a few moist crumbs. Start checking at 26 minutes. Do not overbake.
- Let cakes cool in their pans for 10 minutes. Run a knife around the edges and carefully turn out onto a wire rack. Cool completely — at least 1 full hour — before frosting. A warm cake will melt the frosting.
- Beat the COLD block cream cheese alone in a large bowl for 2 minutes until completely smooth and lump-free. Set aside.
- In a separate bowl, beat the softened butter for 3 minutes until very pale and extremely fluffy. Add the beaten butter to the cream cheese bowl and beat together for 1 minute.
- Add the sifted powdered sugar one cup at a time on low speed, beating well between each addition. Add vanilla extract and salt. Beat on medium-high speed for 2 minutes until frosting is thick, glossy, and holds stiff peaks. If too thick, add heavy cream 1 teaspoon at a time. If too thin, add powdered sugar 2 tablespoons at a time.

- Using a serrated knife, level the tops of the cooled cake layers if they have domed. Save all trimmed crumbs — do not discard. Crumble them finely for the classic red velvet crumb decoration.
- Place one cake layer on a cake board or serving plate. Spread about 1 cup of frosting evenly across the top using an offset spatula. Place the second layer on top, pressing gently to level.
- Apply a thin crumb coat of frosting all over the top and sides. Refrigerate for 15 minutes until firm.
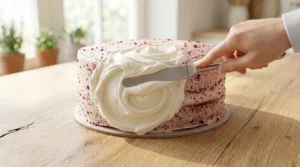
- Apply the final generous layer of frosting over the top and sides. For ultra-smooth sides, use a bench scraper held against the cake while rotating the stand. For a classic look, create swirls and swoops with the offset spatula.
- Immediately press the reserved red cake crumbs gently onto the sides and top of the cake while the frosting is still slightly tacky. Work quickly — once the frosting sets, crumbs will not adhere. Slice with a hot damp knife for clean cuts and serve at room temperature.

Notes
- Natural cocoa ONLY — not Dutch process. This is the most critical rule for Red Velvet Cake. Natural cocoa is acidic and reacts with the baking soda to create the proper rise and velvety texture. Dutch process cocoa is alkaline and neutralized — it will not react the same way and your cake will not turn out correctly. This is the opposite of our Chocolate Fudge Cake which requires Dutch process.
- Gel food coloring — not liquid. Liquid food coloring is mostly water and disrupts the acid-base balance of the batter. You would need several tablespoons to achieve a vivid red, which adds too much liquid. Gel food coloring is highly concentrated — half a teaspoon gives a dramatically more vivid crimson. Find it at any craft store, baking supply store, or Amazon.
- No food coloring? Use 2 tablespoons of beet powder in place of the gel food coloring — add it with the dry ingredients. The color will be a deep natural burgundy-red. The beet flavor is completely undetectable in the finished cake.
- Why is there vinegar in this cake? The white vinegar reacts with the baking soda to help the cake rise and adds to the overall acidity that tenderizes the gluten — creating the signature velvety crumb. You cannot taste it in the finished cake. Do not skip it.
- No buttermilk? Add 1 tablespoon of white vinegar or lemon juice to 1 cup of whole milk. Stir and let sit for 5 minutes — it will curdle slightly. This works perfectly. Full-fat Greek yogurt thinned with a splash of milk also works.
- The never-melt frosting secret. Use COLD block cream cheese and SOFT butter — and beat them separately before combining. Cold cream cheese keeps the frosting structured and stable at room temperature. If both are room temperature, the frosting becomes too soft and slides off the cake.
- Block cream cheese only — not tub. Tub or spreadable cream cheese has too much water content. It cannot hold its structure in frosting and will cause the frosting to become runny and slide off the cake.
- Cake flour upgrade. Substitute 2½ cups of cake flour for the all-purpose flour for an even softer, finer crumb. No cake flour? Mix 2 cups all-purpose flour with ¼ cup cornstarch as a substitute.
- Room temperature ingredients. Cold butter will not cream properly, and cold eggs can cause the batter to curdle. Take everything out of the fridge 45 minutes before starting.
- UK/Australia notes. “All-purpose flour” = plain flour. “Powdered sugar” = icing sugar. “Heavy cream” = double cream. “Granulated sugar” = caster sugar works well.
- Cupcakes. Fill lined muffin tins ⅔ full and bake at 350°F (175°C) for 18–22 minutes. Makes approximately 24 standard cupcakes.
- Storage — Room temp: Under a cake dome, up to 2 days. Refrigerator: Up to 5 days tightly covered — bring to room temperature 45–60 minutes before serving. Freezer (unfrosted layers): Wrapped tightly, up to 3 months. Freezer (frosted whole cake): Up to 2 months — freeze uncovered 1 hour until frosting is firm, then wrap.
- Make-ahead timeline: Bake layers 3 days ahead (freeze). Thaw 1 day before, frost and refrigerate overnight. Remove from fridge 1 hour before serving.
- Nutrition values are estimates. Use a nutrition calculator with your exact brands for precise figures.
Note
- Values are estimates calculated with standard ingredient brands. Actual values vary based on exact ingredients, slice size, and frosting amount. Use a nutrition calculator with your exact brands for precise figures.
Frequently Asked Questions
What does Red Velvet Cake actually taste like?
Red Velvet Cake is not chocolate cake and it is not vanilla cake — it is its own distinct flavor. The base is a mild cocoa flavor with strong vanilla notes, deepened by the tang of buttermilk and vinegar. The cream cheese frosting adds a slightly tangy sweetness that balances the cake perfectly. It is rich without being heavy, and the flavor is genuinely unlike any other cake. Most people who say they do not like cake make an exception for red velvet.
Why is my Red Velvet Cake brown instead of red?
Two common reasons: you used Dutch process cocoa instead of natural cocoa (Dutch process is already dark and neutralizes the red color), or you used liquid food coloring instead of gel (liquid coloring is diluted and fades during baking). Switch to natural unsweetened cocoa powder and red gel food coloring for a vivid, stable crimson color.
Can I make Red Velvet Cake without food coloring?
Absolutely. Use 2 tablespoons of beet powder in place of the gel food coloring, added with the dry ingredients. The color will be a deep burgundy rather than bright crimson, but it is naturally stunning. You can also simply omit the coloring entirely — the cake will be a beautiful reddish-brown and the flavor will be identical.
Why does Red Velvet Cake have vinegar in it?
The white vinegar is doing two important jobs. First, it reacts with the baking soda to help the cake rise and create a lighter crumb. Second, it adds to the overall acidity of the batter, which — combined with the buttermilk — tenderizes the gluten in the flour and produces that signature velvety texture. You cannot taste the vinegar in the finished cake. Do not skip it.
Can I use cream cheese from a tub for the frosting?
No — always use block cream cheese. Tub or spreadable cream cheese has a much higher water content and cannot hold its structure in frosting. It will be too soft to pipe, too runny to stack layers, and it will slide off the cake. Block cream cheese cut from a block is the only option for stable red velvet cake frosting.
How do I get the frosting perfectly smooth?
After the crumb coat, refrigerate for 15–20 minutes until firm. Apply the final frosting layer using an offset spatula. For ultra-smooth sides, hold a flat bench scraper against the side of the cake while rotating the turntable in one smooth motion. Dip your spatula in hot water and dry it before the final smoothing pass — the warmth creates a glassy finish.
Can I make Red Velvet Cake as cupcakes?
Yes — fill lined muffin tins ⅔ full and bake at 350°F (175°C) for 18–22 minutes. This recipe makes approximately 24 standard cupcakes. The frosting recipe makes enough to generously frost all 24 cupcakes with a piped swirl.
How far in advance can I make Red Velvet Cake?
You can bake the cake layers up to 3 days in advance (freeze wrapped) or frost the assembled cake up to 2 days in advance (refrigerate covered). For the absolute best texture, bake layers 1 day ahead, frost same day, refrigerate overnight, and bring to room temperature before serving.
The Cake That Starts Conversations
Every time a Red Velvet Cake appears at a table — birthday, holiday, dinner party, or no occasion at all — it commands attention before a single slice is cut. That crimson color, that white frosting, that dramatic cross-section when you finally slice into it and reveal the layers. It is theatrical in the best way.
And now you know every secret behind it. The science of natural cocoa and acid. The butter-oil combination that gives you flavor and moisture together. The cold cream cheese frosting technique that holds for hours without drooping. The red crumb decoration that takes 90 seconds and looks like a professional did it.
Make this Red Velvet Cake once and it will become your signature. The one people request for their birthdays. The one that always prompts someone to ask for the recipe before they finish their slice.
Tag us on Instagram @viralfoodhacks706 when you make yours — I want to see that vivid red cross-section! Save this to Pinterest so it is always there when a birthday, a Valentine’s Day, or a Tuesday that needs to be extraordinary comes around.