

Let me guess. You love sushi at restaurants, but the second someone mentions making it at home, your brain immediately goes to — raw fish, sharp knives, fancy techniques, total disaster.
Here’s the thing though: a Homemade Shrimp Tempura Roll has zero raw fish. Not a single piece. The shrimp is fully cooked, the fillings are fresh vegetables you already know, and the whole thing comes together with skills you definitely already have. No culinary degree. No sushi chef apprenticeship. Just crispy golden shrimp, creamy avocado, cool cucumber, and a drizzle of spicy mayo — all wrapped up in seasoned sushi rice and nori.
And in this guide, I’m giving you 3 different ways to make the shrimp — whether you have 15 minutes or 45, whether you want a weeknight shortcut or a full from-scratch experience. Pick your level, follow the steps, and get ready to never overpay for a sushi restaurant again.
Why This Homemade Shrimp Tempura Roll Will Be Your New Favorite
Before we get into the kitchen, here’s why this specific roll is the one to start with if you’re new to homemade sushi:
No raw fish — ever. The shrimp is fried. Fully cooked. Safe for everyone at the table including kids, pregnant women, and anyone who’s just not ready for raw fish yet.
Three shrimp options — you choose. Got 15 minutes? Use frozen pre-made tempura shrimp from the freezer aisle. Got 30? Fry frozen raw shrimp yourself. Want the full restaurant experience? Make the batter from scratch. All three methods are in this article.
Maximum flavor, minimum stress. The combination of crispy shrimp + creamy avocado + cool cucumber + spicy mayo is one of those flavor combinations that just works — every single time.
Cheaper than takeout. One sushi restaurant roll costs $14–18. This recipe makes 4 full rolls (32 pieces) for roughly the same price. Do the math.
The Science Behind the Crunch: Why Tempura Is Different
Here’s what separates a great Shrimp Tempura Roll Recipe from one where the shrimp comes out greasy and sad — and it all comes down to gluten, temperature, and ice.
Regular fried chicken batter is thick and heavy because it develops gluten — the stretchy protein network that forms when flour mixes with warm water and gets stirred. Gluten absorbs oil. More gluten = greasier coating.
Tempura batter is the opposite. It uses ice-cold water (sometimes sparkling water for extra airiness), minimal mixing, and sometimes cornstarch instead of all-purpose flour — all specifically to prevent gluten from forming. When this near-freezing batter hits oil at 350°F, it shocks into a crispy shell almost instantly before it can absorb oil. The result is that signature shatter-light crunch you get with good tempura — a coating so thin and airy it barely feels fried.
Two more rules that matter:
Never overmix the batter. Lumps are your friend. Smooth batter = gluten developed = heavy coating. Stop mixing the moment the dry ingredients are barely incorporated.
Fry in small batches. Adding too many shrimp at once drops the oil temperature below 350°F. When the temperature drops, the batter absorbs oil instead of crisping instantly — and you get greasy shrimp every time.
Master these two things and your homemade shrimp tempura will be restaurant-quality. Guaranteed.
Tempura has been part of Japanese cuisine since the 16th century — if you’re curious about its fascinating history, Britannica has a great overview of how this iconic dish evolved.
What You Need
For the Sushi Rice
- 2 cups short-grain Japanese sushi rice
- 2½ cups water
- ¼ cup rice vinegar
- 2 tbsp sugar
- 1 tsp salt
For the Spicy Mayo
- 3 tbsp Japanese Kewpie mayo (or regular mayo)
- 1–2 tbsp sriracha (adjust to your heat level)
- 1 tsp sesame oil (optional but adds depth)
For the Roll Assembly
- 4 sheets nori (roasted seaweed)
- 1 English cucumber, cut into thin strips
- 1 ripe avocado, sliced
- Sesame seeds for topping (optional)
- Soy sauce, wasabi, pickled ginger for serving
For the Shrimp — Choose Your Method Below
Serves: 4 rolls (about 32 pieces)
The 3 Ways to Make Your Shrimp — Pick Your Level
This is what makes this Homemade Shrimp Tempura Roll guide different from everything else out there. No other article gives you all three options side by side. Here they are:
This card uses Method 2… For quickest version see Method 1… For scratch batter see Method 3 in the article above
Method 1 — Frozen Pre-Made Tempura Shrimp (15 Min, Beginner)
Best for: Weeknights, first-timers, anyone who just wants to get rolling fast.
What you need: 1 box frozen pre-made tempura shrimp (found in the freezer section of most grocery stores — look near the frozen appetizers or Asian foods aisle)
How to cook: Simply bake according to package directions — usually 400°F for 12–15 minutes until golden and crispy. Let them cool for 5 minutes before adding to your roll. That’s it. Seriously, that’s the whole method.
J.ZaiB Tip: Buy the longest shrimp in the box — longer shrimp mean more coverage across the roll and a better bite in every piece.
Method 2 — Frozen Raw Shrimp, Fry Yourself (30 Min, Intermediate)
Best for: When you want that fresh-fried crunch without making batter from scratch.
What you need:
- 12–16 large raw shrimp, peeled and deveined, tails on (thawed if frozen)
- ½ cup all-purpose flour (for dredging)
- 1 cup tempura flour (available at Asian grocery stores or Amazon)
- 1 cup ice-cold water
- Neutral oil for frying (vegetable, canola, or sunflower)
How to cook:
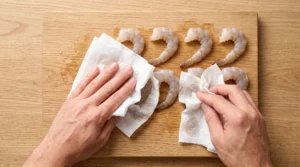
- Pat shrimp completely dry with paper towels — moisture is the enemy of crispy batter.
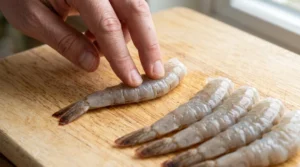
- Make 4–5 shallow slits on the underside (belly side) of each shrimp. Flip over and press firmly along the back with your finger until you feel the muscles pop. This keeps shrimp straight during frying — curved shrimp won’t fit neatly in your roll.

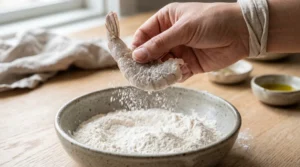
- Dredge each shrimp lightly in all-purpose flour. Shake off excess.
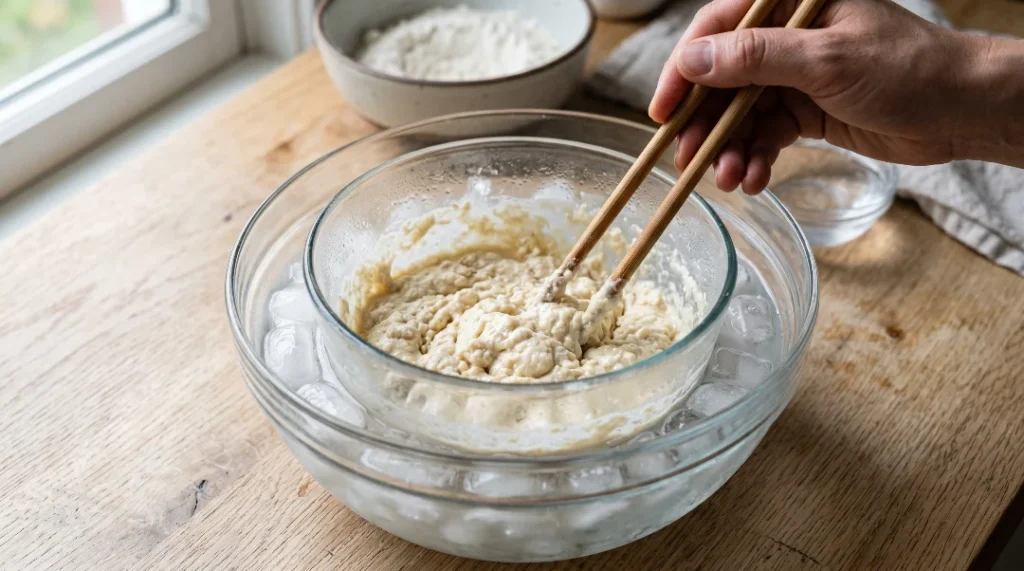
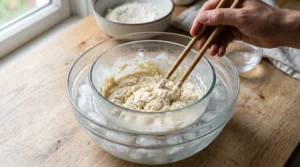
- Mix tempura flour with ice-cold water in a bowl — stir just until combined. Lumps are fine. Do not overmix.
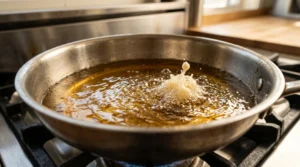
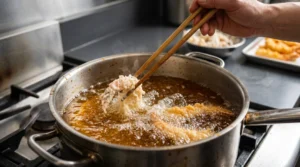
- Heat oil in a deep pot to 350°F. Test it: drop a tiny bit of batter in — it should sizzle and rise to the surface within 2 seconds.
- Dip floured shrimp into the batter and immediately lower into the oil. Fry 2–3 pieces at a time, 2 minutes per side, until light golden.
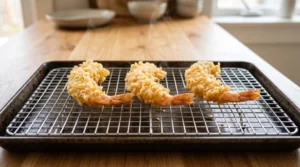
- Drain on a wire rack — NOT paper towels. Paper towels trap steam underneath and soften the crust.
J.ZaiB Tip: Keep your batter bowl sitting in a larger bowl of ice water while you fry. Cold batter = crispier shrimp, every time.
Method 3 — Completely From Scratch (45 Min, Full Experience)
Best for: Sushi nights, impressing guests, when you want the real deal.
What you need:
- 12–16 large raw shrimp, peeled and deveined, tails on
- ½ cup all-purpose flour + extra for dredging
- ¼ cup cornstarch
- ½ tsp baking powder
- 1 egg yolk, cold from the fridge
- ¾ cup ice-cold sparkling water (club soda) — the carbonation adds extra airiness
- Neutral oil for frying
How to cook:
- Straighten the shrimp using the slit-and-press technique from Method 2.
- Pat shrimp completely dry. Dredge in flour, shake off excess.
- In a chilled bowl, whisk egg yolk and ice-cold sparkling water together.
- Add flour, cornstarch, and baking powder to a separate bowl. Pour the egg mixture in. Stir with chopsticks or a fork just 4–5 times. Stop. The batter should be lumpy — that’s correct.
- Drop 2–3 ice cubes directly into the batter to keep it cold while you fry.
- Heat oil to 350°F. Dip shrimp in batter, let excess drip off, lower slowly into oil.
- Fry 2 minutes per side until pale golden — tempura should NOT be dark brown.
- Drain on a wire rack. For extra crunch that lasts longer, fry a second time for 1 minute after a 2-minute rest.
J.ZaiB Tip: Club soda instead of plain water = noticeably lighter, crispier batter. The carbonation bubbles create tiny air pockets in the coating as it fries — same science as why soda water makes better pancake batter.
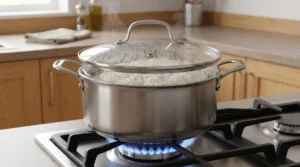
How to Make the Sushi Rice
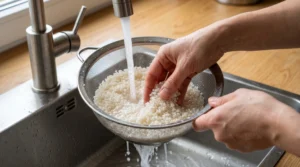
- Rinse rice under cold water until water runs clear — about 3–4 rinses.
- Cook with 2½ cups water in a rice cooker or on the stovetop (bring to boil, reduce to low, cover, 15–18 minutes, then rest covered for 10 minutes).
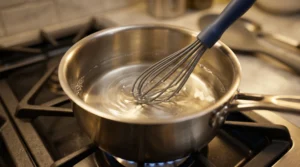
- While rice cooks, gently heat rice vinegar, sugar, and salt in a small pan until sugar dissolves. Do not boil.
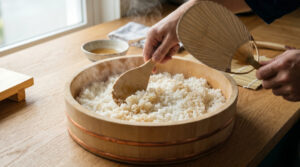
- Transfer cooked rice to a large non-metallic bowl. Pour vinegar mixture over and fold in gently with a rice paddle using a slicing motion. Fan the rice as you fold — this creates the glossy finish.
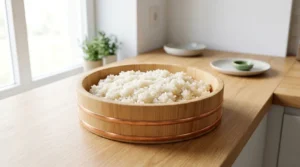
- Let cool to room temperature. Never refrigerate sushi rice.
How to Roll Your Homemade Shrimp Tempura Roll (Step-by-Step)
Step 1 — Set Up Your Station
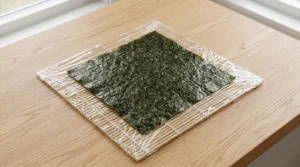
Cover your bamboo mat with plastic wrap (prevents sticking). Set out: nori sheets, cooled rice, shrimp, cucumber strips, avocado slices, a small bowl of water for your hands, and a damp cloth for your knife.
Step 2 — Spread the Rice
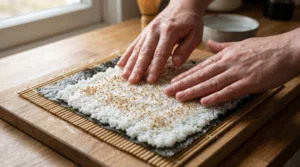
Place one nori sheet shiny-side down on your mat. Wet your hands. Take a handful of rice and spread a thin, even layer over the nori, leaving a 1-inch border at the top edge. Sprinkle sesame seeds over the rice if using.
Micro-tip: For an inside-out roll (rice on outside), spread rice, flip the nori over so rice faces down on the mat, then add fillings to the nori side.
Step 3 — Add the Fillings
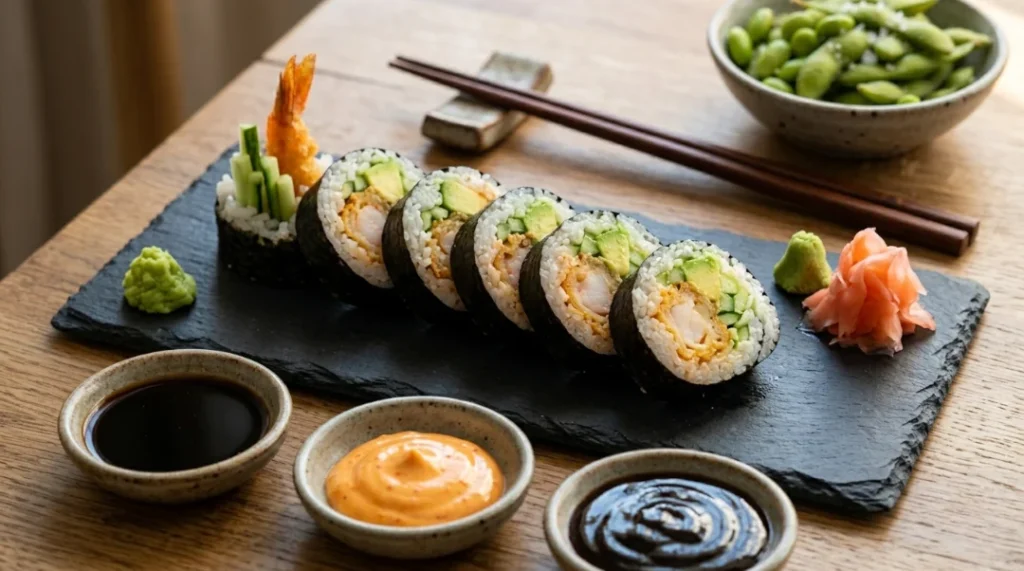
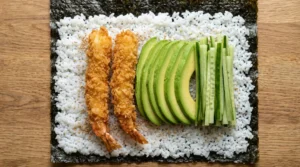
Arrange 2–3 pieces of shrimp tempura horizontally across the center of the rice. Add a line of cucumber strips and avocado slices alongside. Do not overfill — less is more for a tight, clean roll.
Step 4 — Roll It
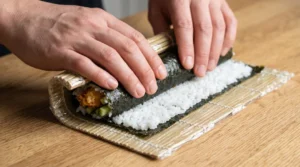
Lift the bottom edge of the mat and roll forward, tucking the edge firmly over the fillings. Apply gentle but firm pressure. Roll forward completely, squeeze the mat around the roll to tighten. The seam should be on the bottom.

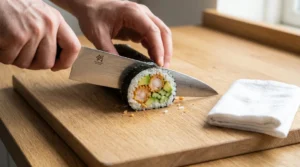
Step 5 — Slice
Using a sharp knife wiped with a damp cloth, slice the roll in half. Line the two halves up and cut into thirds — giving you 6 pieces per roll. Wipe the knife between every cut.
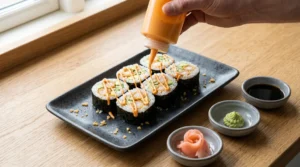
Step 6 — Drizzle and Serve
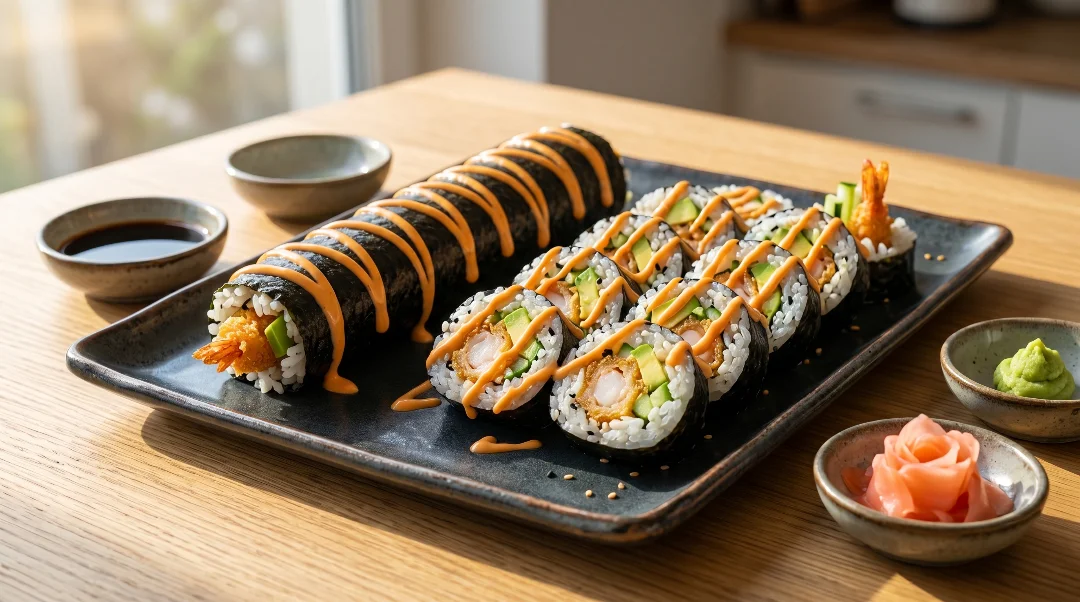
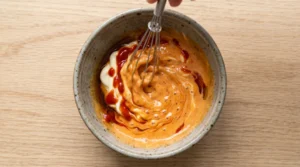
Mix your spicy mayo (Kewpie mayo + sriracha + sesame oil) and drizzle over the top. Serve immediately with soy sauce, wasabi, and pickled ginger.
J.ZaiB’s Expert Touch
After many sushi nights (and a few disaster rolls), here are the tips that genuinely changed my results:
Shrimp tails sticking out = restaurant presentation. When you place the shrimp in your roll, let the tails poke out slightly from one end. It looks professional and signals to everyone at the table that there’s real tempura inside.
Wire rack over paper towels — always. I mentioned this in the recipe but it’s worth repeating. Paper towels steam the bottom of your fried shrimp and you lose that crunch within minutes. A wire rack keeps air circulating underneath.
Kewpie mayo changes everything. Japanese Kewpie mayo is richer, tangier, and more umami-forward than regular American mayo — made with egg yolks only instead of whole eggs. Your spicy mayo will taste noticeably better with Kewpie. Find it at most Asian grocery stores or on Amazon.
Avocado ripeness matters. A just-ripe avocado (slightly firm, not mushy) holds its shape when you slice it and stays in the roll when you cut the sushi. Overripe avocado smears and makes assembly messy.
Cool shrimp before rolling. Hot shrimp inside a nori roll = steam = soggy nori. Let your fried shrimp cool for at least 5 minutes before assembly.
Variations to Try
Dragon Roll Style: After rolling, place thin avocado slices on top of the finished roll and press gently with the mat to adhere. Drizzle with eel sauce. Stunning presentation for parties.
Cream Cheese Addition: Add a thin strip of cream cheese alongside the cucumber and avocado inside the roll. Rich, creamy, and the combination is incredible — closer to a Philadelphia Roll hybrid.
Spicy Kick Version: Mix a little sriracha directly into the sushi rice before spreading. Every bite has a subtle heat before you even hit the spicy mayo drizzle.
No-Fry Baked Version (Healthier): Use Method 1 (frozen pre-baked shrimp) and bake instead of fry for a lighter roll that’s still crispy. Great for weeknights when you don’t want to deal with hot oil.
Kid-Friendly Version: Skip the spicy mayo entirely. Let kids dip their pieces in plain soy sauce or a little teriyaki sauce. No heat, no raw anything — a great intro to sushi for younger family members. If you’re looking for another no-fish beginner sushi option kids love, check out our Easy Veggie Roll Sushi Recipe.
Serving Ideas
A Homemade Shrimp Tempura Roll is a complete meal on its own, but here’s how to make it a full spread:
For a sushi night at home, pair these rolls alongside our California Roll (Easy Sushi Recipe for Beginners) — guests love having two different rolls to choose from.
For dipping sauce options beyond soy sauce: spicy mayo for drizzling, sweet eel sauce (unagi sauce — found at most Asian grocery stores) for a sweet-savory note, or a simple ponzu sauce (soy + citrus) for something lighter.
For sides, miso soup, edamame, or a simple cucumber salad round out the meal beautifully without competing with the sushi flavors.
Storage & Make-Ahead Guide
Sushi rice: Make up to 2 hours ahead. Keep covered with a damp cloth at room temperature. Never refrigerate — cold temperatures harden sushi rice.
Assembled rolls: Best eaten within 30–60 minutes of rolling. The nori softens as it absorbs moisture from the rice. If you must store, wrap unsliced rolls tightly in plastic wrap and refrigerate up to 24 hours. Let sit at room temperature 15 minutes before serving.
Leftover shrimp tempura: Store separately from rice in an airtight container in the fridge for up to 2 days. Re-crisp in an air fryer at 375°F for 3–4 minutes or in the oven at 400°F for 5 minutes. Do not microwave — you’ll lose all the crunch.
Freezing: Not recommended. The rice texture and shrimp coating both suffer significantly after thawing.
Party make-ahead hack: Prep everything separately — rice (covered, room temp), sliced fillings (fridge), cooked shrimp (airtight container). Roll fresh right before guests sit down. Takes under 10 minutes once everything is prepped.
Homemade Shrimp Tempura Roll
Ingredients
Equipment
Method
- Rinse sushi rice under cold water until water runs completely clear — about 3 to 4 rinses.

- Cook rice with 2½ cups water in a rice cooker or stovetop (bring to boil, reduce to low, cover, cook 15–18 minutes, then rest covered for 10 minutes).
- While rice cooks, combine rice vinegar, sugar, and salt in a small saucepan over low heat. Stir until sugar dissolves completely. Do not boil. Set aside to cool.
- Transfer cooked rice to a large non-metallic bowl. Pour vinegar mixture over rice and fold gently with a rice paddle using a slicing motion. Fan the rice as you fold to cool it faster and create a glossy finish.
- Let rice cool to room temperature. Do not refrigerate.
- Pat shrimp completely dry with paper towels. Moisture prevents the batter from sticking.
- Make 4–5 shallow slits on the underside (belly side) of each shrimp. Flip over and press firmly along the back with your finger until you feel a slight pop. This straightens the shrimp so it fits neatly in the roll.
- Dredge each shrimp lightly in all-purpose flour. Shake off any excess.
- In a bowl set inside a larger bowl of ice water, mix tempura flour with ice-cold water. Stir just until combined — lumps are perfectly fine. Do not overmix.
- Heat oil in a deep pot to 350°F. Test by dropping a small amount of batter in — it should sizzle and rise to the surface within 2 seconds.
- Dip each floured shrimp into the tempura batter and immediately lower into the hot oil. Fry 2 to 3 pieces at a time for 2 minutes per side until light golden.
- Remove shrimp and drain on a wire rack. Do NOT use paper towels — they trap steam and soften the crust. Let cool for 5 minutes before rolling.
- Mix Kewpie mayo, sriracha, and sesame oil together in a small bowl. Adjust sriracha to your preferred heat level. Set aside.
- Cover bamboo mat with plastic wrap. Place one nori sheet shiny-side down on the mat.
- Wet your hands. Spread a thin, even layer of sushi rice over the nori, leaving a 1-inch border at the top edge. Sprinkle sesame seeds over rice if using.
- Arrange 2 to 3 pieces of shrimp tempura horizontally across the center of the rice. Add a line of cucumber strips and avocado slices alongside the shrimp. Do not overfill.
- Lift the bottom edge of the mat and roll forward firmly, tucking the edge over the fillings. Apply gentle but firm pressure as you roll. The seam should end up on the bottom.
- Using a sharp knife wiped with a damp cloth, slice the roll in half. Line up the two halves and cut each into thirds — giving 6 pieces per roll. Wipe the knife between every single cut.
- Drizzle spicy mayo over the finished rolls. Serve immediately with soy sauce, wasabi, and pickled ginger.
Notes
- 3 Shrimp Methods Available: This card uses Method 2 (Frozen Raw Shrimp, Fry Yourself). For the quickest version, use frozen pre-made tempura shrimp from the freezer aisle and bake at 400°F for 12–15 minutes (Method 1). For a full from-scratch tempura batter using club soda and egg yolk, see Method 3 in the article above.
- Ice cold batter is non-negotiable. Keep your batter bowl sitting inside a larger bowl of ice water the entire time you fry. Cold batter hitting hot oil = crispy crunch. Warm batter = greasy shrimp.
- Wire rack only — never paper towels. Paper towels trap steam underneath the shrimp and soften the crust within minutes.
- Oil temperature must stay at 350°F. Fry in small batches of 2–3 shrimp only. Too many shrimp at once drops the oil temperature and the batter absorbs oil instead of crisping.
- Cool shrimp before rolling. Hot shrimp creates steam inside the roll, which makes the nori go limp. Wait at least 5 minutes after frying before assembling.
- Wet your knife between every cut. A dry knife squishes the roll. A wet, sharp knife gives clean, restaurant-quality slices.
- Avocado ripeness matters. Use just-ripe avocado — slightly firm, not mushy. Overripe avocado smears during assembly and slicing.
- Never refrigerate sushi rice. Cold temperatures harden the starch and ruin the texture. Use rice within 2 hours of making at room temperature.
- Kewpie mayo for spicy mayo. Japanese Kewpie mayo makes noticeably better spicy mayo than regular American mayo. Find it at Asian grocery stores or Amazon.
- Storage: Assembled rolls are best eaten within 30–60 minutes. Wrap unsliced rolls tightly in plastic wrap and refrigerate up to 24 hours if needed. Let sit at room temperature 15 minutes before serving.
Note
- Nutrition values are estimates calculated without spicy mayo drizzle. Use a nutrition calculator with your exact brands for precise figures. Values will vary based on oil absorption during frying and exact ingredient amounts.
Frequently Asked Questions
What is a Shrimp Tempura Roll made of?
A classic Shrimp Tempura Roll (also called an ebi roll) is made with seasoned sushi rice, nori (roasted seaweed), crispy battered and fried shrimp tempura, avocado, and cucumber. It’s finished with a drizzle of spicy mayo and served with soy sauce, wasabi, and pickled ginger. Some versions also add cream cheese or imitation crab inside.
Can I make a Homemade Shrimp Tempura Roll without a bamboo mat?
Absolutely. Use a clean kitchen towel or tea towel covered with a piece of plastic wrap. The technique is identical — the towel gives you the same firm, even pressure as the bamboo mat. It’s slightly trickier to get a tight roll, but completely doable.
Why does my tempura batter come out greasy instead of crispy?
Three most common reasons: the oil wasn’t hot enough (must be 350°F), you added too many shrimp at once and dropped the temperature, or you overmixed the batter and developed too much gluten. Fix all three and your batter will be light and crispy every time.
Can I use regular rice instead of sushi rice?
You need short-grain Japanese rice — labeled “sushi rice” at most grocery stores. Long-grain rice like basmati or jasmine stays fluffy and separate after cooking and won’t stick together enough to hold a roll. Short-grain rice is high in amylopectin starch which gives it that gentle clinginess perfect for rolling.
How do I stop my shrimp from curling during frying?
Make 4–5 shallow slits on the underside (belly side) of each shrimp before frying. Then flip and press firmly along the back with your finger until you feel a slight pop — this breaks the muscle tension. Shrimp fried this way stays long and straight, which makes rolling much easier.
Can I make the shrimp tempura ahead of time?
Yes — fry the shrimp up to 2 hours ahead and keep at room temperature. Re-crisp in an air fryer for 2–3 minutes right before rolling. Do not refrigerate before rolling as the cold and moisture will soften the coating.
Is Shrimp Tempura Roll healthy?
It’s more calorie-dense than raw fish rolls due to the fried shrimp, but it’s still a relatively balanced meal — lean protein from the shrimp, healthy fats from the avocado, and fiber from the vegetables. If you want a lighter version, use Method 1 (baked frozen shrimp) and go easy on the spicy mayo drizzle.
If you’re curious how traditional Japanese tempura differs from the American version, Japan Guide has a detailed breakdown.

Your Sushi Night Starts Here
There’s a reason the Homemade Shrimp Tempura Roll is one of the most ordered rolls at Japanese restaurants across America — it’s that combination of hot crispy shrimp, cool fresh vegetables, and silky spicy mayo that keeps every single bite interesting. And now you know exactly how to make it at home, three different ways, at whatever skill level you’re starting from.
Start with Method 1 if you want to keep it simple tonight. Graduate to Method 3 when you’re ready to go full sushi chef mode. Either way, you’re getting restaurant-quality results without the restaurant price tag.
Tag me on Instagram @viralfoodhacks706 when you roll yours — I want to see those crispy shrimp tails! And save this to Pinterest so you have all three methods ready for your next sushi night. 🍤
You made easy recipes i like your work and passion 😜