

Quick Recipe Summary (For those who just want the basics — full details below)
- Prep Time: 25 minutes
- Bake Time: 55–65 minutes
- Chill Time: 8 hours (overnight best)
- Serves: 12–16 slices
- Key Hack: Steam pan on lower rack — no water bath needed
- Skill Level: Intermediate — patience required
👇 Full recipe with step-by-step photos below
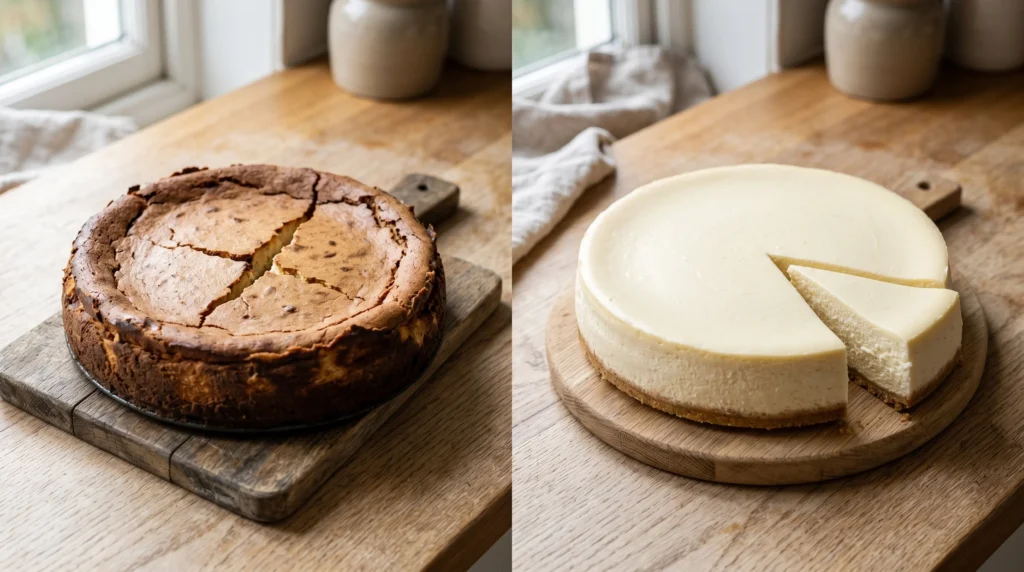
Your Cheesecake Cracked. Again. Here’s What Was Actually Going Wrong.
You followed every step. Foil wrapped the springform pan — twice. Roasting pan filled with boiling water. Oven door stayed shut the whole time.
And still. That ugly crack right down the middle.
Honestly, I made five cracked cheesecakes before I figured out what was really happening. Not four — five. And looking back, most of them cracked for the same reason: the water bath itself was the problem. The foil leaked on cheesecake number one. The pan leaked on number two. By cheesecake three, the crust had absorbed enough water to completely change the texture of the filling.
So I tried something different. Instead of putting the cheesecake pan inside water, I put a separate pan of boiling water on the rack below — and left the cheesecake completely dry on the rack above. Same humidity. Zero contact. No leaking possible.
That cheesecake — number four, if you’re counting — came out smooth on top and creamy all the way through. Not because I got lucky. Because I removed the thing that was causing the problem.
This New York Cheesecake recipe uses that exact method. Let’s get into it.

What Makes This New York Cheesecake Recipe Worth Making
No water bath headaches. The steam hack creates the same humid oven environment without any risk to your crust or filling. If your oven runs hot or your foil tends to leak, this method removes both problems in one step.
Real imperfections included. Depending on your oven, the top edge might brown slightly — that’s actually normal and is what the sour cream topping covers. If your oven runs 25°F hotter than it reads, your timing will need adjustment. More on that in the tips section.
Four blocks of cream cheese. Not two. Not three. Four. That’s what gives a proper New York Cheesecake that dense, rich, slice-and-hold texture instead of the wobbly supermarket version.
Keto and gluten-free variations. Both are in the Variations section below — and both are genuinely good, not consolation prizes.
Make it 2 days ahead. In most cases, this cheesecake tastes better on day two than day one. Plan ahead when you can.
Why New York Cheesecake Cracks — The Short Version
There are five reasons cheesecake cracks. This recipe addresses all of them.
Too much air in the batter from overmixing — eggs especially hold air when beaten, so mix on low speed and stop early. No stabilizer in the filling — a small amount of cornstarch keeps the egg proteins flexible during baking instead of contracting and cracking. Temperature shock — moving a hot cheesecake into a cold room causes the edges to contract faster than the center, and that tension creates cracks. Overbaking — cheesecake is done before it looks done; pull it when the center still wobbles gently. And finally, water bath leakage — which changes the moisture balance of the filling in ways that only show up after baking.
Fix all five and cracking becomes unlikely. Not impossible — ovens vary, ingredients vary — but in most cases, following these steps produces a smooth top.
For the full science behind cream cheese protein behavior in baked desserts and why cracks form, King Arthur Baking has an excellent detailed breakdown on why cheesecakes crack that explains exactly what happens at different temperatures.
A Quick Note on History
New York Cheesecake as most Americans know it was shaped in the early 1900s by Arnold Reuben, who built his version around Philadelphia brand cream cheese — which had been developed by a New York dairy in the 1870s. The tall, dense, oven-baked style was later popularized by Junior’s Restaurant in Brooklyn, which opened in 1950 and still serves what many consider the definitive version. The philosophy was simple: maximum cream cheese, minimal air, gentle heat. That’s still the foundation of this recipe.
(For a deeper dive into cheesecake history across cultures, Britannica’s overview is worth a few minutes.)
What You Need
For the Graham Cracker Crust
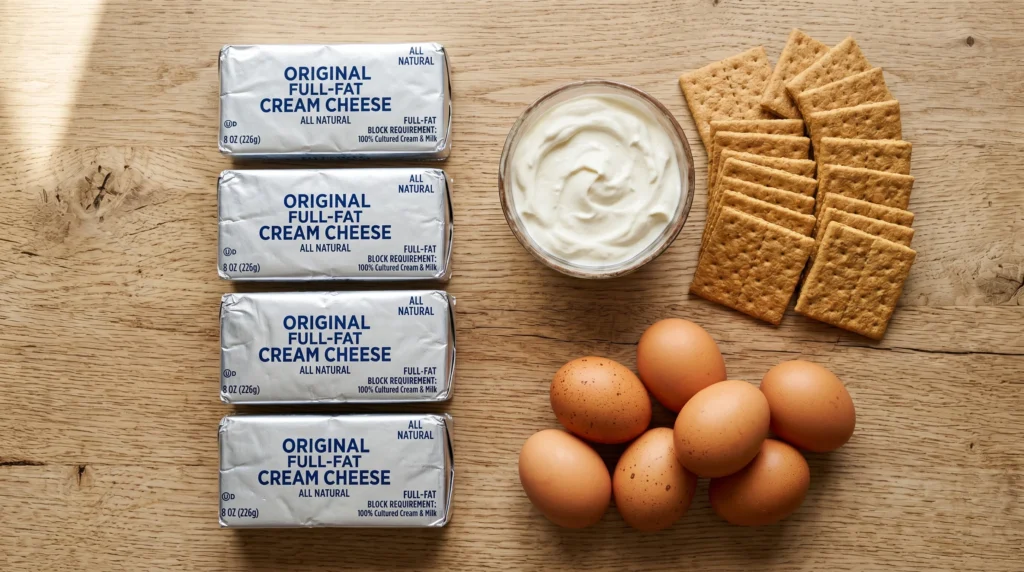
- 2 cups (200g) graham cracker crumbs (about 14 crackers — pulse in a food processor)
- ¼ cup (50g) granulated sugar
- ½ cup (115g) unsalted butter, melted
- Pinch of salt
For the New York Cheesecake Filling
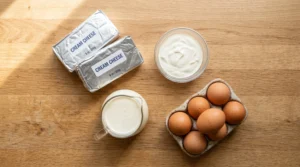
- 32 oz (900g) full-fat block cream cheese, room temperature (4 blocks — Philadelphia brand recommended)
- 1¼ cups (250g) granulated sugar
- 3 tbsp cornstarch (stabilizes filling — don’t skip)
- 1 cup (240ml) sour cream, room temperature
- ½ cup (120ml) heavy whipping cream, room temperature
- 1 tbsp pure vanilla bean paste (or 2 tsp vanilla extract — paste gives visible flecks and stronger flavor)
- 4 large eggs + 1 egg yolk, room temperature
- 1 tsp fresh lemon zest (optional — brightens the flavor)
For the Sour Cream Topping
- 1 cup (240ml) sour cream
- 2 tbsp powdered sugar
- 1 tsp pure vanilla extract
Equipment needed: 9-inch premium springform pan, heavy-duty stand mixer or hand mixer, food processor for crust, offset spatula
Serves: 12–16 slices
How to Make New York Cheesecake — Step by Step
Step 1 — Room Temperature Ingredients (Non-Negotiable)
Pull cream cheese, sour cream, heavy cream, and eggs from the fridge at least 1 hour before starting. Cold ingredients create lumps. Lumps mean more mixing. More mixing means more air. More air means more cracks.
Set a timer. One hour. Walk away.
J.ZaiB micro-tip: If you forgot to take ingredients out early — warm the cream cheese blocks in 10-second microwave bursts until just soft enough to press your finger in. Not melted. Just soft. It’s not ideal but it works.
Step 2 — Make and Bake the Crust
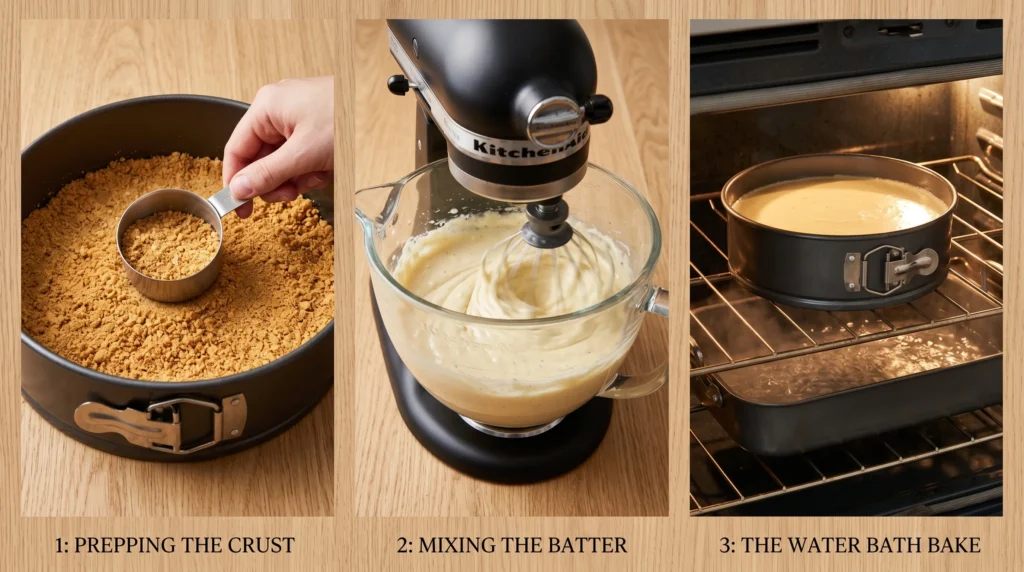
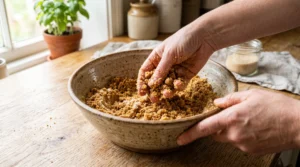
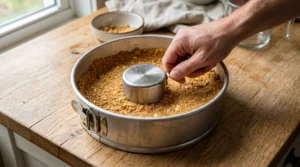
Preheat oven to 325°F (165°C). Pulse graham crackers in a food processor to fine crumbs. Mix with sugar, melted butter, and salt until the mixture clumps when pressed. Press firmly into the springform pan — bottom and about 1 inch up the sides. Use the flat bottom of a measuring cup to compact it evenly.
Bake 8 minutes. Cool completely before adding filling.
J.ZaiB micro-tip: Press the crust higher up the sides than you think necessary. A crust that barely covers the base leaves the filling edges exposed — those edges dry faster and crack first.
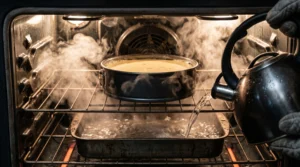
Step 3 — Set Up the Steam Hack
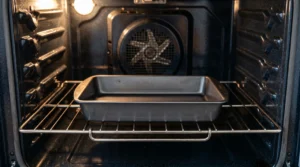
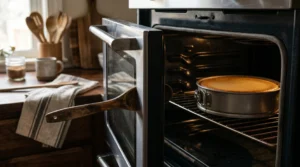
Place an empty metal baking pan on the lowest oven rack. This is where you’ll pour boiling water just before the cheesecake goes in. Metal only — glass can shatter from the sudden heat change.
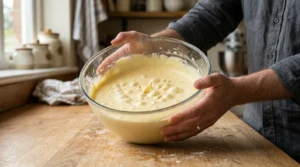
Step 4 — Make the Filling
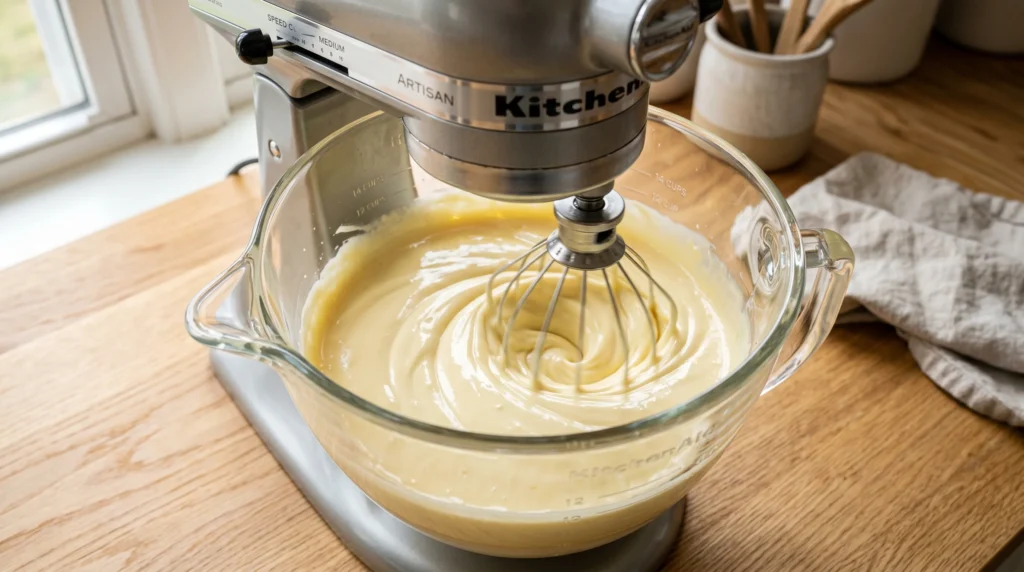
Beat room temperature cream cheese in a heavy-duty stand mixer on MEDIUM speed — not high — for 2 minutes until completely smooth. Add sugar and cornstarch, beat 1 minute. Scrape down the bowl.
Add sour cream, heavy cream, vanilla bean paste, and lemon zest. Mix on LOW until just combined — about 20 seconds. Scrape again.
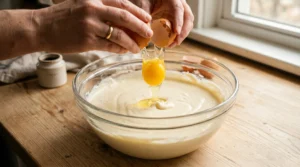
Add eggs one at a time on LOW speed — mix only until each egg disappears before adding the next. Add the egg yolk last. Stop the mixer the moment it’s incorporated.
Tap the bowl hard on the counter 20 times to pop surface bubbles. Let sit 5 minutes, then tap again.
J.ZaiB micro-tip: The moment the last egg disappears — stop. Every extra second is another air bubble. The batter should look thick, smooth, and pourable. If you see foam on top, you’ve gone slightly too long — still usable, just tap firmly to pop it down.
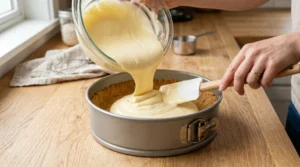
Step 5 — Fill and Prepare
Pour filling over the cooled crust. Smooth the top gently. Tap the pan 5 times on the counter to settle any remaining bubbles.
Step 6 — Steam Hack + Bake
Boil a full kettle. Place cheesecake on the CENTER oven rack. Pour 2 cups of boiling water into the empty metal pan on the LOWER rack. Close oven door immediately.
Bake at 325°F for 55–65 minutes.
Done when: outer 2 inches are set and still, center 3 inches wobble gently as one mass when you nudge the pan — like set Jell-O, not liquid. Start checking at 55 minutes.
J.ZaiB micro-tip: If your oven runs hot (check with an oven thermometer), reduce temperature to 310°F and add 5–8 minutes. Every oven is different — the jiggle test is more reliable than any timer.
⚠️ Real talk: Sometimes the top edge browns slightly even with the steam. That’s normal — the sour cream topping in Step 8 covers it completely.
Step 7 — The Slow Cool-Down
Turn off the oven. Crack the door 1 inch — prop with a wooden spoon. Leave cheesecake inside for 1 full hour. Do not open wider. Do not move it.
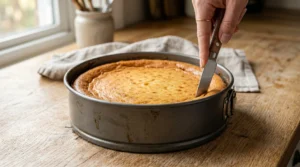
After 1 hour, remove from oven. Immediately run a thin knife around the edge of the pan. Let cool completely at room temperature — about 1 more hour.
J.ZaiB micro-tip: The knife-around-the-edge step is easy to skip. Don’t. As the cheesecake contracts slightly during cooling, stuck edges pull the center — and that’s often what causes late-stage cracking even in an otherwise perfect cheesecake.
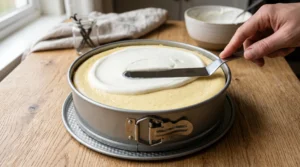
Step 8 — Sour Cream Topping
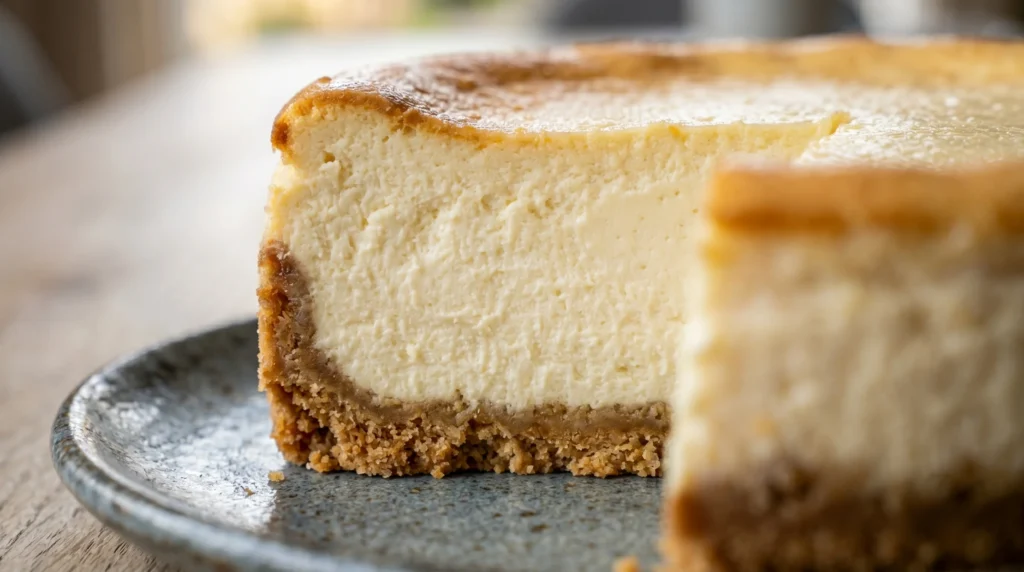
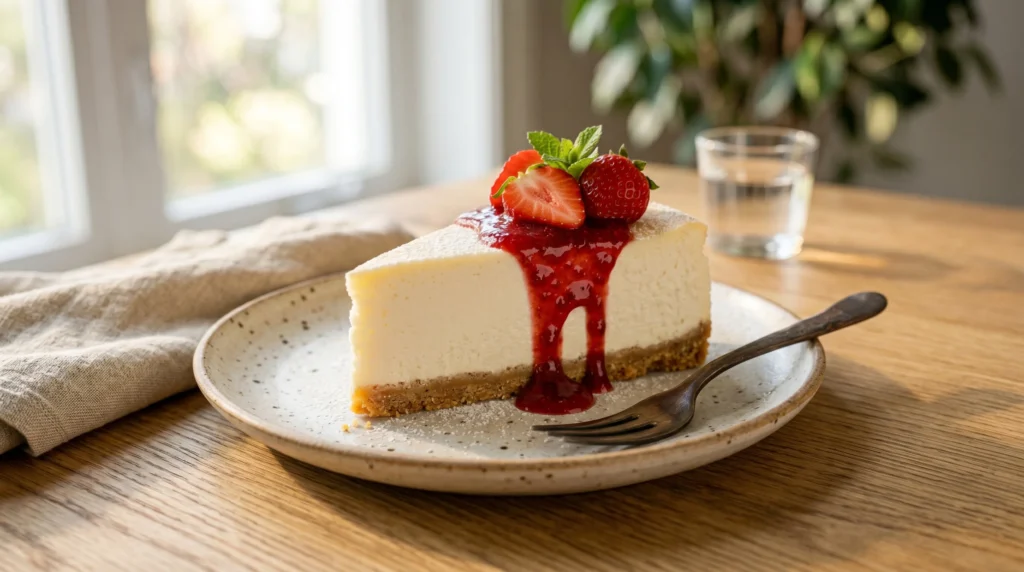
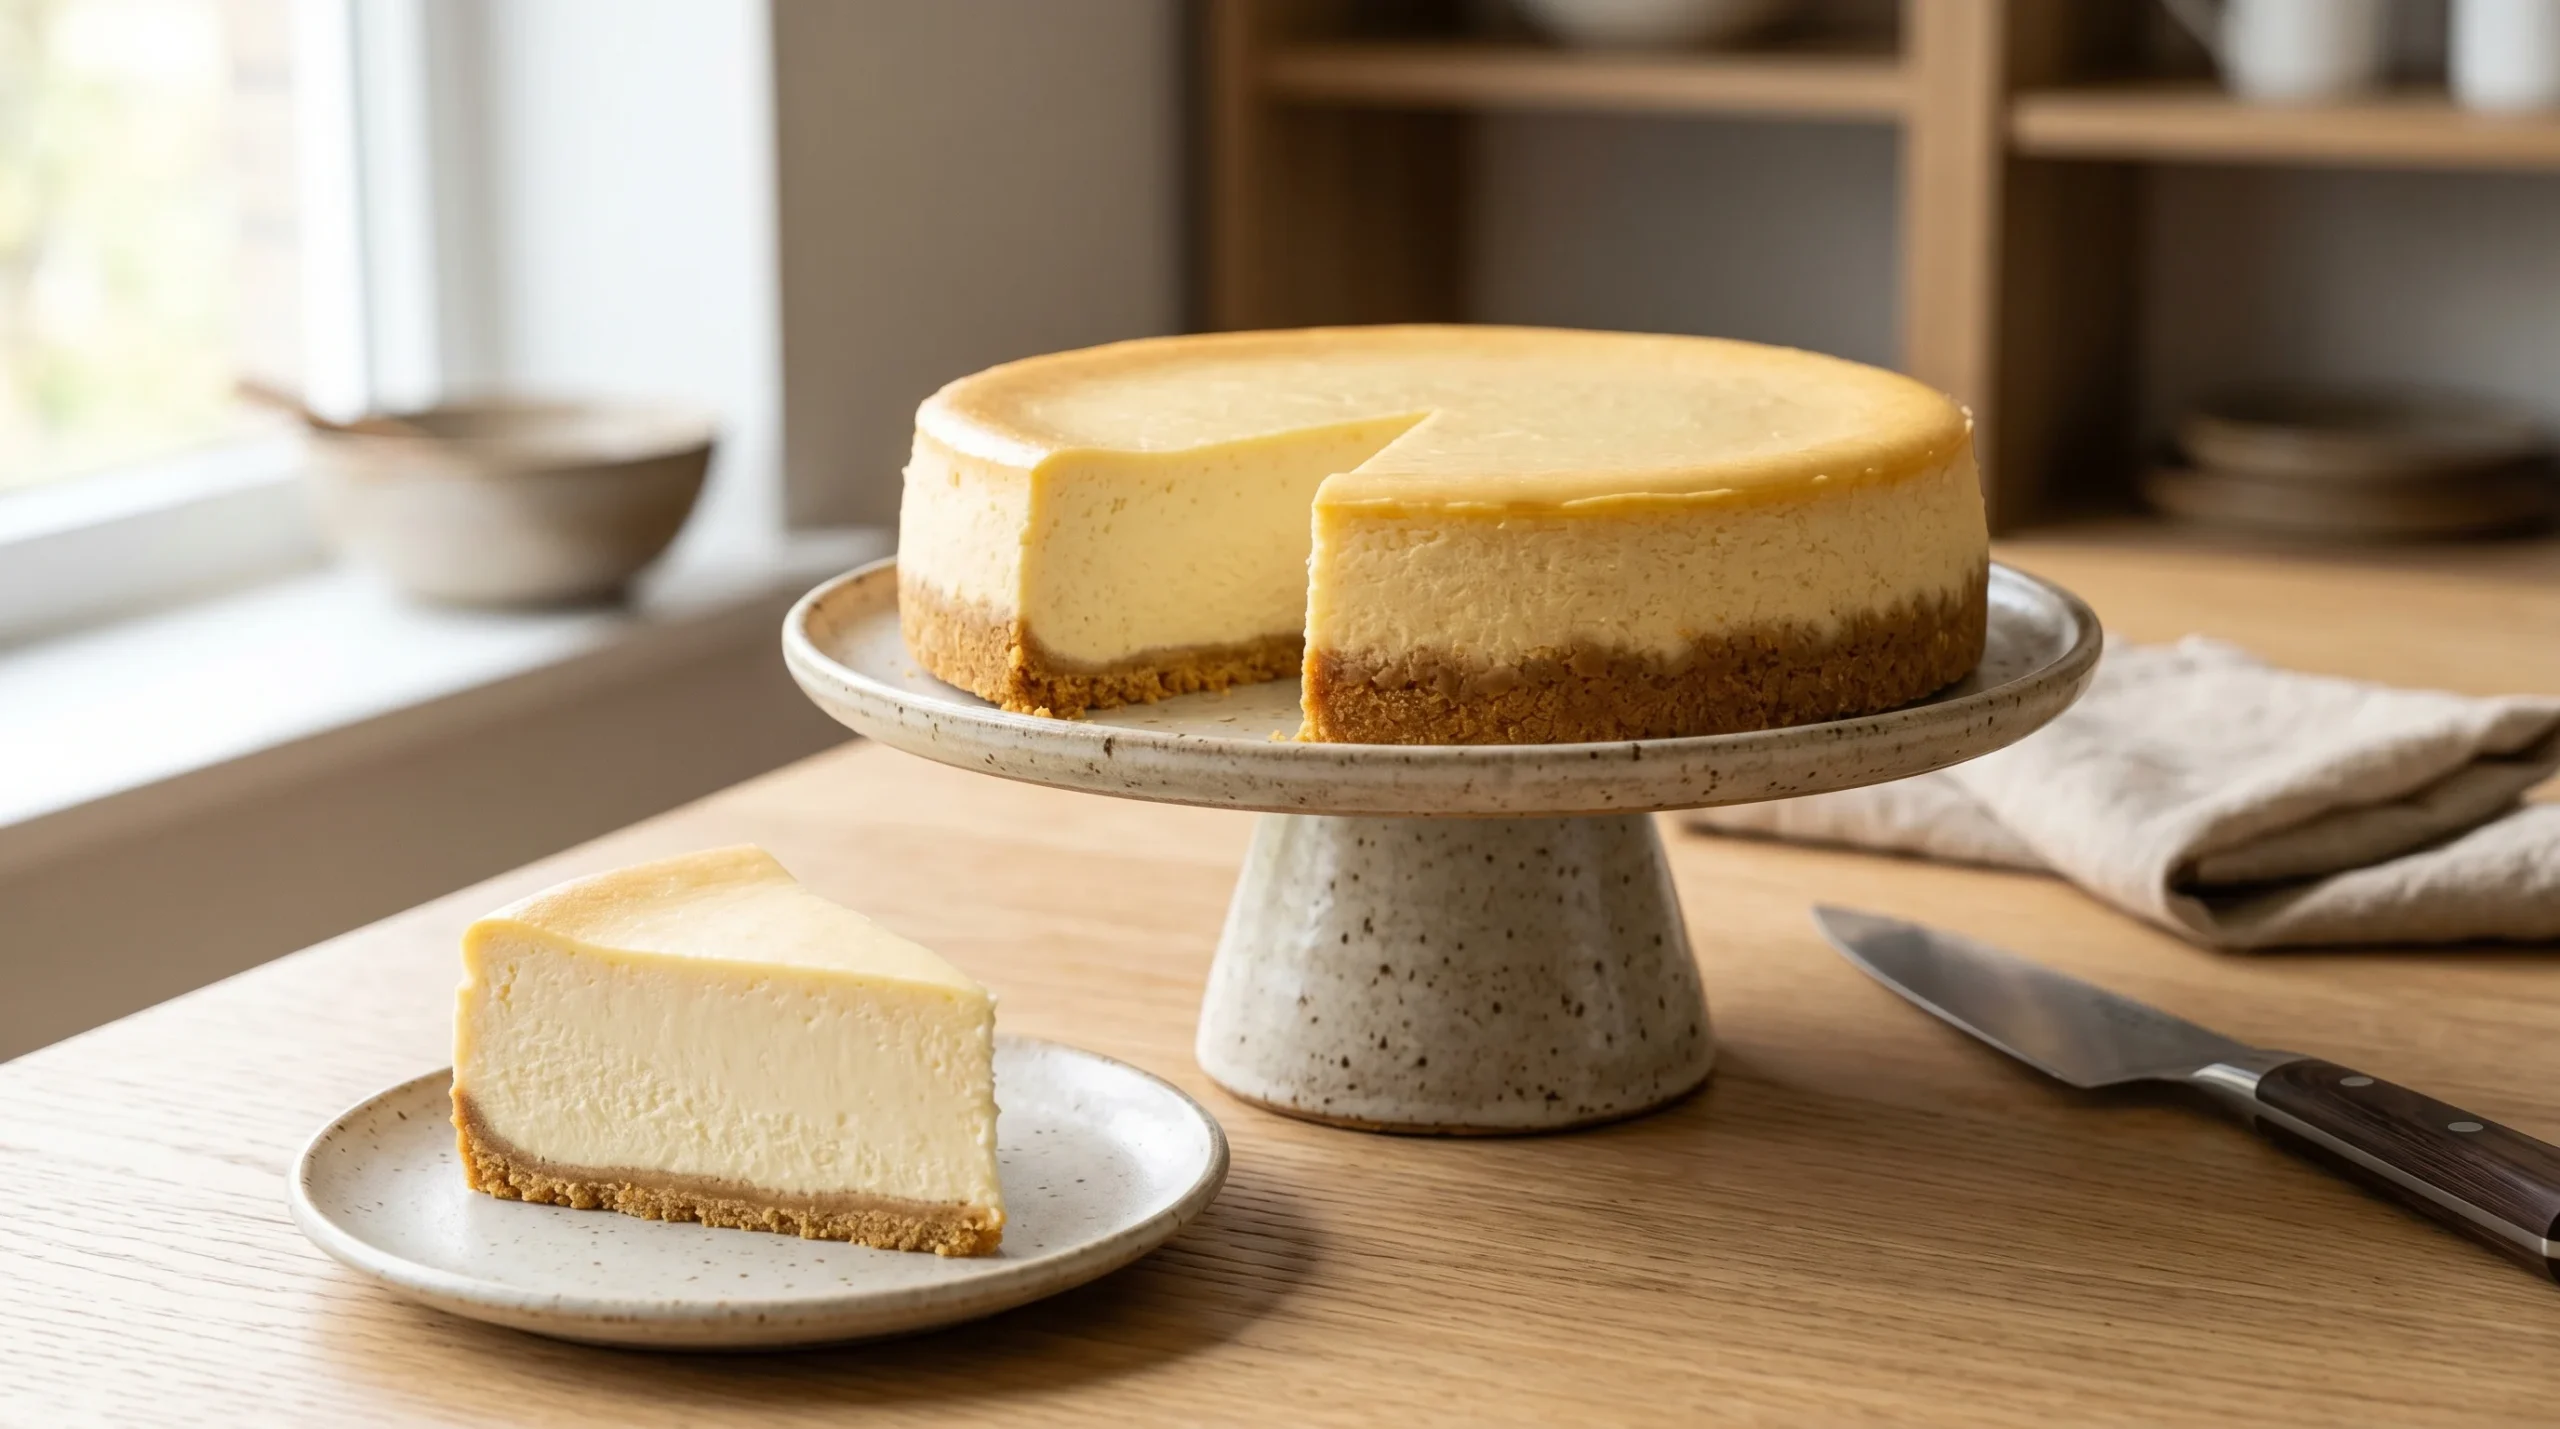
Mix sour cream, powdered sugar, and vanilla until smooth. Spread a thin, even layer over the cooled cheesecake. This classic New York finish adds tanginess, covers any edge browning, and makes the top look professionally smooth.
Step 9 — Refrigerate
Cover loosely with plastic wrap. Refrigerate minimum 8 hours — overnight is better, 2 days is best. Do not rush. The cheesecake needs this time to fully set.
Step 10 — Release and Slice
Run a knife around the edge one more time. Release the springform sides. Slice with a sharp knife dipped in hot water and wiped dry between every cut. Serve cold.
My Five Disasters — What I Actually Learned
Cheesecake number one: foil leaked, soggy crust, odd texture throughout. Cheesecake number two: used tub cream cheese by mistake. Completely wrong texture — too soft, wouldn’t slice. Cheesecake number three: pulled it when the top looked set. Overbaked. Crack appeared as it cooled. Cheesecake number four: tried the steam hack. Smooth top. Finally. Cheesecake number five: forgot to run the knife around the edge during cooling. Small crack on one side. Sour cream topping covered it fine — but still, lesson learned.
Five attempts to find a method that works consistently. The steam hack, room temperature ingredients, low-speed mixing, and the knife trick together are what get you there in most cases. Your oven might behave differently — adjust timing accordingly and trust the jiggle test over the clock.
J.ZaiB’s Expert Touch
Full-fat block cream cheese only. Tub cream cheese has added stabilizers and more water — it produces a softer filling that won’t hold its shape when sliced. Philadelphia brand blocks are the most consistent in fat content and protein structure. Four full 8-ounce blocks. No substitutions.
Pure vanilla bean paste over extract when you can. The visible flecks signal quality to anyone looking at a cross-section. The flavor is more concentrated and rounds out the tanginess of the cream cheese in a way that extract doesn’t quite match. Worth the slightly higher price for a dessert this important.
Your oven probably runs differently than mine. If you’ve had cheesecakes brown on top or crack despite doing everything right, get an oven thermometer. A $10 thermometer reveals what most home bakers never know — that their oven runs 20–30°F off. Adjust accordingly and your results will improve immediately.
The overnight chill is where it all comes together. A cheesecake pulled after 8 hours is good. After 24 hours, it’s noticeably better — firmer, cleaner slices, deeper flavor. If you can plan ahead, do. The difference is worth it.
Hot knife between every cut — not just at the start. Cream cheese filling sticks to the blade after each slice. One swipe through a dry, cream-cheese-coated knife and your next slice looks rough. Dip, wipe, cut, repeat. Takes five extra seconds per slice.
Variations to Try
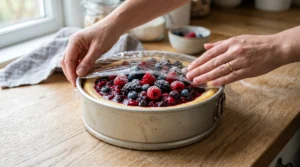
Classic Strawberry Topping: Toss 2 cups sliced strawberries with 2 tbsp sugar and a squeeze of lemon. Let sit 20 minutes until syrupy. Spoon over individual slices right before serving — not over the whole cheesecake, which makes it soggy. If you love pairing fresh fruit with rich desserts, our Fresh Strawberry Pie uses a similar fruit-forward approach and is one of our most popular summer recipes.
Gluten-Free Almond Flour Crust: Replace graham cracker crumbs with 2 cups almond flour mixed with 3 tbsp melted butter, 2 tbsp sugar, and a pinch of salt. Press and bake exactly as the original. The nutty sweetness works beautifully against the tangy filling.
Keto Cheesecake Version: Use the almond flour crust above and replace granulated sugar in the filling with 1 cup powdered erythritol or monk fruit sweetener. The texture is close to the original — not identical, but genuinely satisfying. One of the better keto desserts you can make at home.
Chocolate Swirl: Melt 4 oz dark chocolate, let cool slightly. Pour plain filling into the pan, drop spoonfuls of chocolate over the top, swirl with a skewer. Looks impressive. Actually simple.
Biscoff Crust: Replace graham crackers with crushed Biscoff cookies — reduce butter slightly since Biscoff is fattier. The spiced caramel flavor against tangy cream cheese is one of those combinations that surprises people. If you enjoy layering bold flavors in desserts, our Chocolate Fudge Cake uses the same contrast principle — bitter cocoa against sweet frosting — and it works for the same reason.
Mini Cheesecakes: Line a muffin tin with cupcake liners. Press 1 tbsp crust mixture into each. Fill ¾ full with batter. Bake at 325°F for 20–22 minutes using the same steam method. Makes 24 individual portions — good for parties where slicing gets messy. Similar bite-sized approach to what we did with our No-Bake Tiramisu Cups — individual portions always make serving easier.
Serving Ideas
Plain and cold is the classic way — and honestly still the best. A perfectly smooth top, a clean slice, a fork. Nothing else needed.
For dinner parties, serve alongside our Red Velvet Cake if you want a dramatic two-dessert spread — the crimson and white cake next to the cream-colored cheesecake looks stunning on a table.
For toppings, salted caramel drizzle and lemon curd are both excellent. Let guests choose tableside — it makes the dessert feel interactive and gives people who want it plain that option too.
Drinks that work well: cold brew coffee, espresso, dry Riesling. Each one cuts through the fat of the cream cheese differently — all three work beautifully.
Storage & Make-Ahead Guide
Refrigerator: Up to 5 days tightly covered. Flavor peaks at 24–48 hours. Always serve cold — room temperature cheesecake softens and becomes harder to slice cleanly.
Freezer — slices: Wrap individual slices in plastic wrap and foil. Freeze up to 2 months. Thaw overnight in the fridge — not at room temperature, which causes uneven softening.
Freezer — whole cheesecake: Freeze uncovered 2 hours until surface is firm, then wrap tightly. Freeze up to 2 months. Thaw overnight in the refrigerator.
Make-ahead timeline:
- 2 days before: Bake, cool, refrigerate (no topping yet)
- Day before: Add sour cream topping, re-cover, refrigerate
- Day of: Slice with hot knife before serving, add any fresh toppings
Would I Make This Again?
Yes. Without question.
It’s the recipe I come back to more than any other dessert. Not because it’s easy — it isn’t, really. It takes patience, attention to temperature, and a willingness to trust the wobble test even when your instinct says it needs more time.
But the result, when you get it right — and if you follow these steps, you probably will — is the kind of dessert that genuinely silences a table. That dense, rich, tangy-creamy slice is just hard to argue with.
Difficulty: 6/10 Time: 3 hours active + overnight chill Wow factor: High Would I make it again: Already planning the next one
Perfect New York Cheesecake (No-Crack Steam Hack!)
Ingredients
Equipment
Method
- Take cream cheese, sour cream, heavy cream, and eggs out of the fridge at least 1 hour before starting. Room temperature ingredients are essential — cold cream cheese creates lumps that require overmixing to fix, which adds air, which causes cracks.

- Preheat oven to 325°F (165°C). Pulse graham crackers in a food processor to fine, even crumbs. Mix with sugar, melted butter, and salt until the mixture clumps when pressed.
- Press firmly into the bottom of the springform pan and about 1 inch up the sides. Use the flat bottom of a measuring cup to compact evenly. Bake 8 minutes. Remove and cool completely before adding filling.
- Place an empty metal baking pan on the lowest oven rack. This is where you will pour boiling water just before putting the cheesecake in. Do not use glass — it can shatter from sudden heat.
- Beat room temperature cream cheese in a stand mixer on MEDIUM speed for 2 minutes until completely smooth and lump-free. Add sugar and cornstarch, beat 1 minute on medium. Scrape down the sides of the bowl.
- Add sour cream, heavy cream, vanilla bean paste, and lemon zest. Mix on LOW speed until just combined — about 20 seconds. Scrape the bowl again.
- Add eggs one at a time on LOW speed, mixing only until each egg disappears before adding the next. Add egg yolk last. Stop the mixer the moment it is incorporated. Do not mix further.
- Tap the bowl firmly on the counter 20 times to pop surface air bubbles. Let sit 5 minutes, then tap 10 more times.

- Pour filling over the cooled crust. Smooth the top gently with an offset spatula. Tap the pan 5 times on the counter to settle any remaining bubbles.
- Boil a full kettle of water. Place cheesecake on the CENTER oven rack. Immediately pour 2 cups of boiling water into the empty metal pan on the LOWER rack. Close the oven door quickly.
- Bake at 325°F (165°C) for 55–65 minutes. The cheesecake is done when the outer 2 inches are completely set and still, and the center 3 inches wobble gently as one mass when you nudge the pan — like set Jell-O. Start checking at 55 minutes. If your oven runs hot, start checking at 50 minutes.
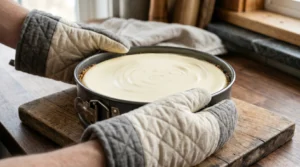
- Turn off the oven. Crack the door open about 1 inch — prop with a wooden spoon. Leave the cheesecake inside for exactly 1 hour. Do not open wider or move the cheesecake during this time.
- Remove from oven. Immediately run a thin knife all the way around the inside edge of the pan. Let cool completely at room temperature — about 1 more hour.
- Mix sour cream, powdered sugar, and vanilla extract until smooth. Spread in a thin, even layer over the completely cooled cheesecake.
- Cover loosely with plastic wrap. Refrigerate for a minimum of 8 hours — overnight is best, 2 days gives peak flavor and texture.
- Run a knife around the edge one more time. Release and remove the springform sides. Slice with a sharp knife dipped in hot water and wiped completely dry between every cut. Serve cold, directly from the refrigerator.
Notes
NOTES
- Block cream cheese only — not tub. Tub or spreadable cream cheese has more water and stabilizers. It produces a softer filling that won’t hold its shape when sliced. Four full 8-oz blocks of full-fat Philadelphia brand cream cheese is the standard for a reason.
- Why cornstarch? Cornstarch stabilizes the egg proteins in the filling, keeping them flexible during baking instead of contracting and cracking. Do not substitute with flour 1:1 — cornstarch has twice the thickening power. If using flour, use 5 tablespoons instead of 3.
- Room temperature is non-negotiable. Cold cream cheese creates lumps. Lumps mean more mixing. More mixing means more air. More air means more cracks. One hour minimum out of the fridge.
- The jiggle test. The center should wobble gently as ONE mass — not slosh like liquid (underdone) and not be completely rigid (overbaked). This is the most reliable doneness indicator for cheesecake.
- Oven variation. If your oven runs hot, reduce temperature to 310°F (155°C) and add 5–8 minutes to baking time. An oven thermometer is the best $10 investment for cheesecake baking.
- Steam hack — metal pan only. Glass pans can shatter when you pour boiling water into them in a hot oven. Use aluminum or steel.
- Edge browning is normal. The top edge may brown slightly during baking. The sour cream topping covers this completely. Do not open the oven to check on it — the temperature drop can cause cracking.
- No buttermilk? This recipe does not use buttermilk — the sour cream provides the tangy flavor and some acidity. No substitution needed.
- Gluten-free crust: Replace graham cracker crumbs with 2 cups almond flour mixed with 3 tbsp melted butter, 2 tbsp sugar, and a pinch of salt. Press and bake exactly the same way.
- Keto version: Use the almond flour crust above and replace granulated sugar in the filling with 1 cup powdered erythritol or monk fruit sweetener.
- UK/Australia notes: “Graham crackers” = digestive biscuits (reduce butter slightly). “Heavy whipping cream” = double cream. “Powdered sugar” = icing sugar. “Sour cream” = same in most regions; crème fraîche works as a substitute.
- Storage — Refrigerator: Up to 5 days tightly covered. Best at 24–48 hours. Always serve cold. Freezer (slices): Wrap individually in plastic wrap and foil, freeze up to 2 months. Thaw overnight in fridge. Freezer (whole): Freeze uncovered 2 hours until firm, wrap tightly, freeze up to 2 months.
- Make-ahead: Bake 2 days ahead, refrigerate without topping. Add sour cream topping the day before serving. Slice and garnish day of.
- Nutrition values are estimates. Use a nutrition calculator with your exact brands for precise figures.
NUTRITION
(Per 1 slice — based on 14 slices, with sour cream topping)
| Nutrient | Amount |
|---|---|
| Calories | ~490 kcal |
| Total Fat | 35g |
| Saturated Fat | 20g |
| Cholesterol | 165mg |
| Sodium | 340mg |
| Total Carbs | 36g |
| Sugars | 28g |
| Fiber | 0g |
| Protein | 9g |
Note: Values are estimates based on standard ingredient brands. Actual values vary based on exact cream cheese brand, slice size, and whether optional ingredients are included. Use a nutrition calculator with your exact brands for precise figures.
Frequently Asked Questions
Why did my New York Cheesecake crack?
Usually one of five things: overmixing (too much air), skipping the cornstarch, overbaking past the wobble stage, cooling too quickly, or water bath leakage. This recipe addresses all five — but if your oven runs hot or you mixed slightly longer than intended, a small crack can still happen. The sour cream topping covers minor surface imperfections beautifully.
Do I really not need a water bath?
Not with this method. The pan of boiling water on the lower rack creates a humid oven environment without any contact with your springform pan. In most cases this works just as well — and removes the risk of foil leaking into your crust entirely.
How do I know when my cheesecake is done?
The jiggle test. Nudge the pan — the outer 2 inches should be completely still while the center 3 inches wobble gently as one unified mass. If the whole surface sloshes, needs more time. If nothing moves at all, it’s overbaked. Start checking at 55 minutes.
Can I make this gluten-free?
Yes — use the almond flour crust in the Variations section. The filling itself is naturally gluten-free when you use cornstarch (not flour) as the stabilizer.
How long does New York Cheesecake last?
Up to 5 days refrigerated, tightly covered. Best at 24–48 hours. Freeze individual slices for up to 2 months if you won’t finish it in time.
Can I use low-fat cream cheese?
It won’t give the same result. Low-fat cream cheese has more water and fewer fats — the filling comes out softer, less dense, and more prone to cracking. Full-fat block cream cheese is worth using for a dessert that takes this much time and effort.
What is the difference between New York Cheesecake and regular cheesecake?
Regular cheesecake is lighter and often made with ricotta or mascarpone — more delicate, less dense. New York Cheesecake uses exclusively cream cheese — more of it — plus sour cream and heavy cream for that signature thick, tangy richness. It’s taller, denser, and holds its shape completely when sliced.
Can I make mini cheesecakes with this recipe?
Yes — cupcake liners in a muffin tin, 1 tbsp crust pressed into each, fill ¾ full, bake at 325°F for 20–22 minutes. Same steam method applies. Makes about 24 individual portions.
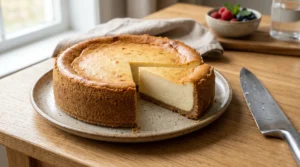
The Dessert That Ends Every Dinner in Silence
There’s something about a perfect New York Cheesecake on a table. It doesn’t need to be dramatic — no layers, no frosting, no presentation trick. Just that smooth cream-colored surface, those clean slices that hold their shape, that first bite of dense, tangy, rich filling.
Most people stop talking for a second. That’s the tell.
If you follow these steps — especially the steam hack, the room temperature ingredients, and the overnight chill — you’ll get there in most cases. Your oven might need a small timing adjustment. Your first attempt might have a small crack that the sour cream topping covers perfectly. That’s fine. The second one will be smoother.
Make it this weekend. Refrigerate it overnight. And when you pull it out Saturday morning and take that first cold slice — you’ll understand why this dessert has been on New York restaurant menus for over a century.
Tag us on Instagram @viralfoodhacks706 when yours is done — I want to see that top! Save this to Pinterest for the next time someone asks you to bring dessert.