

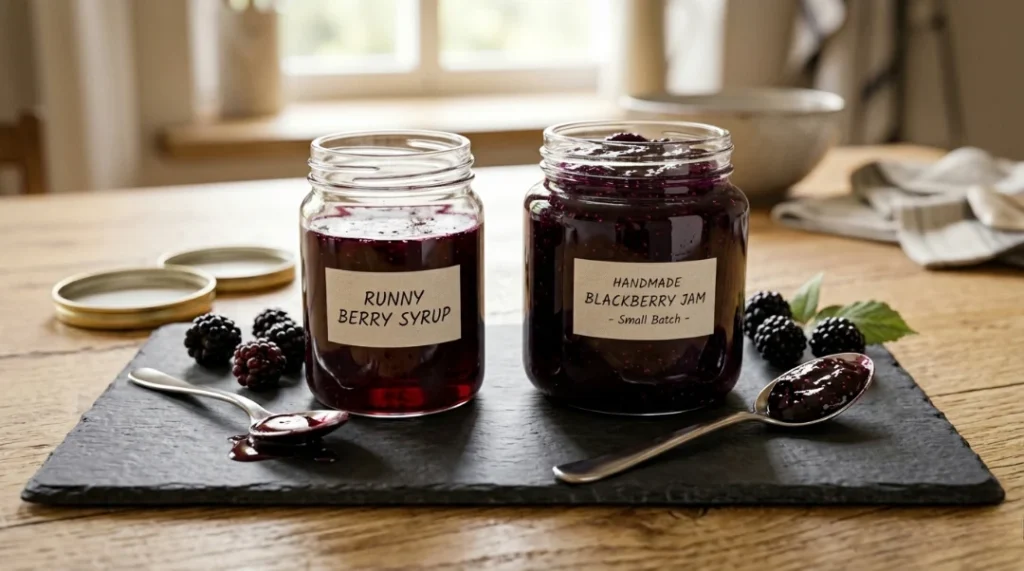
I picked nearly ten pounds of blackberries off a roadside bramble one August and turned them into what I was sure would be jam. It was syrup. Beautiful, deep purple, intensely flavored syrup that never thickened past the consistency of pancake topping, even after an extra twenty minutes on the stove.
I assumed I needed store-bought pectin. I bought a box. The second batch set, but it tasted oddly sweet and somehow less like blackberries than the syrup version had.
The actual problem was never the fruit and never the pectin. It was that I had no idea what temperature my jam was actually reaching, and I had no real understanding of why temperature even mattered. Blackberries are naturally one of the highest pectin fruits that exist. The pectin was always there. What was missing was hitting 220°F precisely, the exact point where enough water evaporates for that natural pectin to lock into a gel.
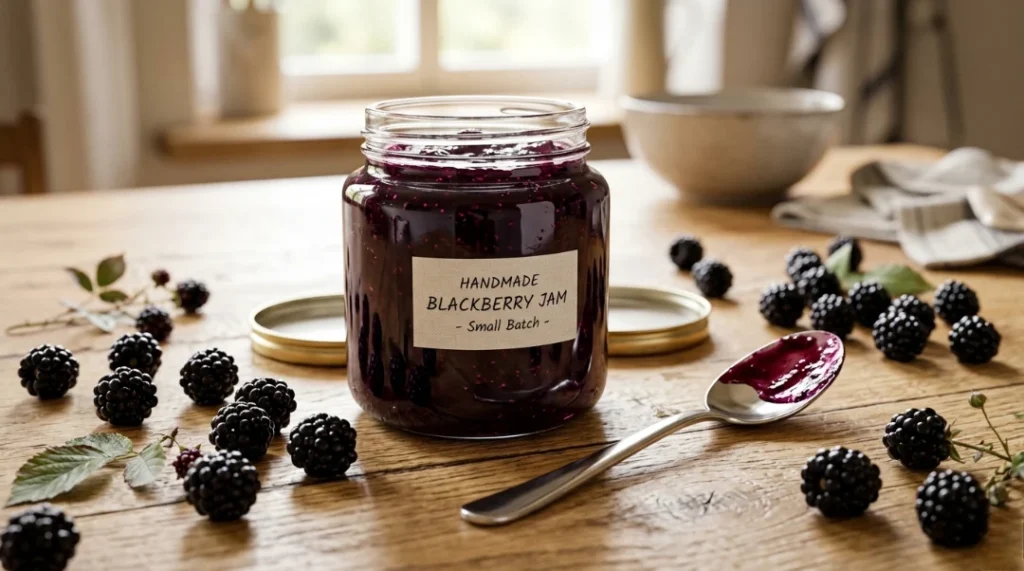
This Blackberry Jam Recipe is built around understanding that one number, plus a simple cold plate test that tells you exactly when you have hit it. No added pectin needed. No guesswork either.
Let’s make a batch that actually sets.
Why This Is the Best Blackberry Jam Recipe
No added pectin, and a real explanation of why that works. Blackberries are exceptionally high in natural pectin already. This recipe explains the actual chemistry behind getting that pectin to set reliably instead of just promising it will work.
The wrinkle test replaces guesswork entirely. Instead of hoping your jam looks “thick enough,” this recipe gives you a precise physical test using a chilled plate that tells you definitively whether your jam has reached gel point.
Seedless and silky, with three removal methods compared. Most recipes pick one method and move on. This one compares a food mill, a fine mesh strainer, and cheesecloth so you can choose based on what equipment you actually own.
A real fix for runny jam, not just “cook it longer.” If your jam has failed before, this recipe explains the three actual causes and gives you a specific recovery method for a batch that already cooled thin.
Canning safety covered properly. Whether you are making a small fridge batch or canning for the pantry, this guide gives you the real safety guidance, not a vague mention.
A Quick History – Where Blackberry Jam Comes From
Blackberries are technically not true berries at all. Botanically, a blackberry is an aggregate of drupelets, dozens of tiny individual fruits fused together from a single flower, each one clinging to a juicy white core at the center. Blackberries are native chiefly to the north temperate regions of the world and are particularly abundant in eastern North America, where wild brambles have spread along roadsides, fence lines, and forest edges for centuries.
Preserving the late summer blackberry harvest into jam has been a practical necessity for as long as the fruit has been gathered. A short, intense ripening window meant that turning baskets of berries into shelf-stable jam was the only way to enjoy that flavor outside of a few weeks each August. For more on the botany behind this fruit, Britannica’s full entry on the blackberry plant covers its structure and history in detail.
The Science: Why Blackberry Jam Sets (or Doesn’t)
This is the section that explains exactly what is happening inside the pot, so you understand the recipe instead of just following it.
Pectin is already there. Heat and time activate it. Pectin is a polysaccharide naturally present in the cell walls of fruit, made of long chains of D-galacturonic acid units. Blackberries rank among the highest pectin fruits available, which is exactly why this recipe needs no added commercial pectin at all. The carboxyl groups along the pectin chain carry methoxyl groups (-OCH3), and the proportion of these methoxyl groups determines whether a pectin is classified as high-methoxyl or low-methoxyl. Blackberries contain primarily high-methoxyl pectin, which gels through hydrogen bonding and hydrophobic interactions once the right combination of sugar concentration and acidity is reached, typically requiring around 55 percent or more soluble solids and a pH between 3.0 and 3.3.
Sugar isn’t just sweetness. It’s the mechanism that lets pectin bond. As the jam boils, sugar dissolves into the fruit juice and begins pulling free water molecules away from the pectin chains. This matters because pectin chains in a watery solution stay spread apart, surrounded by water and unable to interact with each other. As sugar concentration rises and water becomes scarcer, the pectin chains are forced closer together. At that closer proximity, hydrophobic interactions and hydrogen bonds begin forming between adjacent chains, creating the interconnected three-dimensional network that traps the remaining water and sugar inside it. That trapped network is what you experience as a “set” jam rather than a thin syrup.
Lemon juice isn’t a flavor add-in. It’s the pH controller. Pectin’s carboxyl groups carry a negative charge in neutral or alkaline conditions, and that negative charge causes pectin chains to repel each other rather than bond, which is exactly why an under-acidified jam stays thin no matter how much sugar you add. Lemon juice’s citric acid lowers the pH into the narrow window, roughly 3.0 to 3.3, where high-methoxyl pectin actually gels. Push the pH too high (above 3.5) and the pectin molecules continue repelling each other, staying liquid indefinitely. Push it too low (below 3.0) and the jam can set too fast or weep liquid later in storage. The lemon juice in this recipe exists specifically to land in that narrow, correct range.
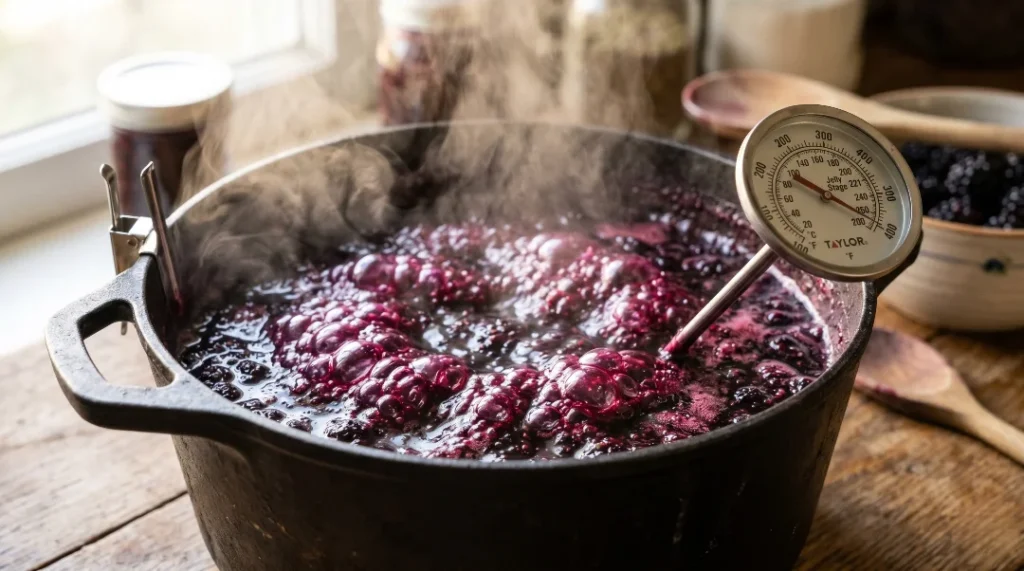
The 220°F gel point is a measurement of water loss, not a magic number. As your jam boils, water continuously evaporates from the pot. The boiling point of a sugar solution rises as its water content drops and its sugar concentration increases, which is why properly concentrated jam boils at a higher temperature (220°F at sea level) than plain water (212°F). Reaching 220°F is essentially a reliable proxy for “the water has reduced enough that the remaining sugar, acid, and pectin concentration is correct for gelling.” This is also why altitude matters. At higher elevations, water boils at a lower temperature, so the correct gel point temperature must be adjusted downward (roughly 2°F lower for every 1,000 feet of elevation) to represent that same true water concentration.
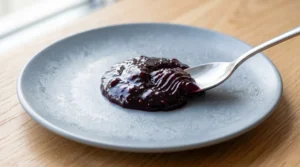
The wrinkle test physically checks whether the gel network has formed. Spoon a small amount of hot jam onto a plate that has been chilled in the freezer. As it cools rapidly on the cold surface, the pectin network either locks into a gel (if conditions were correct) or stays loose and runny (if not). Push the cooled jam gently with your fingertip. If the surface wrinkles and resists rather than sliding smoothly, the pectin has successfully formed its gel network and your jam is ready. If it slides around the plate without resistance, the chains have not yet bonded sufficiently and more cooking time is needed.
Why jam can still turn out runny even at the right temperature. Three real, often overlooked causes. First, very ripe or overripe blackberries contain less pectin than berries that are slightly underripe, since pectin actually converts to soluble form and breaks down as fruit ripens past peak. A mix that includes a few firmer, less-ripe berries genuinely sets better. Second, a thermometer that is not properly calibrated can read 220°F while your actual jam is several degrees off, since cheap probe thermometers can drift over time. Third, humidity and altitude both affect the true boiling point of water at your specific location and on that specific day, meaning 220°F at sea level on a dry day is not the same true concentration as 220°F in a humid kitchen at elevation. This is exactly why the wrinkle test as a physical check matters more than the number on the thermometer alone.
For complete, science-backed canning guidelines for blackberry jam including safe processing times, the National Center for Home Food Preservation at the University of Georgia is the most authoritative resource available for home canners.
Seed Removal Methods Compared
Blackberry seeds are notably larger and harder than raspberry seeds, and many people find them genuinely unpleasant in a finished jam. Here is how the three common removal methods actually compare.
| Method | Texture Result | Speed | Best For |
|---|---|---|---|
| Food mill | Smoothest, removes nearly all seed fragments | Fastest for large batches | Anyone making jam regularly |
| Fine mesh strainer | Very good, occasional tiny seed fragments pass through | Moderate, requires pressing with a spoon | Most home cooks, no special equipment needed |
| Cheesecloth/jelly bag | Completely seedless, produces jelly-like clarity | Slowest, requires patience for full drainage | Those wanting a true clear jelly rather than jam texture |
My recommendation: A fine mesh strainer is the best balance of effort and result for most home kitchens. A food mill is worth owning if you can berries every summer.
What You Need
For the Blackberry Jam
- 6 cups (about 2 lbs) fresh or frozen blackberries, rinsed (thaw first if frozen)
- 1½ cups (300g) granulated sugar (adjust slightly based on berry sweetness)
- 3 tbsp fresh lemon juice (bottled works but fresh is preferred for full acid strength)
- Pinch of salt (rounds out sweetness, optional)
For Canning (Optional, if storing at room temperature)
- 4 to 5 half-pint (8oz) canning jars with new lids and rings
- Water for the canner
Equipment: Heavy bottomed stockpot, fine mesh strainer or food mill, candy or instant-read thermometer, ladle, chilled plate for testing, water bath canner (if canning for shelf storage) Makes: About 3 cups (24 oz) of jam
How to Make the Best Blackberry Jam Recipe, Step by Step
Prepare the Berries
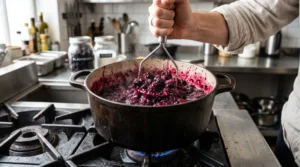
Mash and Cook Down: Place the rinsed blackberries in a heavy bottomed stockpot. Mash them with a potato masher until broken down but not fully pureed. Add the lemon juice now, before any heat, so the acid is evenly distributed through the fruit from the start. Place over medium heat and simmer for 8 to 10 minutes, stirring occasionally, until the berries have fully softened and released their juice.
Remove the Seeds
Strain for a Smooth Texture: Press the cooked berry mixture through a fine mesh strainer set over a large bowl, using the back of a spoon or a rubber spatula to push as much pulp and juice through as possible while leaving the seeds behind. This step is optional if you don’t mind seeds in your finished jam, but most people find blackberry seeds noticeably harder and more bitter than the seeds in other berries.
Add Sugar and Begin the Real Cook
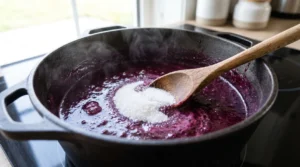
Stir in Sugar Over Low Heat: Return the strained berry puree to the cleaned pot. Add the sugar and salt, stirring over medium-low heat until the sugar fully dissolves into the liquid before increasing the heat. Dissolving the sugar gently first prevents it from scorching on the bottom of the pot once the heat increases.
Boil to the Gel Point
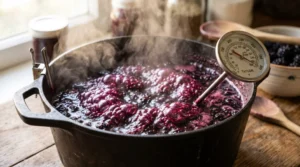
Watch the Thermometer Closely: Increase the heat to medium-high and bring the mixture to a full, rolling boil. Clip a candy thermometer to the side of the pot if possible, or check frequently with an instant-read thermometer. Stir regularly to prevent scorching on the bottom, especially as the mixture thickens and the boiling becomes more vigorous. Cook until the temperature reaches 220°F at sea level, adjusting roughly 2°F lower for every 1,000 feet of elevation if you live at higher altitude.
Confirm With the Wrinkle Test
Check on a Cold Plate: Before pulling the pot off the heat permanently, spoon a small amount of the hot jam onto a plate that has been sitting in the freezer for at least 10 minutes. Let it sit for 60 seconds, then push it gently with your fingertip. If the surface wrinkles and holds its shape rather than sliding smoothly across the plate, your jam has reached gel point and is ready. If it still slides easily, return the pot to the heat for another 2 to 3 minutes and test again.
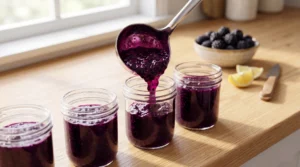
Jar and Cool, or Can for Storage
For Fridge Storage: Remove the pot from heat. Let the jam cool for 5 minutes, then ladle into clean jars, leaving about ¼ inch of space at the top. Let cool completely at room temperature before sealing and refrigerating.
For Shelf-Stable Canning: Ladle the hot jam into sterilized half-pint jars, leaving ¼ inch headspace. Wipe the rims clean, apply lids and rings, and process in a boiling water bath canner for 10 minutes, adjusting the time upward for higher elevations according to USDA guidelines. Always verify current safe processing times through the National Center for Home Food Preservation before canning for room temperature storage.
J.ZaiB’s Expert Touch
Mix in a few slightly underripe berries on purpose. This sounds backward, but it genuinely works. Pectin content is highest just before a berry reaches full ripeness and actually decreases as the fruit becomes very soft and sweet. A handful of firmer, slightly less ripe berries mixed into an otherwise ripe batch noticeably improves your odds of a clean set without changing the final flavor much at all.
Calibrate your thermometer before you trust it. Drop your candy or instant-read thermometer into a pot of plain boiling water at sea level. It should read 212°F exactly. If it reads even two or three degrees off, account for that difference when you check for the 220°F gel point during your actual cook. This single five-minute check has saved me from more than one runny batch since I started doing it.
Salt is doing real work, not just rounding out flavor. A small pinch of salt does not make jam taste salty. It actually suppresses the perception of bitterness from the berry skins while making the natural sweetness and tartness both taste brighter and more defined. Leave it out and the jam tastes slightly flatter, even if you cannot immediately identify why.
If a batch cools runny, you can absolutely fix it. Pour the cooled jam back into the pot and bring it back to a full boil. Add an additional tablespoon of lemon juice if the original batch was light on acid, then continue cooking and retesting with the wrinkle test every few minutes until it passes. A failed batch is almost never wasted. It is simply undercooked and can be recooked successfully.
Stir constantly in the final five minutes before gel point. The mixture thickens dramatically right before it reaches 220°F, and that thickened sugar syrup scorches on the bottom of the pot far more easily than the thinner mixture did earlier in cooking. A scorched batch tastes bitter and cannot be fixed by recooking, so this is the moment to stay at the stove rather than walking away.
Variations to Try
Blackberry Lemon Jam: Add the zest of one lemon along with the juice for a brighter, more aromatic version. The citrus oils in the zest add a dimension that juice alone does not provide, similar to the zest technique used in our Homemade Lemonade Recipe.
Spiced Blackberry Jam: Add ½ teaspoon of ground cinnamon and a pinch of ground cloves during the sugar stage for a warm, slightly spiced jam that works beautifully on toast through the cooler months.
Blackberry Vanilla Jam: Split one vanilla bean and scrape the seeds into the pot along with the sugar, or stir in 1 teaspoon of pure vanilla extract once the jam has finished cooking and cooled slightly. A subtle, genuinely lovely addition.
Mixed Berry Jam: Replace up to half the blackberries with raspberries or blueberries. Since blackberries carry such high natural pectin, this blend can still set without added pectin, though the wrinkle test becomes even more important to confirm doneness with the altered fruit ratio.
Low-Sugar Blackberry Jam: Reducing sugar significantly in a recipe that relies on natural high-methoxyl pectin will compromise the set, since that pectin specifically requires high sugar content to gel. For a genuinely lower sugar version, use a low-methoxyl pectin product designed for reduced sugar recipes, which gels using calcium rather than sugar concentration.
Serving Ideas
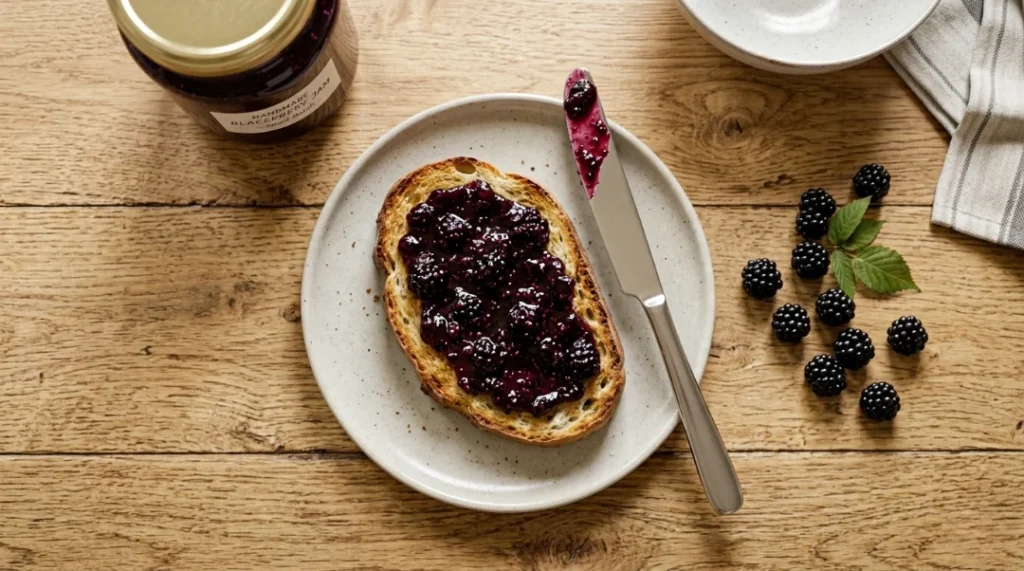
Classic breakfast spread: Warm buttered toast with a generous spoonful of jam is the simplest and arguably best way to taste this jam properly. Try it spread over our Fluffy Pancake Recipe in place of syrup for an entirely different breakfast experience.
Pastry filling: A spoonful swirled into the center of our Kouign Amann before the final bake adds a fruity contrast to the buttery, caramelized layers.
Cheese board addition: A small dish of this jam alongside sharp cheddar or creamy brie on a cheese board brings a sweet-tart element that pairs beautifully with both.
Dessert pairing: Spoon slightly warmed jam over vanilla ice cream, or use it as a filling between layers of a simple cake in place of standard fruit filling.
Storage Guide
Refrigerator (unprocessed): Jam that has not been water bath canned will keep refrigerated in a sealed jar for up to 3 weeks.
Freezer: Leave at least ½ inch of headspace in freezer-safe containers to allow for expansion, and freeze for up to 1 year. Thaw in the refrigerator before use.
Shelf-stable canned jars: Properly processed in a boiling water bath following current USDA guidelines, sealed jars will keep in a cool, dark pantry for up to 1 year. Once opened, refrigerate and use within 3 weeks.
Checking the seal: After canning, confirm each lid has sealed properly by pressing the center. It should not flex or pop. Any jar that did not seal correctly should be refrigerated and used within a few weeks rather than stored at room temperature.
Best Blackberry Jam Recipe (No Pectin)
Ingredients
Equipment
Method
- Mash and Cook Down: Place the rinsed blackberries in a heavy bottomed stockpot. Mash with a potato masher until broken down but not fully pureed. Add the lemon juice now, before any heat, so the acid distributes evenly through the fruit from the start. Place over medium heat and simmer for 8 to 10 minutes, stirring occasionally, until the berries fully soften and release their juice.

- Strain for a Smooth Texture: Press the cooked mixture through a fine mesh strainer set over a large bowl, using the back of a spoon to push pulp and juice through while leaving the seeds behind. This step is optional if seeds don't bother you, but most people find blackberry seeds noticeably harder and slightly bitter compared to other berries.

- Dissolve the Sugar Gently First: Return the strained puree to the cleaned pot. Add the sugar and salt, stirring over medium-low heat until the sugar fully dissolves before increasing the heat. This prevents scorching once the mixture starts boiling harder.
- Watch the Thermometer Closely: Increase the heat to medium-high and bring to a full, rolling boil. Clip a candy thermometer to the pot, or check frequently with an instant-read thermometer. Stir regularly to prevent scorching, especially as the mixture thickens. Cook until the temperature reaches 220°F at sea level, adjusting about 2°F lower for every 1,000 feet of elevation.
- Check on a Cold Plate: Spoon a small amount of hot jam onto a plate that has been chilled in the freezer for at least 10 minutes. Let it sit for 60 seconds, then push it gently with your fingertip. If the surface wrinkles and holds rather than sliding smoothly, the jam has reached gel point. If it still slides easily, return to the heat for another 2 to 3 minutes and test again.
- For Fridge Storage: Remove from heat and let cool 5 minutes. Ladle into clean jars, leaving about ¼ inch of space at the top. Cool completely at room temperature before sealing and refrigerating.
- For Shelf-Stable Canning: Ladle the hot jam into sterilized half-pint jars, leaving ¼ inch headspace. Wipe rims clean, apply lids and rings, and process in a boiling water bath for 10 minutes, adjusting time upward for higher elevation per current USDA guidelines.
Notes
- Why no added pectin is needed: Blackberries are naturally among the highest pectin fruits, and the correct sugar and acid ratio at the right temperature is enough to form a full gel network without any commercial pectin product.
- Calibrate your thermometer first. Test it in plain boiling water, which should read exactly 212°F at sea level. Adjust your target gel point reading accordingly if your thermometer reads even slightly off.
- The wrinkle test matters more than the number. Temperature is a helpful guide, but the physical wrinkle test on a chilled plate is the true confirmation that the pectin network has actually formed.
- Slightly underripe berries set better. Pectin content peaks just before full ripeness and decreases as fruit becomes very soft. Mixing in a few firmer berries with your ripe ones genuinely improves the set.
- Fixing a runny batch: Pour the cooled jam back into the pot, bring back to a full boil, add an extra tablespoon of lemon juice if needed, and continue cooking while retesting with the wrinkle test every few minutes.
- Stir constantly near the end. The mixture thickens significantly just before reaching gel point and scorches easily on the bottom of the pot at that stage.
- Altitude adjustment: Subtract roughly 2°F from the 220°F target for every 1,000 feet above sea level.
- Storage: Refrigerator up to 3 weeks unprocessed. Freezer up to 1 year with headspace for expansion. Properly water bath canned jars up to 1 year in a cool, dark pantry, then refrigerate after opening and use within 3 weeks.
- UK/Australia notes: “Granulated sugar” works the same internationally. “Candy thermometer” may be labeled a sugar thermometer. Half-pint jars are roughly 250ml jars.
- Nutrition values are estimates and vary based on exact berry sweetness and final yield.
NUTRITION Blackberry Jam Recipe
(Per 1 tablespoon serving)
| Nutrient | Amount |
|---|---|
| Calories | ~35 kcal |
| Total Fat | 0g |
| Saturated Fat | 0g |
| Cholesterol | 0mg |
| Sodium | 5mg |
| Total Carbs | 9g |
| Sugars | 8g |
| Fiber | 1g |
| Protein | 0g |
Note: Values are estimates and vary based on exact sugar quantity used and final batch yield.
Frequently Asked Questions
Why is my blackberry jam runny even though I cooked it to 220°F?
The most common causes are an uncalibrated thermometer reading inaccurately, very overripe berries that naturally contain less pectin, or local humidity and altitude affecting the true boiling point on a given day. Always confirm with the wrinkle test on a chilled plate rather than relying on temperature alone, since the physical test checks the actual gel formation rather than just a number.
Can I make blackberry jam without any pectin at all?
Yes, and this is exactly how this recipe works. Blackberries are naturally among the highest pectin fruits available, so with the correct ratio of sugar and acid and by reaching the proper gel point temperature, no commercial pectin is needed at all.
How do I remove seeds from blackberry jam?
Cook the berries down first, then press the mixture through a fine mesh strainer using the back of a spoon, or use a food mill for faster processing of larger batches. For a completely seedless, clear result, straining the juice through cheesecloth or a jelly bag produces the smoothest texture, though this takes longer and yields slightly less volume.
Can I fix a batch of jam that already cooled and turned out thin?
Yes. Pour the cooled jam back into your pot, bring it back to a full boil, and continue cooking while checking the wrinkle test every few minutes. If the original batch seemed low on acidity, add an extra tablespoon of lemon juice before recooking. A runny batch is undercooked, not ruined.
Do I need a candy thermometer to make blackberry jam?
A thermometer makes hitting the gel point far more reliable, but it is not strictly required if you rely entirely on the wrinkle test for confirmation. For the most consistent results, use both together, checking temperature as a general guide and confirming with the cold plate test before declaring the jam finished.
Is blackberry jam safe to store at room temperature?
Only if it has been properly processed in a boiling water bath canner using current, tested guidelines, with new lids and the correct processing time for your altitude. Jam that has simply been jarred hot without water bath processing must be refrigerated and treated as a short-term refrigerator preserve, not a shelf-stable product.
Why does my recipe call for lemon juice if blackberries are already tart?
Tartness to the tongue and the precise pH needed for pectin gelling are two different things. Blackberries vary naturally in acidity depending on ripeness and growing conditions, and most batches need the reliable, measured acidity of lemon juice to land in the narrow pH range, roughly 3.0 to 3.3, that high-methoxyl pectin requires to actually form a gel network.
Can I use frozen blackberries instead of fresh?
Yes, frozen blackberries work very well for jam, since the fruit is cooked down regardless. Thaw them fully first and account for the extra liquid they release during thawing, which may mean a slightly longer cooking time to reach the correct gel point.
The Jam That Finally Sets
A great Blackberry Jam Recipe does not need a box of commercial pectin or a leap of faith. It needs an understanding of three things: sugar concentration, the correct acid level, and the precise temperature where natural pectin locks into a gel.
Mash the berries, strain the seeds if you want them gone, watch the thermometer, and trust the wrinkle test over a guess. That combination is the entire difference between three failed batches of syrup and a jar of jam that holds its shape on a spoon exactly the way it should.
Make a batch this weekend while blackberries are in season. Pour a little extra into your morning toast tomorrow. And when you push your finger against that wrinkled, set surface on the cold plate and feel it resist instead of slide, you will understand exactly why that one test matters more than anything else in this recipe.
Tag us on Instagram @viralfoodhacks706 when your jars are filled. I especially love seeing the deep purple color against a white jar lid! Save this to Pinterest for the next blackberry season that deserves jars worth keeping.