

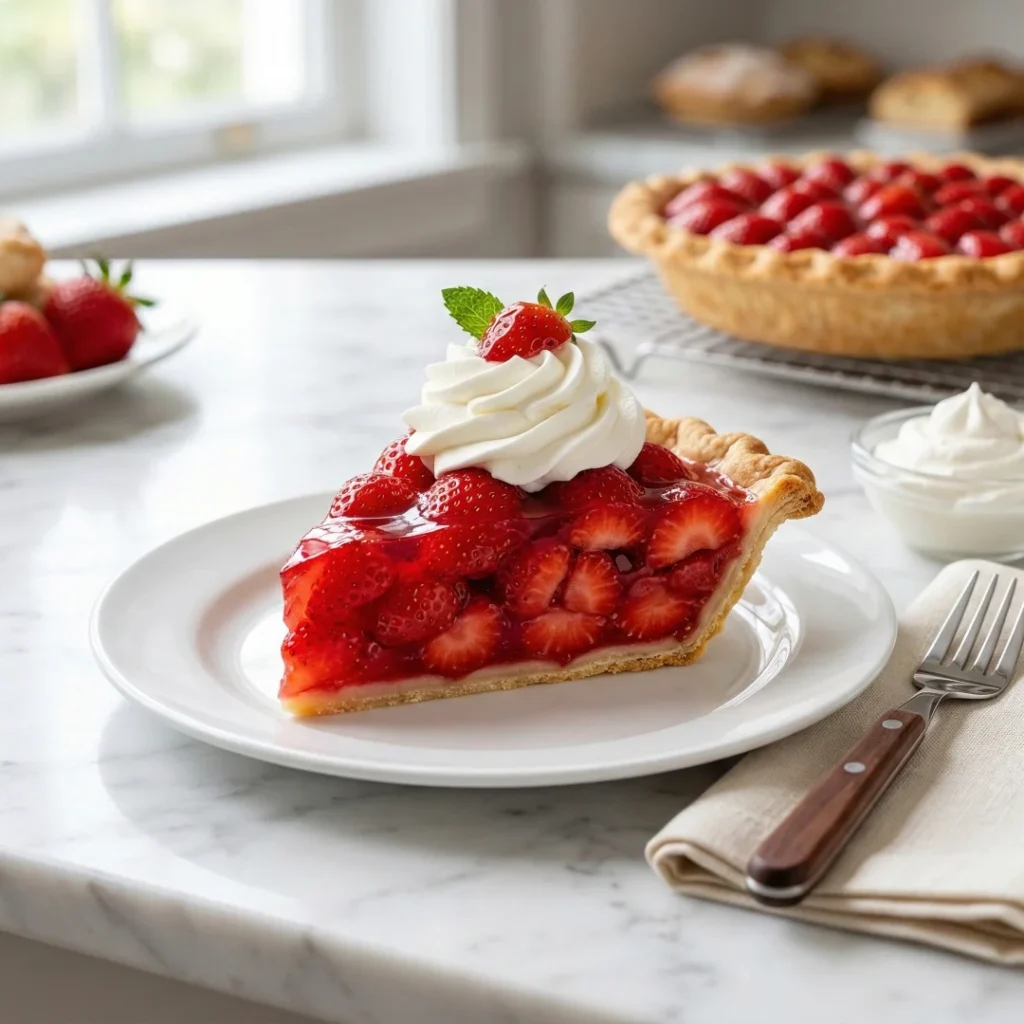
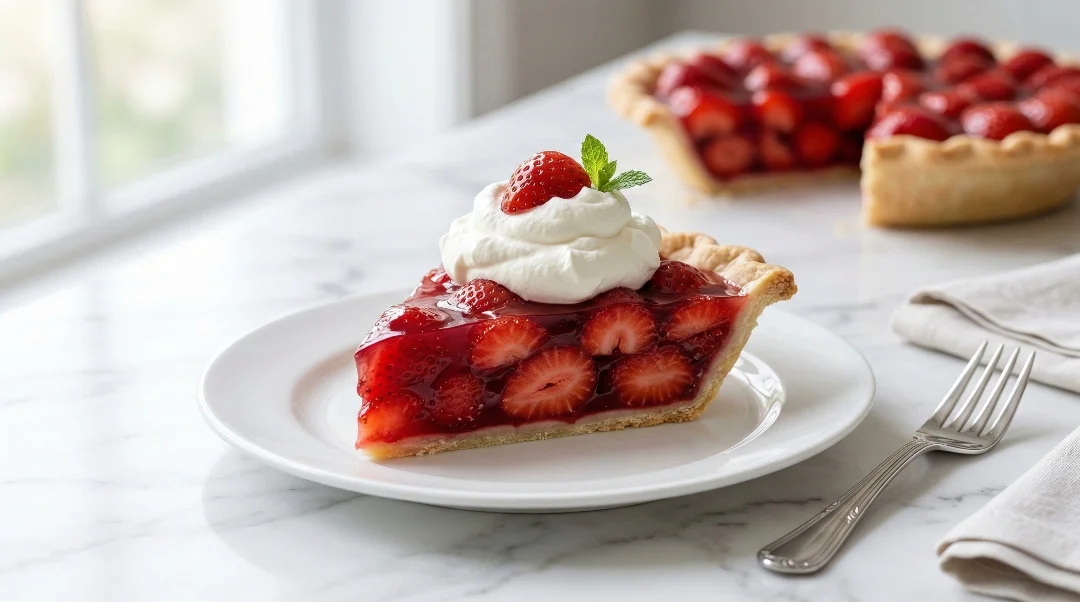
here is nothing quite like the taste of a fresh strawberry pie to bring back the best summer memories. But let me be honest: my first attempt at making one was a complete disaster. I used frozen berries because I didn’t read the recipe properly, and the whole thing turned into a sad, red soup within minutes. The crust was completely soggy, the filling was watery, and I ended up tossing it and just serving my guests plain ice cream instead!
If you have ever sliced into a beautiful pie only to watch it collapse, you are not alone. After testing countless variations in the Viral Food Hacks kitchen to redeem that first failure, I finally found the ultimate secret to a pie that slices perfectly every single time. And the best part? This fresh strawberry pie recipe is made completely from scratch, with absolutely no Jello!(Looking for more baking inspiration? Check out our guide to the 10 + Best Types of Pie you can easily bake at home!)
Why This Fresh Strawberry Pie Recipe Beats the Jello Version
Most old-fashioned strawberry pie recipes rely on a box of store-bought strawberry gelatin (Jello) to hold the berries together. While that is a popular shortcut, it completely changes the soul of the dessert. Here is why we are skipping the Jello today:
- The Taste Difference: Jello has an artificial, candy-like flavor that masks the natural, sweet-tart taste of real strawberries. This recipe uses a homemade glaze made from actual crushed berries, guaranteeing 100% pure fruit flavor in every single bite.
- The Texture: Gelatin creates a bouncy, almost rubbery texture. Our from-scratch cornstarch glaze coats the berries in a thick, rich, and juicy sauce that beautifully melts in your mouth instead of bouncing off your fork.
- It is Actually Easier: You might think making a glaze from scratch is complicated, but it takes exactly 5 minutes on the stove. There is no waiting around for gelatin to “partially set” before mixing!
Fresh vs. Frozen Strawberries (Which to Use?)
When baking fruit pies, we often swap fresh fruit for frozen to save time and money. But for this fresh strawberry pie recipe, the rules are strictly fresh-only
Why Fresh is Mandatory
This pie is essentially a fresh fruit showcase. The bulk of the berries are not baked in the oven; they are simply folded into the warm glaze. Fresh strawberries keep their beautiful shape, vibrant ruby color, and firm, satisfying bite.
The Problem with Frozen Berries
Never use frozen strawberries for a no-bake pie filling! When frozen berries thaw, their cell structure breaks down, and they release a massive amount of excess water. If you use them here, your pie will turn into a watery, mushy disaster, and your carefully baked crust will instantly become soggy. Save the frozen berries for smoothies!
How to Pick the Perfect Strawberries
Since the berries are the star of the show, quality matters. Look for medium-sized berries that are bright red all the way up to the stem. If they have large white or green “shoulders” at the top, they were picked too early and will lack flavor. The absolute best time to make this pie is during peak strawberry season when the fruit is naturally sweet, meaning you won’t need to add as much extra sugar.
The Science of a Perfect Pie Filling (No Jello Needed!)
To make a strawberry pie filling that holds its shape without turning rubbery, we have to look at a little baking science.
- Pectin and Cornstarch: Strawberries are naturally low in pectin (the natural compound that helps fruit gel). To fix this, we create a rich, homemade glaze using a portion of mashed strawberries and the perfect ratio of cornstarch.
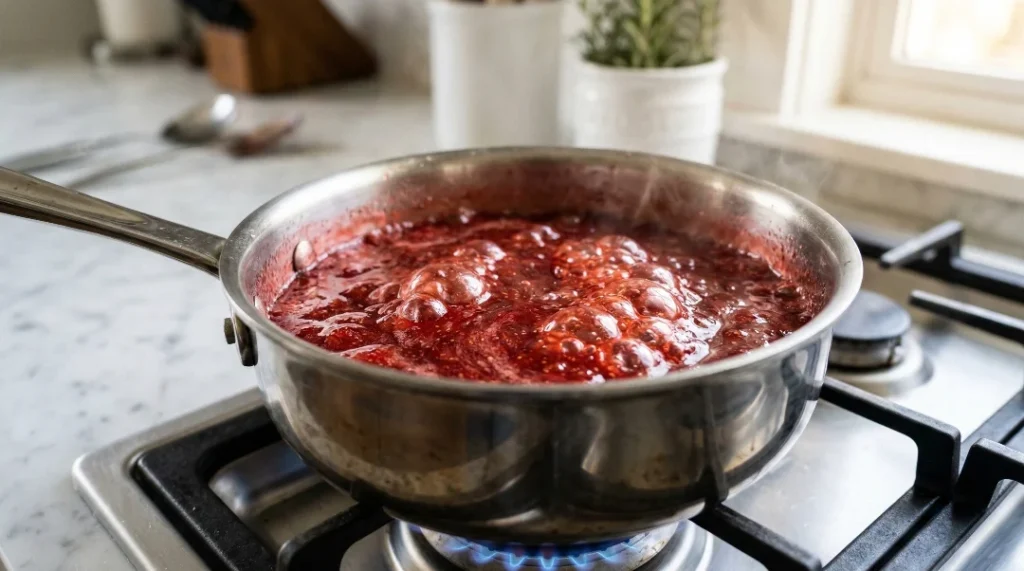
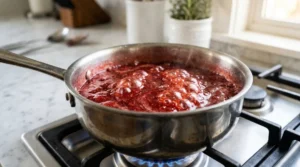
- The Boiling Point: As the baking experts at King Arthur Baking point out, cornstarch only activates and thickens when it reaches a full, rolling boil. Heating our strawberry glaze on the stovetop until it turns thick, glossy, and deep red is the absolute secret to a pie that sets perfectly as it cools. If you don’t let it boil, your pie will be runny!
Tools You’ll Need
You don’t need a fancy bakery setup to make this fresh strawberry pie recipe. Just grab these basics:
- 9-inch Pie Pan: Standard size (glass or ceramic works best).
- Medium Saucepan: For cooking the beautiful strawberry glaze.
- Pie Weights (or dried beans): Essential for blind baking the crust so it doesn’t shrink or puff up in the oven.
Ingredients You Need for Homemade Strawberry Pie

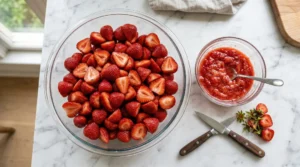
- Fresh Strawberries: About 2 to 2.5 pounds. You will need 1 cup mashed for the glaze and about 4-5 cups of whole or halved berries for the filling.
- Granulated Sugar: To sweeten the tart berries (adjust slightly depending on how sweet your strawberries are).
- Cornstarch: The magic thickener that replaces Jello.
- Fresh Lemon Juice: Brightens the flavor and helps activate the natural pectin in the berries.
- Pie Crust: One 9-inch single pie crust. You can make it from scratch or use a high-quality store-bought dough.
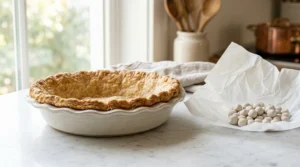
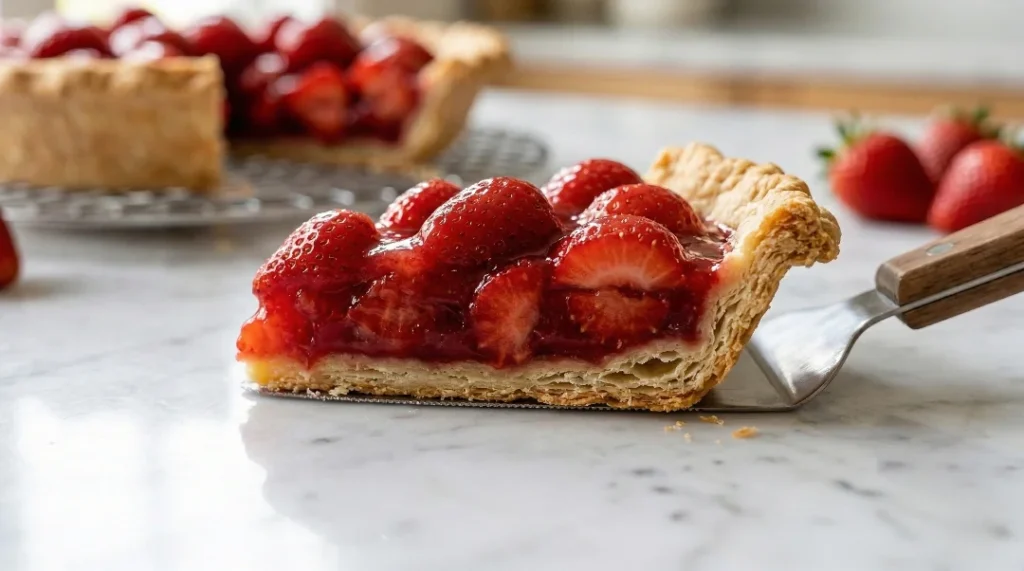
The “No-Soggy-Bottom” Secret: Prepping Your Crust
The biggest complaint with fruit pies is a soft, undercooked crust. The secret to a crisp foundation is Blind Baking.
Since our strawberry filling is cooked on the stove and not in the oven, the pie crust must be fully baked and completely cooled before any fruit touches it. We line the raw crust with parchment paper, fill it with pie weights, and bake it until golden brown. Letting the crust cool entirely creates a sturdy base that won’t turn to mush when the juicy berries are added.
How to Make Strawberry Pie from Scratch (Step-by-Step)
Step 1: Bake and Cool the Crust
Preheat your oven and blind-bake your pie crust until fully golden. Let it sit at room temperature until it is completely cool to the touch.
Step 2: Prep the Berries
Wash your fresh strawberries and dry them thoroughly. Hull the strawberries (remove the green stems). Mash about 1 cup of the less pretty berries for the glaze. Leave the rest whole (if small) or cut them in half.
Step 3: Cook the Glaze
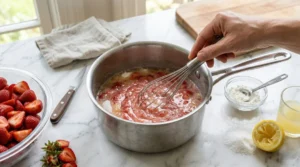
In your saucepan, whisk together the sugar, cornstarch, water, and lemon juice until smooth. Stir in the mashed strawberries. Cook over medium heat, stirring constantly. Once it reaches a rolling boil, let it boil for exactly 1 to 2 minutes until it becomes thick and translucent.
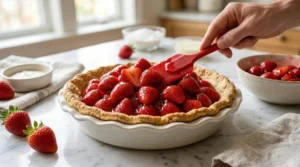
Step 4: Coat the Fresh Berries
Remove the glaze from the heat and let it cool. Place your fresh, dry berries into a large bowl and pour the slightly cooled glaze over them. Gently fold everything together until every single berry is coated in the glossy sauce.

Step 5: The 3-Hour Chill
Pour the glazed berries into your fully cooled pie crust, arranging them so there are no empty gaps. Now, the most important step: place the pie in the refrigerator for at least 3 to 4 hours to completely set.
Pro Tips from J.ZaiB
After making this pie dozens of times (and learning from my early disasters!), here are my non-negotiable rules for the perfect slice:
- The Berry Size Trick: Always use small to medium strawberries, not the massive ones. Large berries often have hollow centers and hidden water pockets that will release liquid and make your filling runny.
- Bone-Dry Berries: After washing your strawberries, dry them thoroughly with a paper towel. Any extra water clinging to the outside of the fruit will thin out your glaze.
- The 5-Minute Cooling Rule: Let your cooked glaze cool for exactly 5 minutes before pouring it over the fresh berries. If the glaze is boiling hot, it will instantly cook the fresh fruit, turning them mushy and ruining that perfect fresh bite.
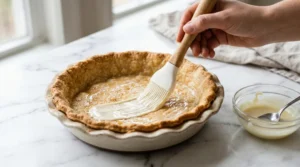
- The White Chocolate Barrier (Game Changer!): Want a 100% waterproof crust? Melt a little bit of white chocolate and brush a thin layer over the bottom of your fully baked and cooled crust. Let it harden before adding the filling.
- The Spoon Trick: To know if your glaze is thick enough, dip a spoon in it. Run your finger down the back of the spoon. If the line stays clean and the glaze doesn’t run into it, it’s ready.
- Make-Ahead Secret: This pie actually tastes better the next day! Letting it sit in the fridge overnight allows the flavors to meld and guarantees the cleanest slice.
Storage & Make-Ahead Tips
Can I Prep Ahead?
Yes! You can fully bake the crust 1-2 days in advance and keep it wrapped at room temperature. You can also make the glaze a day ahead, keep it in the fridge, and just warm it slightly before folding in the fresh berries.
How to Store
Keep your strawberry pie covered loosely with plastic wrap or in an airtight container in the refrigerator. It will stay fresh and delicious for 2 to 3 days.
Freezing (Yes or No?)
Strictly NO. You cannot freeze this fresh strawberry pie. Freezing and thawing will destroy the texture of the fresh strawberries, leaving you with a weeping, soggy mess. Enjoy it fresh!
What to Serve With Strawberry Pie
- The Classics: A generous dollop of homemade whipped cream or a scoop of vanilla bean ice cream is mandatory.
- The Perfect Summer Menu: Hosting a summer party? Serve this pie as a dessert after our famous Honey Glazed Ham and classic BBQ sides.
- Drink Pairings: Wash it down with a refreshing drink from our Beverages Collection, like ice-cold homemade lemonade or sweet iced tea for the ultimate summer vibe.
Best Fresh Strawberry Pie Recipe (Easy & No Jello!)
Ingredients
Equipment
Method
- Blind Bake the Crust Preheat your oven to 400°F (200°C). Line the unbaked pie crust with parchment paper and fill it with pie weights. Bake for 15 minutes. Remove the weights and parchment paper, then bake for another 5-10 minutes until the crust is golden brown. Let it cool completely.

- Waterproof the Crust (Optional) Brush a thin layer of melted white chocolate over the bottom of the fully cooled crust. Let it harden. This creates a barrier so the fruit juice doesn't make the crust soggy.
- Prep the Berries Mash 1 cup of the fresh strawberries in a small bowl. Cut the remaining strawberries in half (or leave them whole if they are small) and place them in a large bowl.
- Mix the Glaze In a medium saucepan, whisk the sugar, cornstarch, water, and fresh lemon juice together until smooth. Stir in the 1 cup of mashed strawberries.
- Cook the Glaze: Cook the mixture over medium heat, stirring constantly so it doesn't burn. Let it come to a full, rolling boil. Boil it for exactly 1 to 2 minutes until the glaze becomes thick, glossy, and deep red.
- Coat the Berries Remove the glaze from the heat and let it cool for exactly 5 minutes. Pour the warm glaze over the large bowl of fresh strawberries. Gently fold everything together until every berry is coated.
- Assemble and Chill: Pour the glazed berries into your cooled pie crust, spreading them evenly so there are no empty gaps. Place the pie in the refrigerator for at least 3 to 4 hours so the glaze can completely set.
- Serve Slice the pie cleanly and serve cold with a dollop of fresh whipped cream or vanilla ice cream.


Notes
- The Waterproof Crust: Do not skip the melted white chocolate layer if you want a 100% guarantee against a soggy bottom. It acts as an invisible, delicious barrier between the juicy berries and the baked crust.
- Cooling the Glaze: Let the boiled glaze cool for exactly 5 minutes before mixing it with the fresh strawberries. If the glaze is boiling hot, it will instantly cook the fresh berries and make them mushy.
- Make-Ahead & Storage: This pie actually tastes even better on the second day! Store it loosely covered in the refrigerator for up to 3 days. Do not freeze this pie, as thawing will ruin the texture of the fresh strawberries.
- Berry Size Trick: Try to use small or medium strawberries. Huge strawberries often contain hollow centers filled with water, which can release liquid and thin out your beautiful glaze.
Frequently Asked Questions (FAQs)
Can I use canned strawberry pie filling?
While you can, it defeats the whole purpose of making this fresh strawberry pie recipe. Canned filling is often overly sweet and lacks the bright, tart flavor of fresh berries.
What pan size should I use?
A standard 9-inch pie dish is perfect. Deep-dish pans will work, but your pie won’t look as full.
How to know when the pie is completely set?
Give the pie pan a gentle jiggle. If the center moves like a liquid, it needs more time in the fridge. It should feel firm and hold its shape.
Can I make mini strawberry tarts instead?
Absolutely! You can divide the crust and filling into mini tart pans. The chilling time will be slightly shorter.
Is there a gluten-free crust option?
Yes! Simply swap the regular pie crust for your favorite gluten-free pastry dough or a gluten-free graham cracker crust. The filling is naturally gluten-free.
Can I add other berries?
Definitely! Mixing in a handful of fresh raspberries or blueberries makes a fantastic mixed berry pie.
Why use lemon juice in the glaze?
The acidity in the lemon juice balances the sugar and helps to extract and activate the natural pectin from the strawberries, aiding in the thickening process.
Final Thoughts & Your Next Bake
This is my go-to fresh strawberry pie recipe, and it proves you really don’t need artificial Jello.
When I remember my first soggy pie, the fix was actually very simple. All it took was a basic cornstarch glaze, a dry crust, and enough time in the fridge. Once you see how neatly this pie slices and taste the real strawberries, you will probably skip the boxed gelatin for good. And the best part? No more emergency ice cream for dessert!
Show Us Your Pies!
Did you try the white chocolate barrier trick? Snap a picture and tag us on Instagram @ViralFoodHacks706. We love seeing your creations! Leave a Comment: Let us know below what your favorite summer pie is, and don’t forget to explore our full Recipe for your next weekend bake!