Ingredients
Equipment
Method
Make the Pie Crust
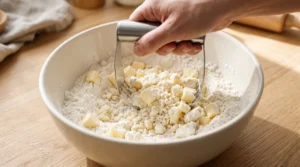
- Cut Cold Butter Into the Flour: In a large bowl, whisk together the flour, sugar, and salt until evenly combined. Add the cold, cubed butter pieces all at once. Using a pastry cutter or two forks, cut the butter into the flour until the mixture looks like coarse breadcrumbs with some pea-sized butter pieces still visible. Those visible butter pieces are what create the flaky layers in the finished crust, so stop before everything looks perfectly uniform.
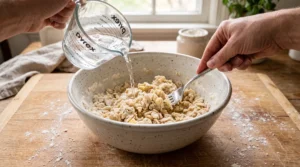
- Add Ice Water and Chill: Add ice water one tablespoon at a time, stirring gently with a fork after each addition. Stop adding water the moment the dough just barely comes together when you press a handful between your fingers. Too much water makes a tough crust. Divide the dough in half, shape each into a flat disc, wrap in plastic wrap, and refrigerate for at least 1 hour.
Make the Filling
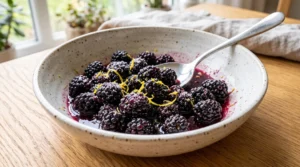
- Toss and Rest: In a large bowl, gently toss the blackberries with the sugar, cornstarch, lemon juice, lemon zest, and cinnamon if using until the berries are evenly coated. Let the mixture sit for 10 minutes while you roll out the crust. The berries will begin releasing juice, which is exactly what you want.
Roll and Line the Pie Dish
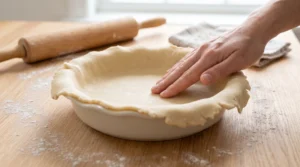
- Work Quickly with Cold Dough: On a lightly floured surface, roll one disc of chilled dough from the center outward into a 12-inch circle, about ⅛ inch thick. Fold in half, then in quarters, transfer to the 9-inch pie dish, and unfold. Press gently into the base and sides, leaving a 1-inch overhang around the edge. Return the lined dish to the refrigerator while you prepare the lattice.
Make and Weave the Lattice
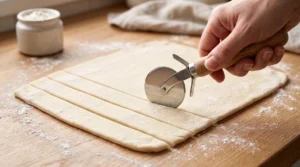
- Cut the Strips: Roll the second dough disc into a 12 by 14-inch rectangle. Cut into strips about 1 inch wide using a pastry wheel or sharp knife. You need 10 to 12 strips total.
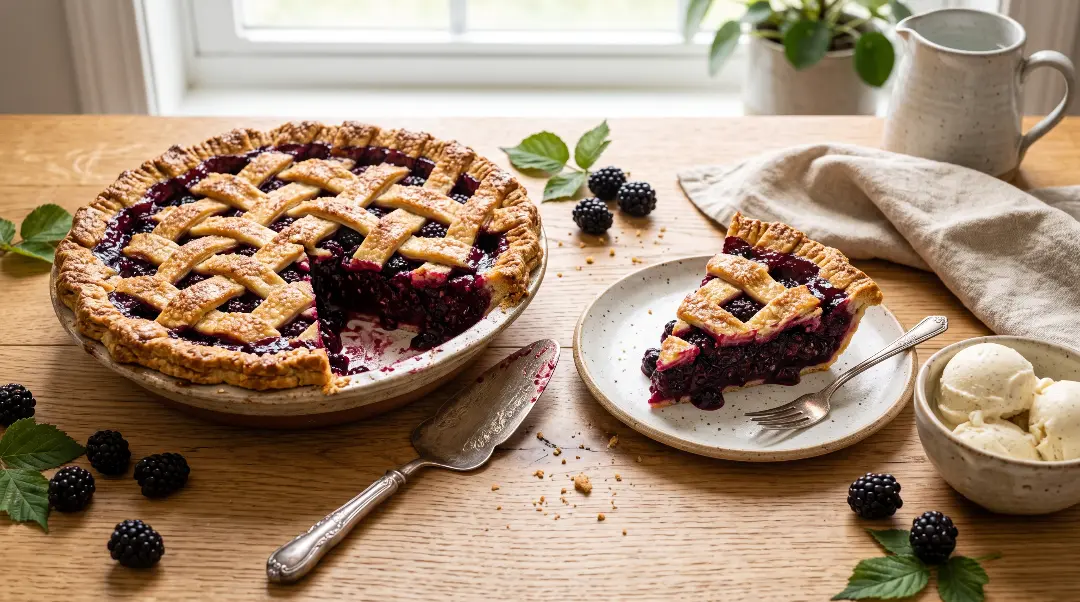
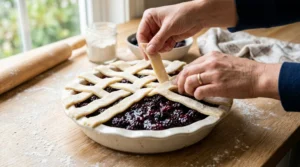
- Weave the Lattice: Pour the blackberry filling into the chilled bottom crust. Dot the small pieces of cold butter evenly over the filling. Lay 5 to 6 strips going in one direction across the filling, spaced evenly. Fold back every other strip halfway toward you. Lay one strip going crosswise, perpendicular to the first set. Unfold the folded strips over the new perpendicular strip. Fold back the strips you did not fold the first time. Lay another perpendicular strip, spaced evenly. Continue this over-under weaving until all strips are used. Trim the edges, fold the bottom crust overhang up over the lattice ends, press to seal, and crimp the entire edge with your fingers or a fork.
Egg Wash and Bake
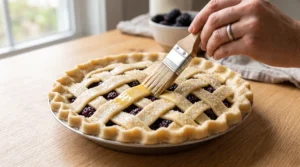
- Brush, Sprinkle, Then Bake: Brush the entire lattice and crimped edge with the beaten egg and milk mixture. Sprinkle coarse sugar evenly over the top. Place the pie on a rimmed baking sheet. Bake at 425°F (220°C) for 20 minutes. Without opening the oven, reduce the temperature to 375°F (190°C) and continue baking for 40 to 50 more minutes, until the crust is deep golden brown and the filling is bubbling actively and visibly in the center of the pie, not just near the edges. If the edges start browning too quickly before the center filling bubbles, place a pie shield or foil strips around the edges and continue baking until the center bubbles.
Cool and Serve
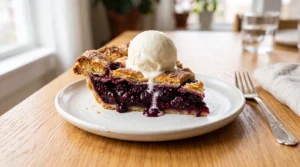
- Wait Before Slicing: Transfer the pie to a wire cooling rack. Let it cool at room temperature for a minimum of 2 hours, ideally 3 to 4 hours. The filling is still liquid when it comes out of the oven and continues setting as it cools. Slicing too early will always result in a runny filling. Once fully cooled, slice with a sharp knife and serve with vanilla ice cream or freshly whipped cream.
Notes
- Why the filling must bubble in the center: Cornstarch only fully activates its thickening power at boiling temperature. Bubbling just at the edges means the center has not yet reached that temperature. Wait for the center to bubble actively before pulling the pie from the oven.
- Why you must wait before slicing: The filling sets as it cools. Slicing a hot or warm pie always produces a runny filling, regardless of how well it baked. Minimum 2 hours at room temperature, 3 to 4 hours for the cleanest slices.
- Frozen blackberries: Do NOT thaw before using. Use straight from frozen. Add 1 extra tablespoon of cornstarch. Add 10 extra minutes to the total bake time.
- Cold butter is non-negotiable for a flaky crust. Warm or room temperature butter blends fully into the flour and produces a crumbly, dense crust instead of flaky layers. Keep butter cold at every step.
- Glass or ceramic pie dish recommended. These conduct heat more gently and evenly than dark metal pans. Glass also lets you see the bottom crust browning through the dish.
- Chill the assembled pie 15 minutes before baking to re-firm the butter in the lattice and keep the woven pattern sharp and defined.
- Crust edge browning: Cover edges with a pie shield or foil strips partway through baking if they are browning faster than the filling is setting.
- Natural pectin in blackberries helps the filling set as it cools alongside the cornstarch, which is why including a few slightly underripe berries helps the pie set more firmly.
- Storage: Room temperature up to 2 days loosely covered. Refrigerator up to 5 days tightly covered. Baked pie freezes up to 3 months, wrapped tightly. Unbaked assembled pie also freezes well, bake from frozen with extra time.
- UK/Australia notes: "All-purpose flour" equals plain flour. "Cornstarch" equals cornflour. "Granulated sugar" equals caster sugar. "Coarse sugar" equals demerara or raw sugar.
- Nutrition values are estimates and vary based on exact sugar quantity and serving size.