
Have you ever spent hours carefully cutting and baking the perfect batch of cookies, only to have the frosting ruin everything? We know the heartbreak. You spend ages decorating, but the frosting never dries, it runs off the edges, or it completely smudges the moment you try to stack them.
I learned this the hard way. My first batch of decorated Christmas cookies looked perfect coming out of the oven. Two hours later? The frosting was sliding off like a melting snowman. My niece was devastated. I almost quit decorating forever.
Then a professional baker friend shared this 3-ingredient trick with me. Game changer. Now my cookies stay perfect for weeks, and I actually enjoy decorating instead of stressing about it.
Stop the frustration right now. The secret to flawless, bakery-style decorated cookies isn’t complicated, and it doesn’t require raw eggs or fancy equipment.
Here at Viral Food Hacks, we are all about keeping things simple. If you are looking for a sugar cookie frosting that hardens, this easy 3-ingredient recipe is the ultimate solution.. It gives you that beautiful, glossy finish you want, but most importantly: it actually hardens. Whether you are making our famousThe Best Easy Christmas Cookies or prepping for a spring bake sale, this foolproof frosting recipe will make your life so much easier.
Why You’ll Love This Easy Cookie Frosting
Before you reach for the store-bought tubs, here is why this homemade sugar cookie frosting that hardens is a total game-changer:
- No Raw Eggs: Unlike traditional royal icing, this recipe uses zero egg whites or meringue powder, making it 100% safe for kids to eat (and help make!).
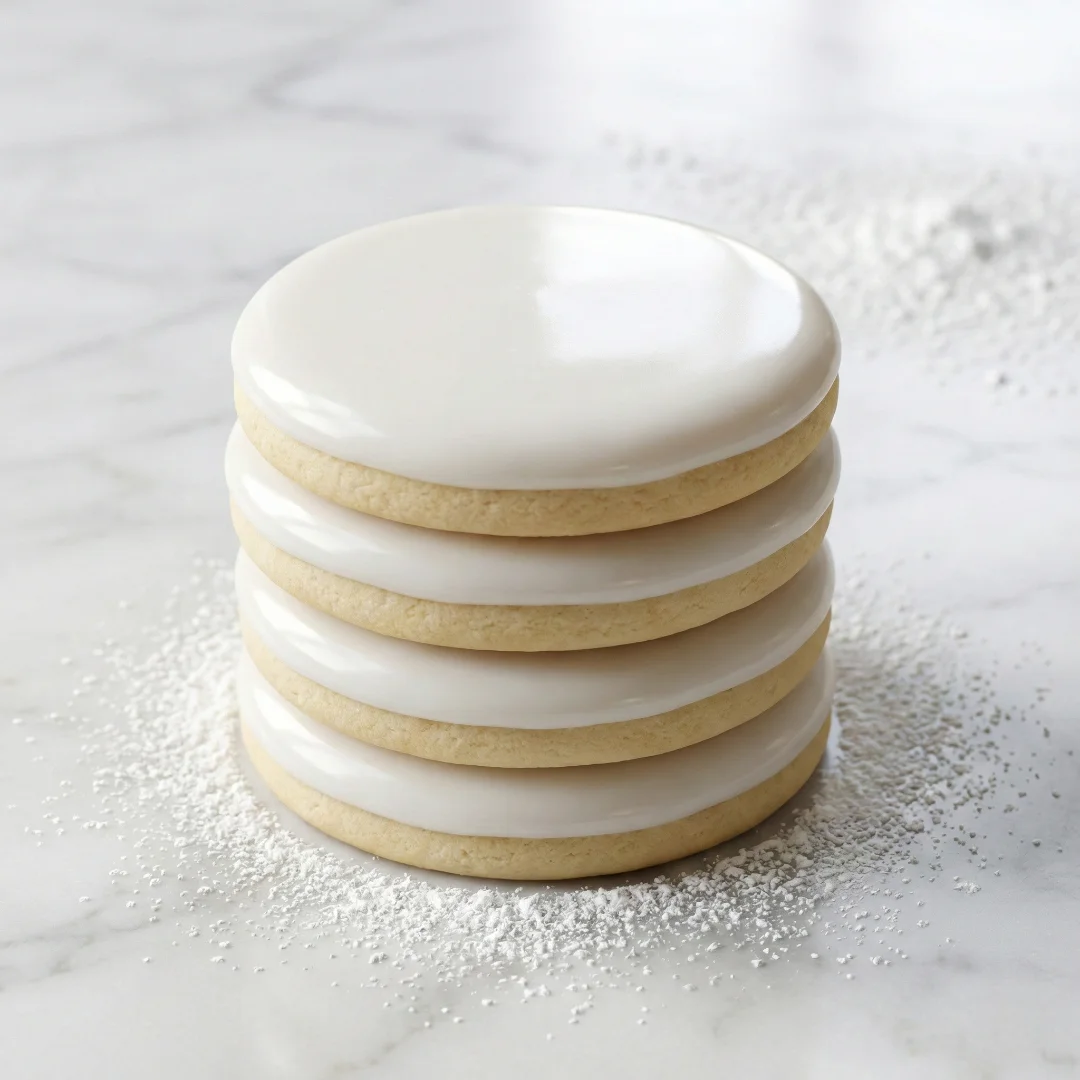
- Hardens Beautifully for Stacking: It dries to a firm, smooth finish so you can stack your cutout cookies in gift boxes without ruining the design.
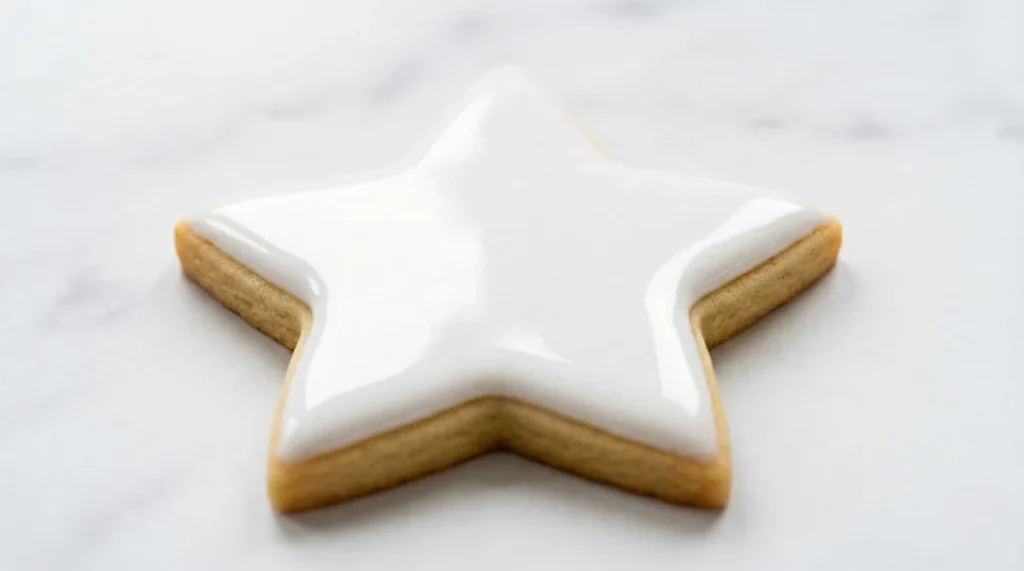
- A Gorgeous Glossy Finish: It looks professional and shiny, just like bakery cookies.
- Ready in 5 Minutes: No electric mixers required. Just a bowl, a whisk, and 5 minutes of your time.
The Science Behind Frosting That Hardens
You might be wondering: how does a simple icing dry so well without egg whites? It all comes down to baking science.
Why Powdered Sugar Works
Powdered sugar (confectioner’s sugar) contains a small amount of cornstarch to prevent caking. This cornstarch, combined with the microscopic sugar crystals, acts as a binding agent when mixed with just a tiny bit of liquid.
The Liquid Ratio Secret
The reason most cookie frostings stay runny is that people add too much milk. By keeping the liquid ratio extremely low, we force the sugar to create a thick paste. As the moisture evaporates at room temperature, the sugar crystallizes again, creating that hard shell.
Sugar Crystallization
As the baking experts at King Arthur Baking explain, controlling the liquid and allowing proper air-drying time allows the sugar matrix to lock into place, giving you a smooth, smudge-proof surface.
The 3 Simple Ingredients You Need
You probably already have these sitting in your pantry!
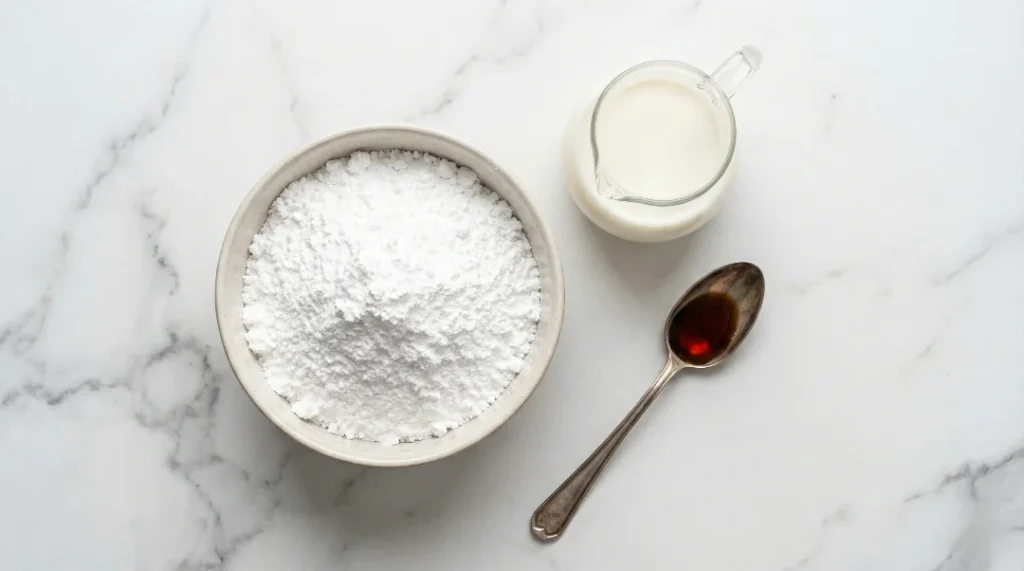
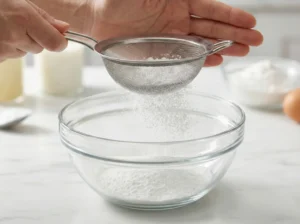
- Powdered Sugar (Confectioner’s Sugar): You must sift this! Sifting removes lumps and ensures your glossy sugar cookie icing is velvety smooth.
- Milk or Heavy Cream: You only need a tiny splash. Heavy cream makes it slightly richer, but any milk (even dairy-free like almond milk) works great.
- Vanilla or Almond Extract: For that classic bakery flavor. Use clear vanilla extract if you want your icing to be pure white.
- Optional – Light Corn Syrup: Want an extra shiny, reflective gloss? Add one teaspoon of light corn syrup. It’s a classic bakery hack for the perfect finish!
How to Make Sugar Cookie Frosting That Hardens (Step-by-Step)
Making this no royal icing cookie frosting is super easy. Just follow these steps:
- Sift the Sugar: Place 2 cups of powdered sugar into a fine-mesh sieve and sift it into a medium mixing bowl to remove all lumps.
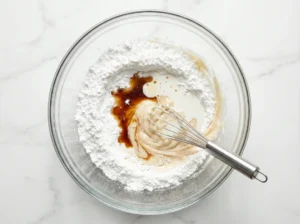
- Add Liquid & Extract Slowly: Add 1 teaspoon of vanilla extract and only 1 tablespoon of milk to start. Whisk gently.
- The “10-Second Rule” Consistency Test: Keep adding milk just 1/2 teaspoon at a time until you reach the right consistency. The Hack: Drag a knife through the center of the frosting. If the line disappears and the frosting smooths out in exactly 10 seconds, it is perfect for flooding and decorating!
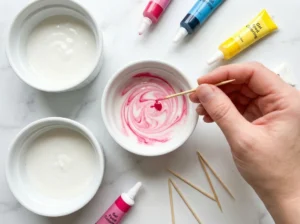
How to Color Your Frosting Like a Pro
Want vibrant, beautiful colors for your cutout cookies?
- Use Gel Food Coloring: Always use gel colors instead of liquid drops. Liquid coloring adds extra moisture, which will make your frosting runny and prevent it from hardening.
- Mixing Technique: Dip a toothpick into the gel color and swirl it into your divided frosting bowls. Start with a tiny amount—gel colors are very concentrated!
Flavor Variations to Try
Once you master the basic recipe, get creative with these flavor twists:
- Lemon Frosting: Swap the vanilla extract for 1 tablespoon of fresh lemon juice and add a pinch of lemon zest. The bright citrus flavor cuts through the sweetness beautifully – perfect for spring and summer cookies!
- Peppermint Frosting: Use 1/4 teaspoon of peppermint extract instead of vanilla. Start with less – peppermint is strong! This is the classic choice for Christmas cookies and candy cane themed treats.
- Almond Frosting: Replace vanilla with 1/2 teaspoon of almond extract (it’s concentrated, so use less). This creates a rich, sophisticated flavor that pairs beautifully with buttery sugar cookies. My personal favorite!
- Coffee Frosting: Dissolve 1 teaspoon of instant espresso powder in the milk before adding. Coffee and sugar cookie = unexpected but amazing combo.
Pro Tips from J.ZaiB
To ensure your cookies look like they came straight out of a high-end bakery, keep these expert tips in mind:
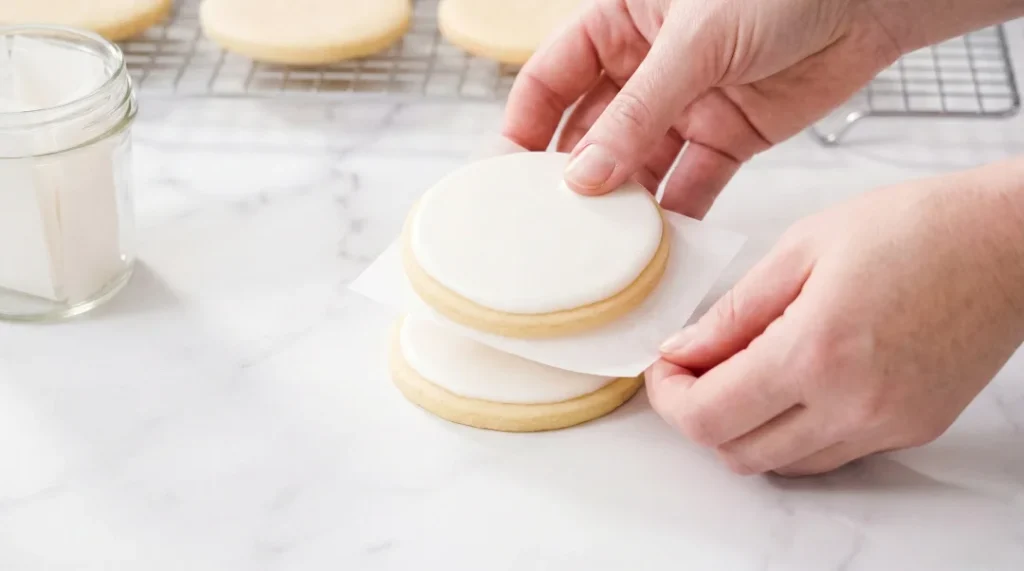
- The Drying Time: Patience is key! For the frosting to harden completely for stacking, let the decorated cookies sit undisturbed at room temperature for 12 to 24 hours.
- The Stacking Technique: Never stack them while they feel “tacky” to the touch. Once fully hardened, place a small square of parchment paper between each cookie just to be safe.
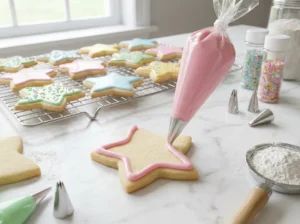
- Piping Bag Tips: For clean edges, use a piping bag with a small round tip (or a Ziploc bag with the very corner snipped off) to outline the cookie first, then “flood” the center.
- Wire Rack Drying: Always dry your frosted cookies on a wire cooling rack so air can circulate underneath them.
- The Toothpick Test: Not sure if your frosting is dry? Gently touch the center with a toothpick. If nothing sticks to it, you’re good to stack!
- Color Intensity Tip: Gel colors deepen as they dry. Start lighter than you think you need – the color will get more vibrant over the next few hours.
How to Store Decorated Cookies
Once your beautiful creations are dry, here is how to keep them fresh:
Room Temperature
Store the fully dried, stacked cookies in an airtight container at room temperature. Because there is so little dairy in the frosting and a high sugar content, they will stay fresh and safe to eat for up to 2 weeks!
Freezing Tips
Yes, you can freeze frosted sugar cookies! Layer them in an airtight, freezer-safe container with parchment paper between each layer. They will last for up to 3 months. Let them thaw at room temperature before serving. Pro Tip: Label your container with the date and flavor. When you open that container months later, you’ll thank yourself!

The Best Sugar Cookie Frosting That Hardens (Only 3 Ingredients!)
Ingredients
Equipment
Method
- Sift the Sugar: Place your fine-mesh sieve over a medium mixing bowl. Sift the 2 cups of powdered sugar completely to remove all lumps.

- Mix the Base: Add 1 teaspoon of vanilla extract and exactly 1 tablespoon of milk to the sifted sugar. Whisk gently to combine.
- The “10-Second Rule” Consistency Test: Check the thickness. Drag a butter knife through the center of the frosting. If the line disappears and smooths out in exactly 10 seconds, it is perfect! If it is too thick, add milk just 1/2 teaspoon at a time.
- Add Color (Optional): Divide the frosting into smaller bowls. Dip a toothpick into gel food coloring and swirl it into the frosting. Mix well.
- Decorate & Dry: Pipe or spread the frosting onto cooled cookies. Let the decorated cookies sit undisturbed at room temperature for 12 to 24 hours to completely harden before stacking.
Notes
- Storage: Store fully dried, stacked cookies in an airtight container at room temperature for up to 2 weeks. You can also freeze them for up to 3 months with parchment paper placed between the layers. Let them thaw at room temperature before serving.
- Runny Frosting Fix: If you accidentally added too much liquid and your frosting is too thin, simply whisk in more sifted powdered sugar, one tablespoon at a time, until it thickens up.
- Coloring Tip: Always use gel food coloring, not liquid drops. Liquid colors add extra moisture and can ruin the consistency, preventing the frosting from hardening.
Frequently Asked Questions
Why is my sugar cookie frosting runny?
If you want a sugar cookie frosting that hardens properly, you must avoid adding too much liquid or using liquid food coloring. To fix a runny batch, simply whisk in more sifted powdered sugar, one tablespoon at a time, until it thickens up.
Does this frosting need to be refrigerated?
No. The high sugar-to-dairy ratio acts as a preservative, meaning your iced cookies are safe stored in an airtight container on the counter.
Can I use this frosting for gingerbread cookies too?
Absolutely! This frosting for cutout cookies works beautifully on gingerbread, shortbread, and even as a glaze for scones.
Can I make this frosting ahead of time?
Yes. You can make it up to 3 days in advance. Store it in an airtight container in the fridge with a piece of plastic wrap pressed directly against the surface of the frosting to prevent a crust from forming. Bring it to room temperature and give it a good stir before using.
What is the best food coloring brand to use?
For the most vibrant colors that won’t thin out your icing, we highly recommend Americolor or Wilton gel food colorings.
How long does it take for the frosting to completely harden?
At room temperature with good air circulation, it takes 12-24 hours to fully harden. Humid weather can slow this down. If you’re in a rush, you can place cookies near (not in front of) a fan to speed up drying.
Can I pipe this frosting for detailed designs?
Yes, but you’ll need to adjust the consistency. For piping outlines and details, use less milk to make it thicker. For flooding large areas, use the 10-second consistency we mentioned earlier.
Why does my frosting have a crust on top while mixing?
This means it’s exposed to air. Work quickly when mixing, and always keep unused frosting covered with plastic wrap pressed directly on the surface.
Your Frosting Success Story
Remember my sliding-frosting disaster at the beginning? That’s not you anymore. You now have the exact 3-ingredient formula that professional bakers use: the right sugar-to-liquid ratio, proper consistency testing, and patience while drying.
The reality? Once you master this sugar cookie frosting that hardens, you’ll never buy store-bought frosting tubs again. This homemade version isn’t just better – it’s easier, safer (no raw eggs!), and actually works.
Show Us Your Cookies! Made beautiful decorated cookies? We want to see that glossy finish! Tag us @viralfoodhacks on Instagram with your creations.
- Need the Perfect Cookies to Frost? Start with our The Best Easy Christmas Cookies – they’re specifically designed to work beautifully with this frosting. The combination is unbeatable!
- Want a Cozy Pairing? Serve these decorated cookies alongside our Viral Italian-Style Thick Hot Chocolate for the ultimate holiday treat experience. The sweet cookies and rich chocolate create the perfect winter afternoon snack.
- Planning a Party? These frosted cookies are the perfect addition to our Ultimate New Year’s Eve Party Menu They’re easy to make ahead, transport well, and always impress guests.
Welcome to the stress-free cookie decorating club!