
I always thought I hated eggnog. The stuff from the carton tasted like thick, artificial bubblegum mixed with weird spices. Then I tried a real homemade eggnog recipe, and it changed everything.
If you’re looking for the best homemade eggnog that is rich, velvety, and 100% safe, you’ve found it. Many people fear raw eggs, but our easy cooked eggnog recipe uses a gentle custard method to guarantee safety without sacrificing that traditional flavor. Whether you want it boozy or non-alcoholic, this creamy homemade eggnog is ready in 15 minutes and beats anything from the store.
Why This Cooked Eggnog Recipe Wins (Safe & Creamy)
This recipe solves every problem you have with traditional eggnog:
100% Safe (No Raw Eggs): We gently cook the egg base to kill any bacteria (and thicken the drink!). No raw egg anxiety here.Better Than Store-Bought: We use real heavy cream, real vanilla, and freshly grated nutmeg. No fake flavorings or corn syrup.Customizable (Boozy or Not): This base recipe is non-alcoholic, so everyone can enjoy it. You can add the “spike” later!Make-Ahead Friendly: Eggnog actually gets better as it sits in the fridge. Make it now, drink it all week.
Ingredients for Traditional Homemade Eggnog
You only need a few ingredients, but quality matters. (Full amounts in the recipe card below!)

The Dairy (The Richness Ratio)
- Milk & Heavy Cream: The secret to the perfect texture (not too thin, not too sludge-like) is the ratio. We use a mix of whole milk and heavy cream for the ultimate velvety mouthfeel.
The Base (Thickness & Safety)
- Egg Yolks: We only use the yolks (the yellow part). The whites can make the drink frothy and thin, but the yolks create that luxurious, custard-like richness we want.
The Flavor (The Holiday Spirit)
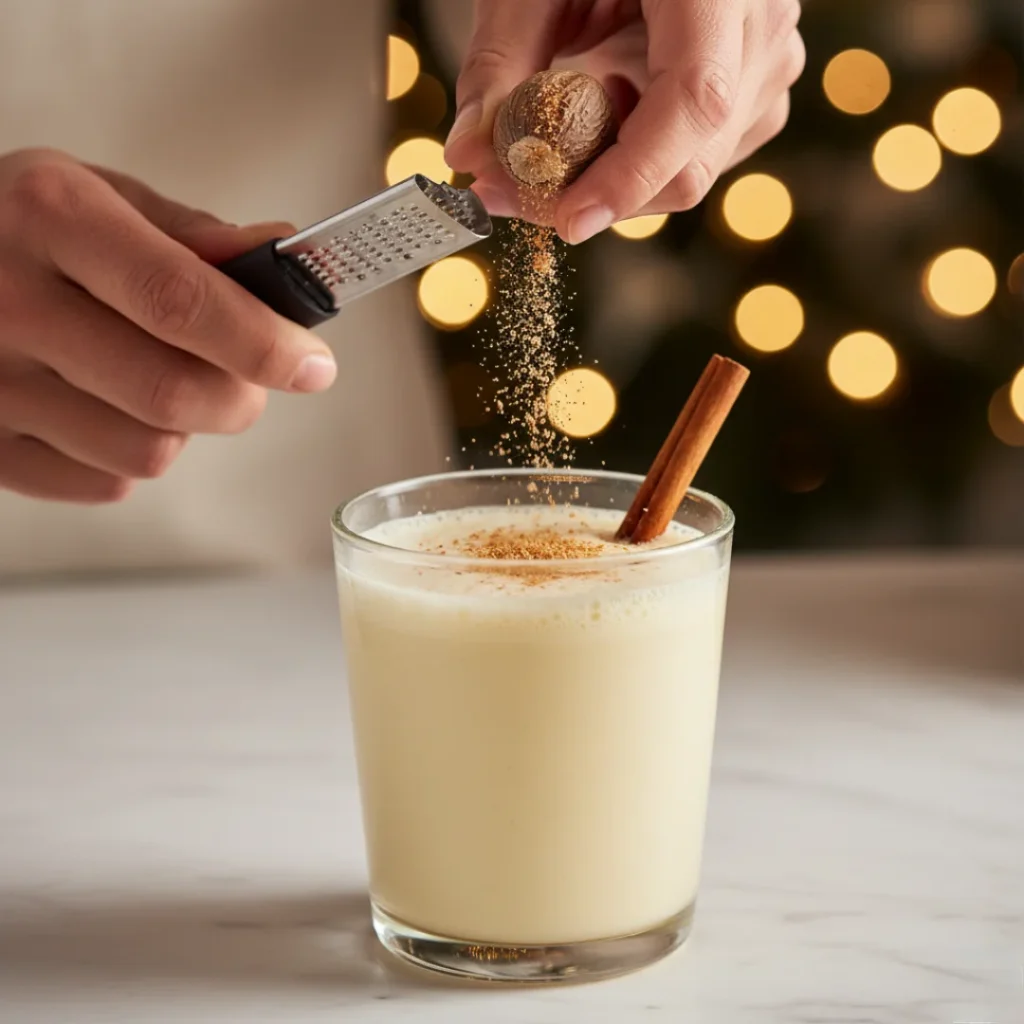
- Fresh Nutmeg: This is non-negotiable! Pre-ground nutmeg tastes like sawdust. Buy whole nutmegs and grate them fresh. It makes all the difference.
- Vanilla: Use a high-quality pure vanilla extract.
How to Make Homemade Eggnog (Step-by-Step)
This takes about 15 minutes on the stove. Don’t rush it!
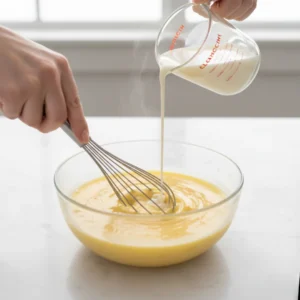
Step 1: Whisk & Heat (The “Tempering” Hack)
- In a bowl, whisk egg yolks and sugar until creamy.
- In a saucepan, heat the milk and spices until steaming.
- The Hack: Pour the hot milk into the eggs very slowly while whisking constantly. This is called “Tempering.” If you dump it in all at once, you’ll get scrambled eggs!

Step 2: Cook to Perfection (The “Thick” Hack)
- Pour everything back into the saucepan. Cook over medium-low heat, stirring constantly with a wooden spoon.
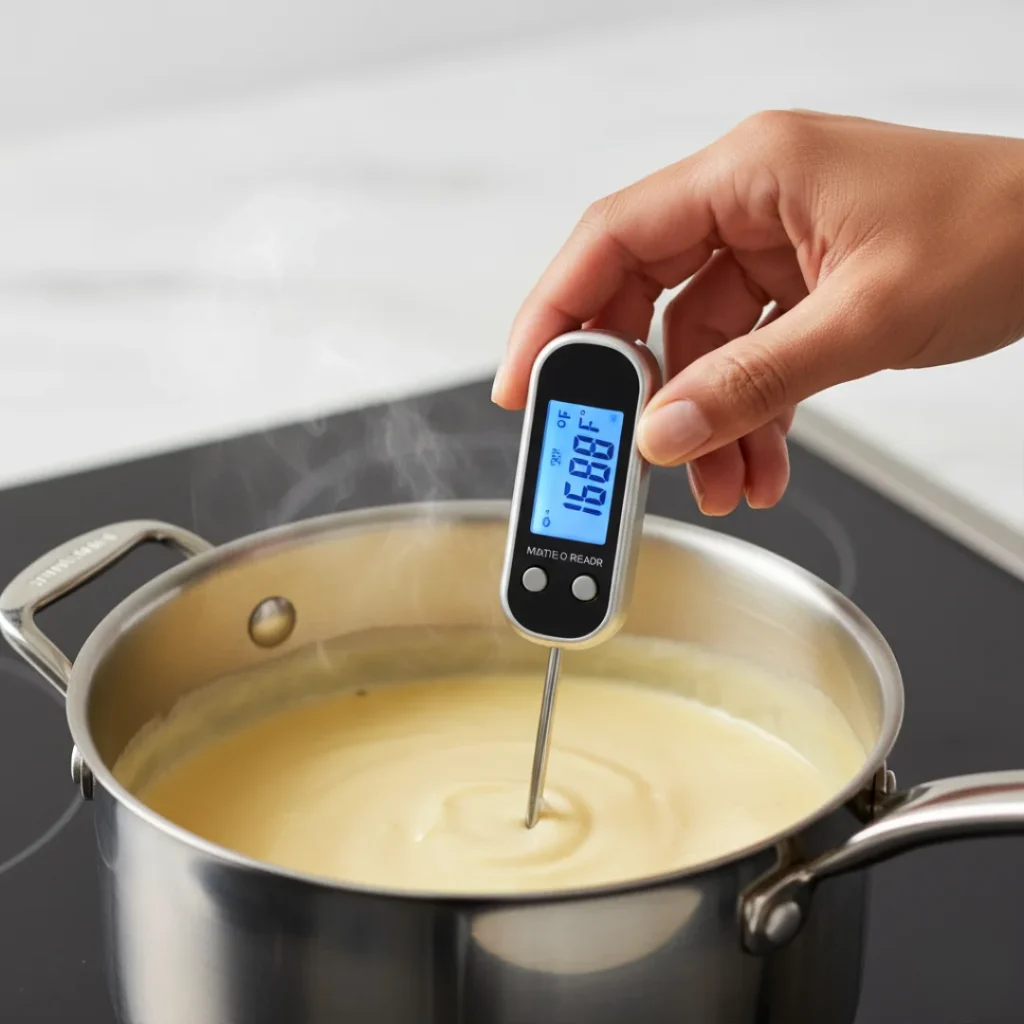
- The Test: It’s done when it coats the back of the spoon and you can draw a clean line through it with your finger (or when it reaches 160°F).
- We cook to 160°F because FoodSafety.gov confirms this is the safe internal temperature for egg dishes. Do not let it boil!

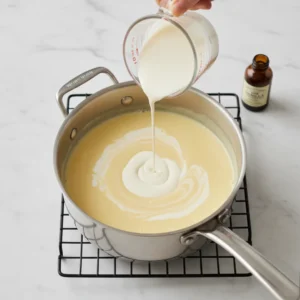
Step 3: Chill & Age (The Flavor Hack)
- Stir in the heavy cream and vanilla (adding cold cream now stops the cooking process).
- Cover and chill for at least 4 hours. It will get much thicker as it gets cold.
Eggnog Recipe Variations (Alcoholic & Non-Alcoholic)
This recipe is delicious on its own, but if you want to “spike” it, here is how to do it like a pro.

The “Boozy” Hack
- Bourbon/Whiskey: Adds a warm, spicy kick.
- Rum: Dark rum adds a classic, sweet molasses flavor.
- Brandy/Cognac: Fruity and traditional.
- The Hack: Stir the alcohol in after the eggnog has cooled completely.
Dairy-Free / Vegan Eggnog
- The Hack: Replace the milk and cream with full-fat Canned Coconut Milk (for thickness) and Almond Milk (for flavor). It works surprisingly well!
Pro Tips from J.ZaiB (@viralfoodhacks)
Emergency Hack: “I Scrambled the Eggs!”
- The Hack: Did you cook it too high and see little yellow lumps? Don’t throw it away! Pour the hot mixture through a fine-mesh sieve (strainer) into a blender. Blitz it for 10 seconds. It will be smooth as silk again.
Emergency Hack: Why is my eggnog too thin?
- The Hack: You likely didn’t cook it long enough or didn’t use enough yolks. It will thicken significantly in the fridge, so be patient. If it’s still thin the next day, you can whisk in a little more heavy cream.
What to do with Leftover Egg Whites?
- The Hack: Don’t waste them! Make a healthy egg-white omelet for breakfast the next day, or whip up some Meringue Cookies.
Serving Ideas for Your Holiday Eggnog
Eggnog isn’t just a drink; it’s a holiday event.

The “Spiking Station” Hack
- If you have guests who don’t drink alcohol (or kids), don’t spike the whole batch! Set up a “Spiking Station” with bottles of Rum and Bourbon. Let guests add a shot to their own glass. Everyone wins!
The Perfect Garnish
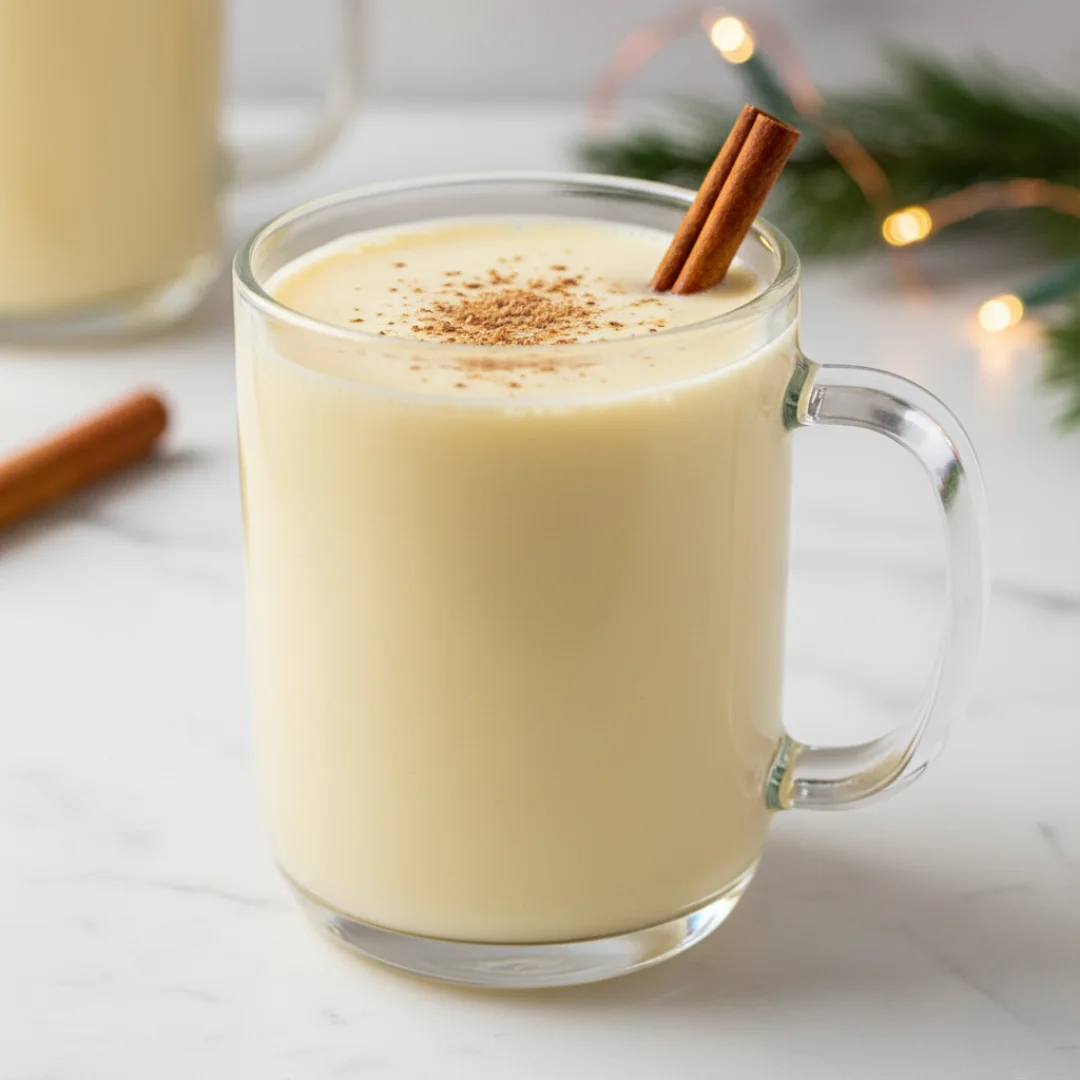
- Fresh Nutmeg: Grate fresh nutmeg on top of every glass right before serving.
- Whipped Cream: Add a dollop of homemade whipped cream for extra indulgence.
How Long Does Homemade Eggnog Last? (Storage Tips)
The “Aging” Hack (Flavor Boost)
- The Secret: Make this recipe at least 24 hours before you plan to serve it. As it sits in the fridge, the flavors meld together and become deeper and richer. This is the best
make aheadholiday recipe!
How long does homemade eggnog last?
- Non-Alcoholic: Stays fresh for 3-4 days in the fridge.
- With Alcohol: High-proof alcohol acts as a preservative. A boozy batch can last 2-3 weeks (or even longer)!
Can I Freeze Eggnog?
- The Hack: Yes! You can freeze eggnog for up to 6 months. Thaw it in the fridge overnight. It might separate a little, so just give it a vigorous shake or a quick blend before serving!
Best Homemade Eggnog Recipe (Easy, Cooked & Safe!)
Ingredients
Equipment
Method
- Whisk Yolks: In a medium bowl, whisk the egg yolks and sugar together until pale and creamy.

- Heat Milk: In a saucepan over medium heat, combine the milk, nutmeg, cinnamon, and salt. Heat until it is steaming (do not boil).
- Temper (The Hack): Slowly whisk about 1 cup of the hot milk into the egg mixture (pour gradually so the eggs don't scramble). Then, pour the egg mixture back into the saucepan with the remaining milk.


- Cook: Cook over low heat, stirring constantly with a wooden spoon, until the mixture thickens slightly and coats the back of the spoon (or reaches 160°F / 71°C). Do not let it boil.
- Finish: Remove from heat. Stir in the heavy cream and vanilla extract. (If adding alcohol, stir it in now).
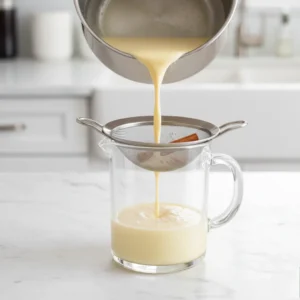
- Strain & Chill: Pour through a fine-mesh sieve into a pitcher or jar (this removes any accidental egg bits). Cover and refrigerate for at least 4 hours until cold and thick.

Notes
- Safety: Cooking to 160°F (71°C) ensures the eggs are pasteurized and safe to drink.
- Alcohol: Add 1/2 cup for a mild kick, or up to 1.5 cups for a strong party punch.
- Leftovers: Store in the fridge for up to 3 days (non-alcoholic) or 2+ weeks (with alcohol). Aging improves the flavor!
FAQs: Your Eggnog Questions, Answered!
Is homemade eggnog safe to drink?
- Yes! Unlike traditional raw recipes that can be risky, our “Cooked Custard Method” gently heats the eggs to 160°F (71°C). This kills any potential bacteria while making the drink richer and creamier. It is completely safe for everyone to enjoy.
How long does homemade eggnog last?
- This depends on the alcohol. Non-alcoholic eggnog stays fresh for 3-4 days in the coldest part of your fridge. If you add high-proof alcohol, it can last for 2-3 weeks (aging makes it taste even better!).
Can I freeze homemade eggnog?
- Yes! You can freeze eggnog for up to 6 months. Leave about an inch of space at the top of the container for expansion. Thaw it in the fridge overnight. It might separate slightly, so just give it a vigorous shake or a quick blend before serving.
How do I make dairy-free or vegan eggnog?
- It’s easy! Replace the whole milk and heavy cream with full-fat canned coconut milk (for thickness) and almond milk or oat milk (for flavor). For a vegan version, you can omit the eggs entirely and use a cornstarch slurry to thicken it.
Why is my eggnog too thin?
- You likely didn’t cook the custard base long enough. It needs to reach 160°F to thicken properly. Also, eggnog naturally thickens significantly as it chills in the fridge.
What is the best alcohol for eggnog?
- The classic choice is Rum (dark or spiced) for a sweet flavor, or Bourbon/Whiskey for a warm, spicy kick. Brandy or Cognac adds a fruity, traditional note. For the ultimate holiday treat, try a mix of all three!
Should eggnog be served hot or cold?
- Traditionally, eggnog is served ice cold directly from the fridge. However, you can gently reheat it on the stove for a “warm hug in a mug” experience, similar to a latte. Just be careful not to boil it, or the eggs will curdle!
Conclusion
Once you try this rich, velvety, vanilla-scented homemade eggnog, you will never buy a carton again. It’s the taste of Christmas in a cup.
- Serve this with our Classic Pumpkin Pie or upcoming Christmas Cookies for the perfect holiday night.
- Instagram CTA: Show us your creamy creations! Tag
@viralfoodhacks!